Umbraco 9+ gives us the possibility to run Umbraco cross platform. In this blog we take a deep dive into how you can configure the CI/CD process for running Umbraco in containers on a Kubernetes platform.
CI/CD Process Umbraco on Kubernetes
- Tagged with:
- Azure
- Backend
- Backoffice
- Configuration
- Frontend
- Security
- v10
- v9
Setup
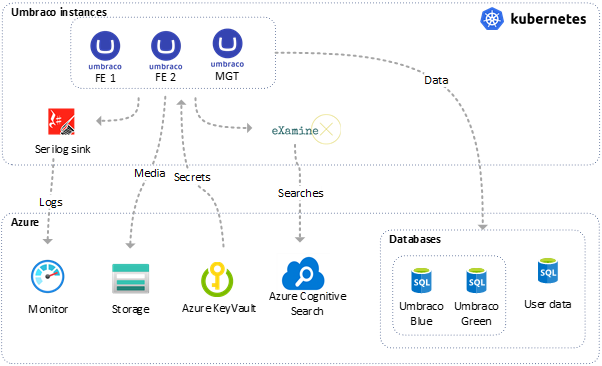
First of all it is good to know which resources we use for our setup. We run Umbraco in a load balanced environment. This means that we have one Umbraco backoffice instance and multiple frontend instances. We work with blue/green Umbraco databases which means we do a database swap during the release process. All media files are stored in a blob storage. Of course we don’t want to check in any secrets in source control, that’s why we use an Azure KeyVault. For logging we use Azure Monitor and for search we use ExamineX and Azure cognitive Search.
Setup
Besides the resources we need to run Umbraco, we also use a tool named Portainer, to deploy, maintain and manage containers. This is a powerful tool, especially for a team of developers that don’t have (a lot of) Kubernetes knowledge. Later, we will describe in more detail why and how we used Portainer during the release process.
Release process in general
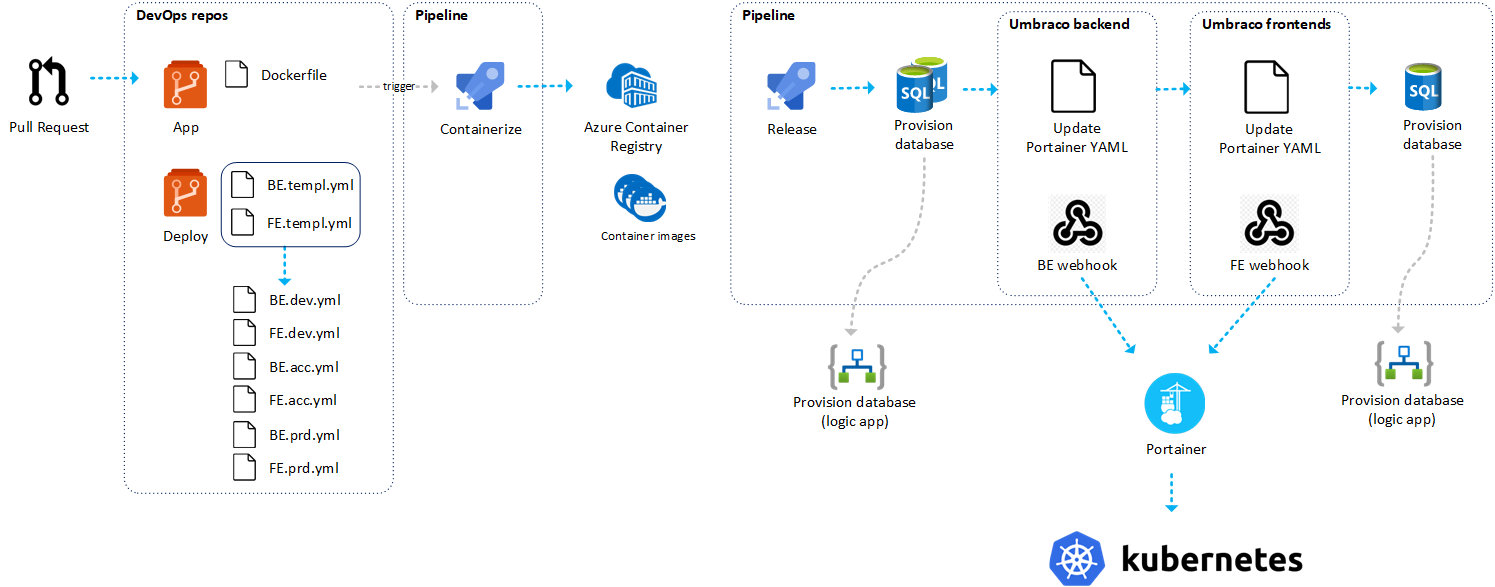
Within our DevOps project we have two repositories. One repo is for the code and the other one is used for the pipeline definitions. We have separated this in two repositories for two reasons.
- We work in two teams, one infra team and a development team. We have also implemented this in the repo structure.
- We created the YAML files as generic as possible so that we can use them as template across multiple projects.
For this release process we use four different pipelines.
- Merge validation
- Containerize
- Release
- Scheduled release
In this blog we will dive into two pipelines in more detail, the containerize pipeline and the release pipeline. The merge validation pipeline is nothing more than a check if the solution can build. This pipeline should pass before a PR can be merged, and the scheduled release pipeline is the same as the release pipeline without the manual approvements. It also triggers an uSync import on startup. This pipeline runs every night to deploy the latest image to our test environment.
Let’s describe the entire release process. A developer creates, after completing a feature, a pull request with the develop branch as a target. Before a pull request can be merged there are three validations steps.
- The merge validation pipeline should pass.
- A developer from the reviewers group should approve the PR.
- All comments must be solved.
When a pull request has been approved and completed the containerize pipeline will be triggered automatically. This pipeline will build the solution and create an image. After creating the image the release can be started.
Release Process
Containerize
Now that it is clear which resources we use for our setup and how the release process works, it is time to dive into the containerize pipeline in more detail. This pipeline builds our solution, creates a container of it and pushes the container to a Azure Container Registry (ACR).
First thing we need is a Service Connection of type ‘Docker Registry’. Next step is to add a pipeline template file that we can use in the actual pipeline run. This is a really basic file. In this file four parameters are defined so the template is as generic as possible and can be used over a number of DevOps Projects.
- imageRepository
- containerRegistry
- containerName
- version
parameters:
- name: imageRepository
  type: string
- name: containerRegistry
  type: string
- name: artifactName
  type: string
- name: containerName
  type: string
- name: version
  type: string


steps:
- task: Docker@2
  displayName: Build and push an image to container registry
  inputs:
    command: buildAndPush
    repository: ${{parameters.imageRepository}}/${{parameters.artifactName}}
    tags: ${{parameters.version}}
    dockerFile: '**/Dockerfile'
    containerRegistry: ${{parameters.containerRegistry}}
    includeLatestTag: true
    useDefaultContext: false
    buildContext: '.'
Containerize Template
As you can see in the code sample above, this file is generic and can be used over multiple projects. One of the inputs of the pipeline task is Dockerfile. Here you can define the path to the Dockerfile.
We included the Dockerfile in our web project. In our Dockerfile we do several things to create an image.
- Get the .NET SDK
- Create a Working Directory
- Copy solution projects to the working directory
- dotnet restore
- dotnet build
- dotnet publish
- Create an entry point
FROM mcr.microsoft.com/dotnet/aspnet:6.0 AS base

WORKDIR /app
EXPOSE 80
EXPOSE 443

FROM mcr.microsoft.com/dotnet/sdk:6.0 AS build
WORKDIR /src
COPY ["UmbracoDemo.Web.UI/UmbracoDemo.Web.UI.csproj", "UmbracoDemo.Web.UI/"]
COPY ["UmbracoDemo.Web.BackOffice/UmbracoDemo.Web.BackOffice.csproj", "UmbracoDemo.Web.BackOffice/"]
COPY ["UmbracoDemo.Web.Website/UmbracoDemo.Web.Website.csproj", "UmbracoDemo.Web.Website/"]
COPY ["UmbracoDemo.Data/UmbracoDemo.Data.csproj", "UmbracoDemo.Data/"]
COPY ["UmbracoDemo.Business/UmbracoDemo.Business.csproj", "UmbracoDemo.Business/"]
COPY ["UmbracoDemo.Core/UmbracoDemo.Core.csproj", "UmbracoDemo.Core/"]

RUN dotnet restore "UmbracoDemo.Web.UI/UmbracoDemo.Web.UI.csproj"
COPY . .
WORKDIR "/src/UmbracoDemo.Web.UI"
RUN dotnet build "UmbracoDemo.Web.UI.csproj" -c Release -o /app/build

FROM build AS publish
RUN dotnet publish "UmbracoDemo.Web.UI.csproj" -c Release -o /app/publish

FROM base AS final
WORKDIR /app
COPY --from=publish /app/publish .
ENTRYPOINT ["dotnet", "UmbracoDemo.Web.UI.dll"]
Dockerfile
So, now we have described the generic containerize template and the Dockerfile. Now it’s time to use the template file in the actual containerize pipeline. The definition of this pipeline is added to the same repo where the code of the project is located, this is because this pipeline definition contains project specific details.
pool:
  vmImage: 'ubuntu-latest'

trigger:
- main
- develop

pr:
  branches:
    include: ['develop','main']

variables:
  major: '1'
  minor: '1'
  revision: $[counter(variables['minor'], 1)]
  version: '$(major).$(minor).$(revision)'

name: $(major).$(minor).$(revision)_$(SourceBranchName)_$(Date:yyyyMMdd)$(Rev:.r)

resources:
  repositories:
  - repository: PipelineRepo
    type: git
    name: UmbracoDemo\UmbracoDemo - Website - Pipelines
    ref: 'refs/heads/develop'

stages:
  - stage: "Containerize"
    jobs:
    - job: Containerize
      displayName: 'Containerize'
      steps:
        - task: Npm@1
          displayName: 'Install NPM Packages'
          inputs:
            command: ci
            workingDir: '$(Build.SourcesDirectory)/UmbracoDemo.Frontend'

        - task: CmdLine@2
          displayName: 'Build Front-end'
          inputs:
            script: 'gulp build-prod'
            workingDirectory: '$(Build.SourcesDirectory)/UmbracoDemo.Frontend'

        - template: '.\Pipelines\build.yml@PipelineRepo'
          parameters:
            imageRepository : 'umbracodemo'
            containerRegistry: ACR UmbracoDemo
            artifactName: 'website-fe'
            containerName: 'website_fe'
            version: ${{variables.version}}

        - template: '.\Pipelines\build.yml@PipelineRepo'
          parameters:
            imageRepository : 'umbracodemo'
            containerRegistry: ACR UmbracoDemo
            artifactName: 'website-be'
            containerName: 'website_be'
            version: ${{variables.version}}
Containerize Pipeline
Let’s explain the YAML file above in more detail. First thing you may have noticed, is that we use Ubuntu to run this pipeline. We were not used to it when it came to pipelines related to Umbraco. Since we create a Linux container image we also want to use Linux to build that image.
As you can see we also define the repo that contains the containerize template we discussed before as a resource so that we can use the template in this pipeline.
This pipeline has only one stage and one job but multiple tasks. The first two steps, ‘Install NPM Packages’ and ‘Build Front-end’ are necessary to build our front-end. For now we will only focus on the containerize part.
The last two steps of this pipeline are both using the template, but with different values. This is because we want to create two different images, one for the Umbraco backoffice and one for the frontend. Those images don’t have to be the same. For example you might don't want to include the App_Plugins folder in your frontend image.
As mentioned before we have multiple parameters in the template we use.
- imageRepository: this is the first part of the name of the repository from the ACR, in this case umbracodemo
- containerRegistry: this is the name of the ServiceConnection we have created, in this case ACR UmbracoDemo
- containerName: is the name of the container, and is together with the imageRepository the full name of the repository that will appear in the ACR
- version: this is the version (SEMVER) of the application, this should be the same for frontend and backend.
After running the pipeline you can see that in the ACR there are two repositories. We have one repository that contains all frontend images and one that contains all backend images. The containerize pipeline pushes two images with the same tag, to guarantee that frontend and backend run exactly the same version.
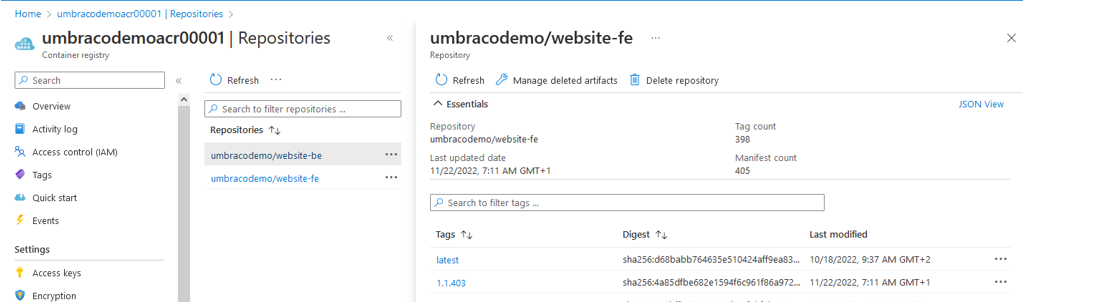
Azure Container Registry
Next step is to start the release process.
Release overview
The release process consists of multiple steps. The schema below shows which steps:
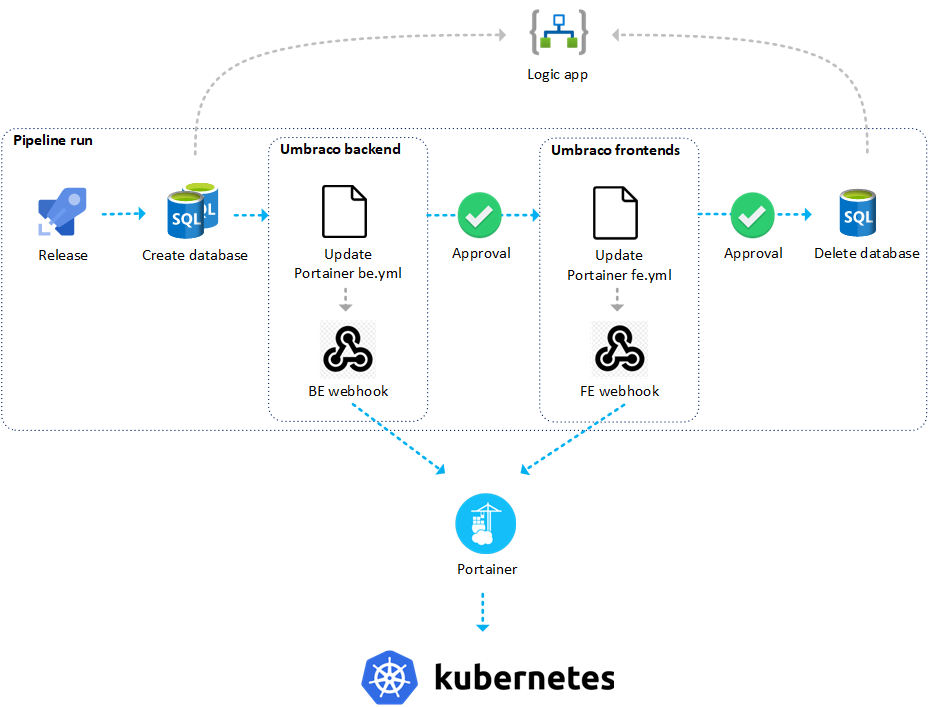
Release overview
We will explain each step in more depth further on in this blog. First a brief introduction about each step to have a correct understanding of the responsibilities of each step.
Create Database
The first step in the pipeline run is the provisioning of a second Umbraco SQL database, besides the existing active Umbraco database. This second database contains a copy of the active database. The reason to do so, is that multiple Umbraco servers are connected to one database (load-balanced). When you roll out a new version with, for example, breaking changes on content types, the changes are first applied to the backend server with the corresponding database, but the frontend servers are still on the old version. That could cause possible exceptions on 'schema' mismatches. For example, the frontend server could expect properties, that are no longer present in the database.
Eliminating this problem is possible by creating a copy of the database each time when deploying, the so-called blue-green strategy. All the stuff you can manage with uSync is imported into the second database, while the frontend (public) servers are still connected to the other database.
Umbraco backend deployment
With the freshly provisioned second database in place, we can continue releasing the new version of our application to the backend server. This happens by calling the Portainer webhook. Portainer handles deploying the backend container image to Kubernetes. Therefore, Portainer will access the deployment file (YML) in the GIT repository to know what exactly should be deployed and which settings (environment variables) must be configured.
Approval for backend
After deployment to the backend server, we decided to manually perform a uSync import action. By doing this by hand, we are able to see what will be imported.
After the uSync import, we check the backend Umbraco instance to see if everything is running fine. If so, we can continue the approval.
Umbraco frontend deployment
A similar process we went through for the backend instance will be started for the frontend servers by calling the Portainer webhook.
Approval for frontend
Right now, all the Umbraco instances are connected to the second database. uSync import is not needed at this stage, because we have one single database, and the schema changes are already imported by deploying to the backend server. We only have to check if the frontend servers are running fine because on approval, the phased-out database will be deleted. When doing so, we can't easily switch back to the old database in case of problems.
Delete database
The last step, as mentioned before, is deleting the phased-out database. When finished, we were succesful in deploying a new version of an Umbraco container image to Kubernetes.
Provisioning database
Now we will dive into details on how the blue-green database strategy exactly works. All the steps required are shown in the schema below.
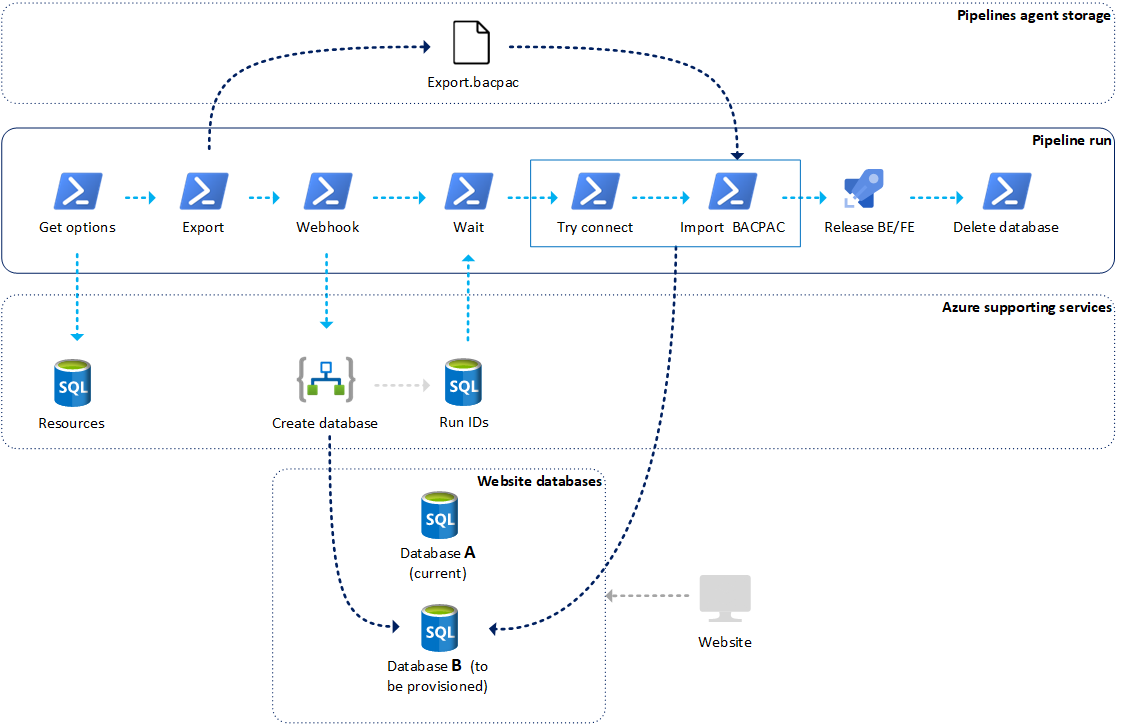
Provisioning database
Because we are switching between databases each time deploying, it is required to store some state about which database is currently active and connected to the live site. This state is managed in a separate SQL database.
So, the first step is getting the active state for the database. This is done by a custom Powershell script. This step outputs 2 output variables, the active and inactive database name:
Write-Host "##vso[task.setvariable variable=databaseoption_inactive;isOutput=true]$($databaseOptionInactive.Resource)"
Write-Host "##vso[task.setvariable variable=databaseoption_active;isOutput=true]$($databaseOptionActive.Resource)"
Setting database variables
In the second step, after getting the active and inactive database names, we will be creating an export file of the active database to the workspace of the pipelines agent.
Then we would like to provision the new database. This is done by calling an Azure Logic App. This Logic App is managed by the infra team, so details of how the database was exactly created in Azure are managed away from the CMS team. The CMS team only has to say: give me a fresh database and we will receive it (or not...).
Request to: ***
{
    "dbname": "{databasename}",
    "env": "tst",
    "state": "present"
}
@{RunID=4061053}
Provision database
The request consists of 3 params:
- The database name of the new database
- The environment the database is part of
- The state. The same logic app is used for creating (state=present) and deleting (state=absent) databases.
Immediately after calling the Logic App, we get a response with a ‘RunID’. Because creating the new database takes some time, the infra team stores the run state in a ‘run database’.
The pipelines contain a script that examines the RunID state from the run database with an interval to check if the database provisioning is successful.
When so, the next step is trying to connect with the new database. Because sometimes we experience delays between Azure says that database provisioning was succesful the moment, we can connect with the database. By having a step that performs a try-to-connect mechanism before continuing, we can prevent connection errors in the pipeline run.
When we can connect, we can start importing the export file of the active database into the new database.
Portainer deployment
When the second database is successfully provisioned, we can continue deploying the container image to the backend server. The backend server is the server where the Umbraco backoffice runs and editors are editing content.
The infra team uses Portainer for the deployment of container images from Azure Container Registry to Kubernetes. Portainer is a management tool to deploy container images to Kubernetes (and other platforms as well).
The basis for deploying Umbraco apps via Portainer is having Kubernetes deployment files, based on YAML. These deployments files contain the following information:
- Image name and tag (version)
- Environment variables
- Other settings are, for example, ports, readiness & liveness checks, policies, etc.
In our load-balanced setup, we have 2 container images: one for the backend and one for the frontend. The frontend image doesn’t contain the Umbraco backoffice file, because it’s only allowed to edit content via the backend server.
Because of these 2 container images, we need at least 2 deployment files for each stage:
- App-be-{stage}.yml
- App-fe-{stage}.yml
The stage contains values like test, acceptance, or production. So, in total, there are 6 deployment files for all stages in the deployment flow. Deployment files for each stage are important because settings and the image version can be different between stages.
A deployment via Container goes through the following phases:
First
To trigger the deployment we must call the webhook URL for the specific Portainer application. A portainer application is linked to one of the 6 deployment files in our GIT repository and correspondents to the FE/BE apps for each stage (test, acceptance & production).
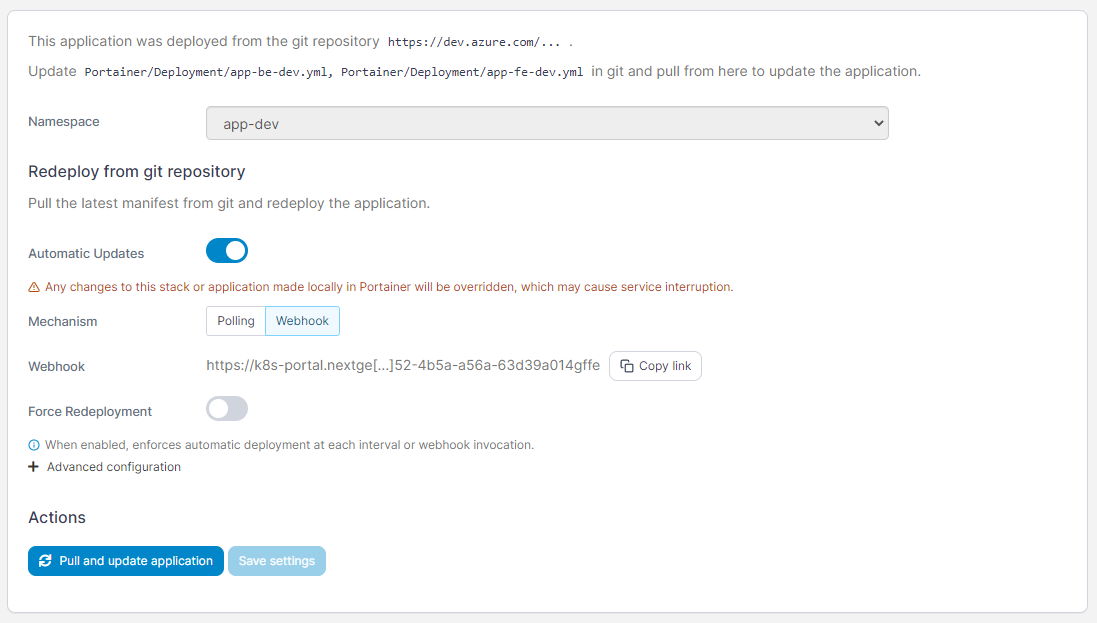
Portainer webhook configuration
Secondly
Portainer pulls the deployment file from our GIT repo and then pulls the specified container image from Azure Container Registry. Together with the specified environment variables in the deployment file, Portainer deployed the image to Kubernetes.
How to update the Portainer deployment files?
When deploying container images via Portainer to Kubernetes we must ensure that the deployment files in our GIT repository are updated.
To do so, we have 2 deployment template files in the GIT repository for the backend and frontend. This repository is checked out by the Pipelines agent to its sources’ directory.
This deployment template file contains a placeholder that should be replaced with variable values by the Pipelines agent. In Pipelines, there are environment-specific libraries (variable sets) that contain environment specific variable values. In the pipeline the ‘replacetokens’ task is used to perform the following:
- Make a copy of the deployment template in memory
- Replace the variable placeholder with actual values
- Create a file from the in-memory file to a new file with the name of the container image and the environment, for example, 'app-backend-acceptance.yml’
# Portainer variable substitution
- task: replacetokens@3
  displayName: 'Portainer variable substitution'
  inputs:
    rootDirectory: "$(Build.SourcesDirectory)/Portainer/Deployment"
    targetFiles: |
      Templates/${{parameters.imageName}}.yml => ../${{parameters.imageName}}-$(portainer_environment).yml
    encoding: 'auto'
    writeBOM: true
    actionOnMissing: 'warn'
    keepToken: false
    tokenPrefix: '#{'
    tokenSuffix: '}#'
    useLegacyPattern: false
    enableTelemetry: true
Portainer variable substitution
With this set-up we have the following template files:
- App-backend-test.yml
- App-frontend-test.yml
- App-backend-acc.yml
- App-frontend-acc.yml
- App-backend-prd.yml
- App-frontend-prd.uml
The output of the new templates is pushed with GIT to the repository linked to Portainer, so when we trigger the Portainer webhook, Portainer pulls the updated version of the deployment file.
Configuring the Umbraco connectionstring
For most Umbraco instances you configure the database connection by adding the connectionstring value to the appsettings.json of the application. With deployment tooling like Azure Pipelines, you can configure the connectionstring per environment.
With the set-up described in this blog post, we have two reasons why we can’t do so:
- The appsettings.json file is part of the container image, and we don't like to change the containers when deploying
- Because of the blue-green database strategy, there are different database names after each deployment.
We solve this problem by adding the Umbraco connectionString as an environment variable on the start-up of the application. On start-up we configure the connectionstring as follows:
- The server, username, and password are loaded from the environment specific Azure KeyVault.
- The database name is configured in the Portainer deployment file as an environment variable, so Portainer configures Kubernetes to load those settings as environment variables in the application. Then it’s easy to get that environment variable (ACTIVE_UMBRACO_DB).
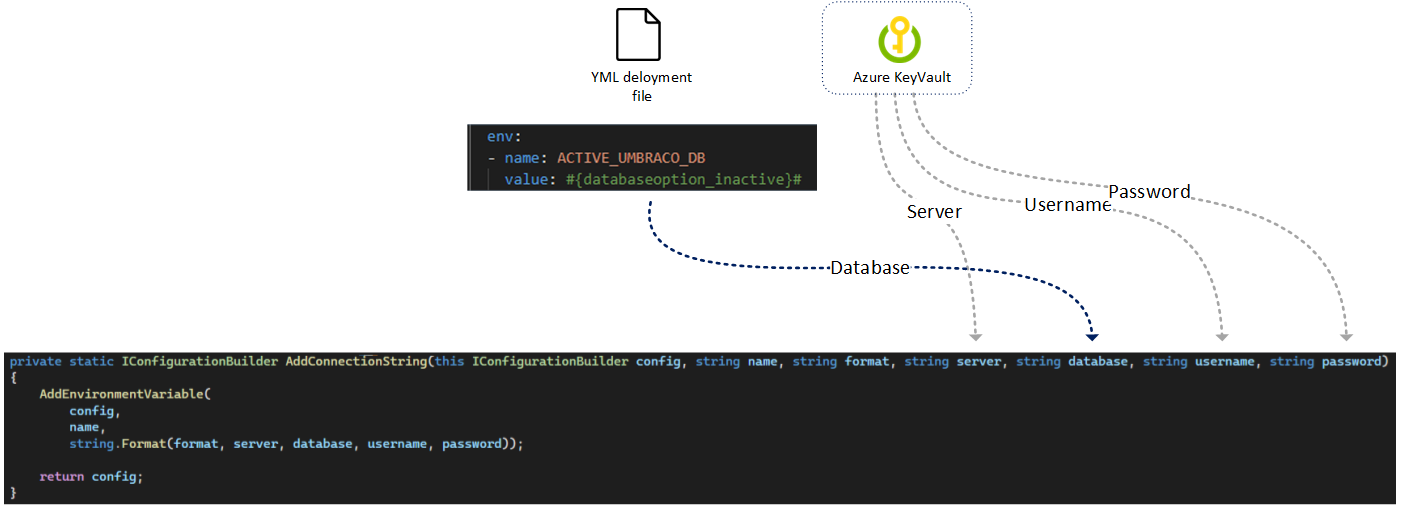
Database connection setup
We hope we gave some insights in how we configured the CI/CD process for running Umbraco on a Kubernetes platform. Of course, any feedback is more than welcome!
Merry Christmas!