Send SMS & MMS from Umbraco Forms Workflows using Twilio

tagged with .NET 6 Umbraco Forms v10

Learn how to extend Umbraco Forms with a workflow that sends SMS and MMS using Twilio.

Umbraco Forms comes with a couple of workflows out of the box which you can use to do things when a form is submitted. One of the most common use cases is to send an email to relevant users, but you may want to send a text message instead, but there's no workflow for that. If there's no workflow that fulfills your needs, you can extend the product with your own .NET code.

In this tutorial, you'll learn how to extend Umbraco Forms to add SMS and MMS support as a workflow using Twilio, so when a form is submitted, Umbraco Forms can send a text message to users.

Prerequisites

Here’s what you will need to follow along:

You can find the source code for this tutorial on GitHub. Use it if you run into any issues, or submit an issue, if you run into problems.

Setup your Umbraco website

For this tutorial, you'll need an Umbraco 10 website and install the Umbraco Forms add on. However, the concepts you'll learn are applicable to older versions of Umbraco and Umbraco Forms, but the Umbraco APIs between versions are slightly different. 

You can set up the Umbraco instance however you'd like or start from an existing one, but in this tutorial I created a blank website using SQLite as the database.

Get started with Twilio

If this is your first time working with Twilio, you may be wondering, what is a Twilio? Developers know Twilio best as the API to SMS, call, and email, but Twilio has a lot more products to communicate and engage with your customers. Now that you have an idea of what Twilio offers, make sure you have a Twilio account and a Twilio Phone Number as you'll need those to send SMS.


The easiest way to integrate Twilio into ASP.NET Core projects is to install the Twilio helper library for ASP.NET. Open a terminal, navigate to your Umbraco project and add the Twilio.AspNet.Core NuGet package:
dotnet add package Twilio.AspNet.Core

Note

This package also installs the Twilio helper library for .NET, not to be confused with the helper library for ASP.NET. The helper library for .NET lets you communicate with the Twilio API and provides some other functionality. The helper library for ASP.NET adds commonly needed classes and methods for integrating with ASP.NET Core and ASP.NET MVC.

Next, open your project using your preferred IDE and create a new file called MessageComposer.cs with the following contents:


using Twilio.AspNet.Core;
using Umbraco.Cms.Core.Composing;

namespace UmbracoSite;

public class MessageComposer : IComposer
{
    public void Compose(IUmbracoBuilder builder)
    {
        builder.Services.AddTwilioClient();
    }
}

MessageComposer.cs

Umbraco will execute this composer during startup and the composer will add the ITwilioRestClient and TwilioRestClient to the dependency injection (DI) container.

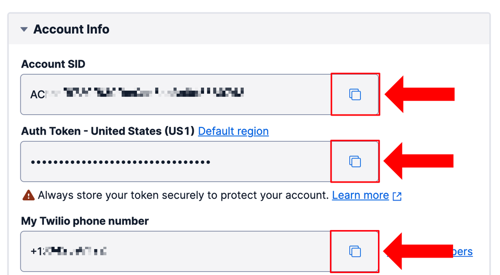
You'll need some configuration elements from Twilio to authenticate with the Twilio API. Open a browser, go to the Twilio Console start page, and take note of your Twilio Account SID and Auth Token located at the bottom left of the page.

Account Info box holding 3 read-only fields: Account SID field, Auth Token field, and Twilio phone number field.

You need to supply this information to the .NET configuration system, which AddTwilioClient() will use to configure the API clients. For local development, the best way to configure sensitive information is to use the Secrets Manager also known as user secrets. Initialize user secrets on your project using this command:


dotnet user-secrets init

Now configure the Account SID and Auth Token using these commands:


export Twilio:Client:AccountSid=[TWILIO_ACCOUNT_SID]
export Twilio:Client:AuthToken=[TWILIO_AUTH_TOKEN]

Replace [TWILIO_ACCOUNT_SID] and [TWILIO_AUTH_TOKEN] with the Account SID and Auth Token you took note of earlier.

Create a message workflow

The workflow will be able to send both SMS and MMS, hence why it will be using the more generic 'message' term. Create a new file MessageWorkflow.cs with the following content:


using Twilio.Clients;
using Twilio.Rest.Api.V2010.Account;
using Twilio.Types;
using Umbraco.Forms.Core;
using Umbraco.Forms.Core.Attributes;
using Umbraco.Forms.Core.Enums;

namespace UmbracoSite;

public class MessageWorkflow : WorkflowType
{
    private readonly IServiceScopeFactory serviceScopeFactory;

    [Setting("From", Description = "The Twilio Phone Number the message is sent from.", View = "TextField")]
    public string FromPhoneNumber { get; set; }

    [Setting("To", Description = "The phone number the message is sent to.", View = "TextField")]
    public string ToPhoneNumber { get; set; }

    [Setting("Message", Description = "The body of the text message.", View = "TextField")]
    public string MessageBody { get; set; }

    [Setting("Media URL", Description = "URL of the media file to sent as an MMS.", View = "TextField")]
    public string MediaUrl { get; set; }

    public MessageWorkflow(IServiceScopeFactory serviceScopeFactory)
    {
        this.serviceScopeFactory = serviceScopeFactory;

        Id = new Guid("9e44e413-afa0-4a1e-a40d-7d10e7c7f2b5");
        Name = "Message";
        Description = "This workflow will send an SMS or MMS.";
        Icon = "icon-chat-active";
        Group = "Communication";
    }

    public override WorkflowExecutionStatus Execute(WorkflowExecutionContext context)
    {
        using var scope = serviceScopeFactory.CreateScope();
        var twilioClient = scope.ServiceProvider.GetRequiredService<ITwilioRestClient>();
        var messageOptions = new CreateMessageOptions(to: new PhoneNumber(ToPhoneNumber))
        {
            From = new PhoneNumber(FromPhoneNumber)
        };

        if (string.IsNullOrEmpty(MessageBody) == false)
        {
            messageOptions.Body = MessageBody;
        }

        if (string.IsNullOrEmpty(MediaUrl) == false)
        {
            messageOptions.MediaUrl = new List<Uri> {new(MediaUrl)};
        }

        MessageResource.Create(messageOptions, client: twilioClient);

        return WorkflowExecutionStatus.Completed;
    }

    public override List<Exception> ValidateSettings() => new List<Exception>();
}

MessageWorkflow.cs

This is a lot of code, so let me break it down into pieces.

First, to extend Umbraco Forms with new workflows, you create a new class that inherits from the abstract WorkflowType class. You have to implement the Execute and ValidateSettings method.

When an Umbraco editor creates your workflow, they are able to configure the settings that are defined on the workflow. To surface these settings, you create properties and mark them with the [Setting] attribute, like this:


[Setting("From", Description = "The Twilio Phone Number the message is sent from.", View = "TextField")]
public string FromPhoneNumber { get; set; }

[Setting("To", Description = "The phone number the message is sent to.", View = "TextField")]
public string ToPhoneNumber { get; set; }

[Setting("Message", Description = "The body of the text message.", View = "TextField")]
public string MessageBody { get; set; }

[Setting("Media URL", Description = "URL of the media file to sent as an MMS.", View = "TextField")]
public string MediaUrl { get; set; }

These settings will be populated by Umbraco and are already parsed with Umbraco Forms' Magic Strings. These Magic Strings allow you to embed data, most commonly from the form submission, but the data can also come from Umbraco documents, and other sources.

The constructor supports dependency injection, which is how the IServiceScopeFactory serviceScopeFactory parameter is injected. This parameter is stored into a field so it can be used during the Execute method. Umbraco Forms expects you to set some properties in your constructor which will be used for displaying your workflow in the backoffice.


public MessageWorkflow(IServiceScopeFactory serviceScopeFactory)
{
    this.serviceScopeFactory = serviceScopeFactory;

    Id = new Guid("9e44e413-afa0-4a1e-a40d-7d10e7c7f2b5");
    Name = "Message";
    Description = "This workflow will send an SMS or MMS.";
    Icon = "icon-chat-active";
    Group = "Communication";
}

Execute is the method that will be executed once the form is submitted. This is where you want to use the Twilio API client to send SMS and MMS messages. However, since the client is registered as a scoped service in the DI container, you first need to create a service scope. Using this scope, the ITwilioRestClient is retrieved from the DI container. Next, the CreateMessageOptions object is created and the workflow settings are used to configure the properties of this object. MessageResource.Create will submit the message to the Twilio API which queues the message for delivery. Finally, ​​WorkflowExecutionStatus.Completed is returned so Umbraco knows the workflow was executed successfully.


public override WorkflowExecutionStatus Execute(WorkflowExecutionContext context)
{
    using var scope = serviceScopeFactory.CreateScope();
    var twilioClient = scope.ServiceProvider.GetRequiredService<ITwilioRestClient>();
    var messageOptions = new CreateMessageOptions(to: new PhoneNumber(ToPhoneNumber))
    {
        From = new PhoneNumber(FromPhoneNumber)
    };

    if (string.IsNullOrEmpty(MessageBody) == false)
    {
        messageOptions.Body = MessageBody;
    }

    if (string.IsNullOrEmpty(MediaUrl) == false)
    {
        messageOptions.MediaUrl = new List<Uri> {new(MediaUrl)};
    }

    MessageResource.Create(messageOptions, client: twilioClient);

    return WorkflowExecutionStatus.Completed;
}

Now, go back to MessageComposer.cs and register the workflow like this:


using Twilio.AspNet.Core;
using Umbraco.Cms.Core.Composing;
using Umbraco.Forms.Core.Providers;

namespace UmbracoSite;

public class MessageComposer : IComposer
{
    public void Compose(IUmbracoBuilder builder)
    {
        builder.Services.AddTwilioClient();
        builder.WithCollectionBuilder<WorkflowCollectionBuilder>()
            .Add<MessageWorkflow>();
    }
}

MessageComposer.cs

Test out the workflow

To test the workflow, you'll need to create a new form and configure the message workflow. Then you'll need to add the form to an Umbraco page and publish it. To do this, you can follow these instructions from Umbraco. Once you have a form on a page, try out the form and see how the message workflow behaves.

The GitHub repository for this tutorial already has configured a form with the workflow and page.

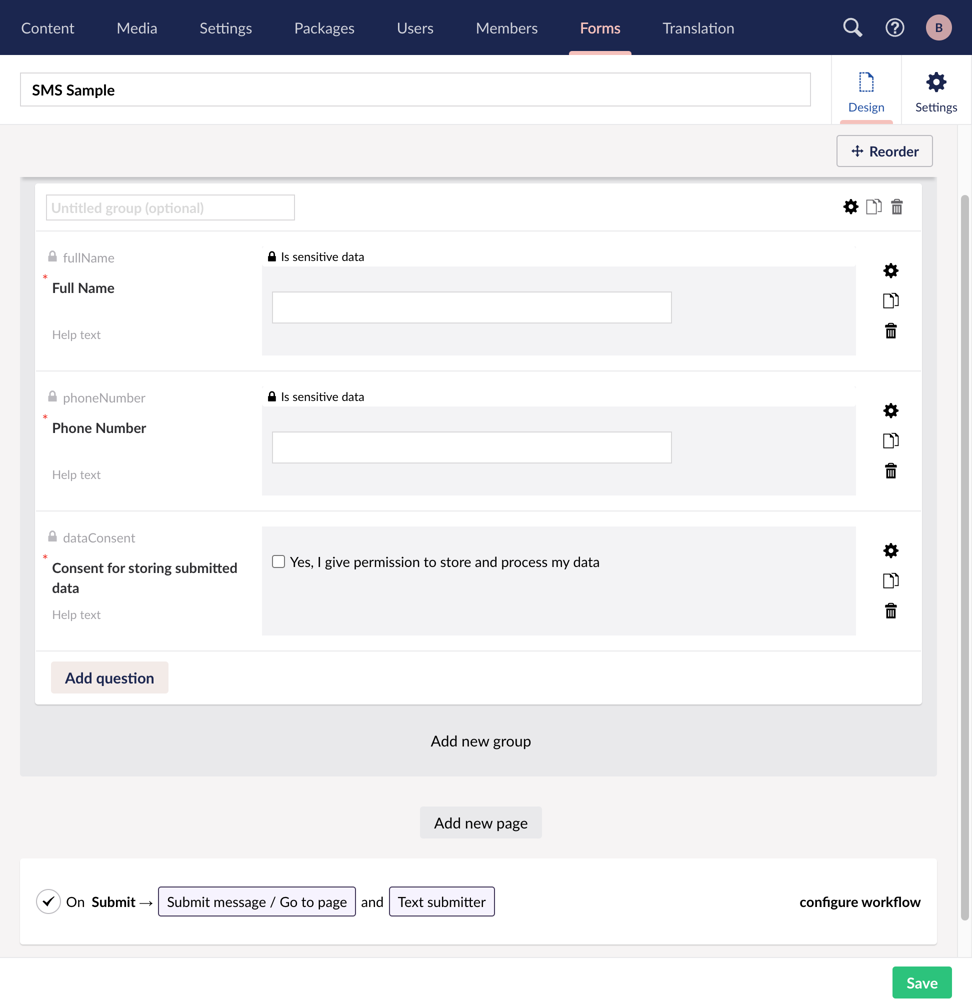
The form looks like this in the backoffice: 

Umbraco Form called "SMS Sample" with a "Full Name" field, a "Phone Number" field, and a data consent field. The form also has a workflow configured called "Text submitter".

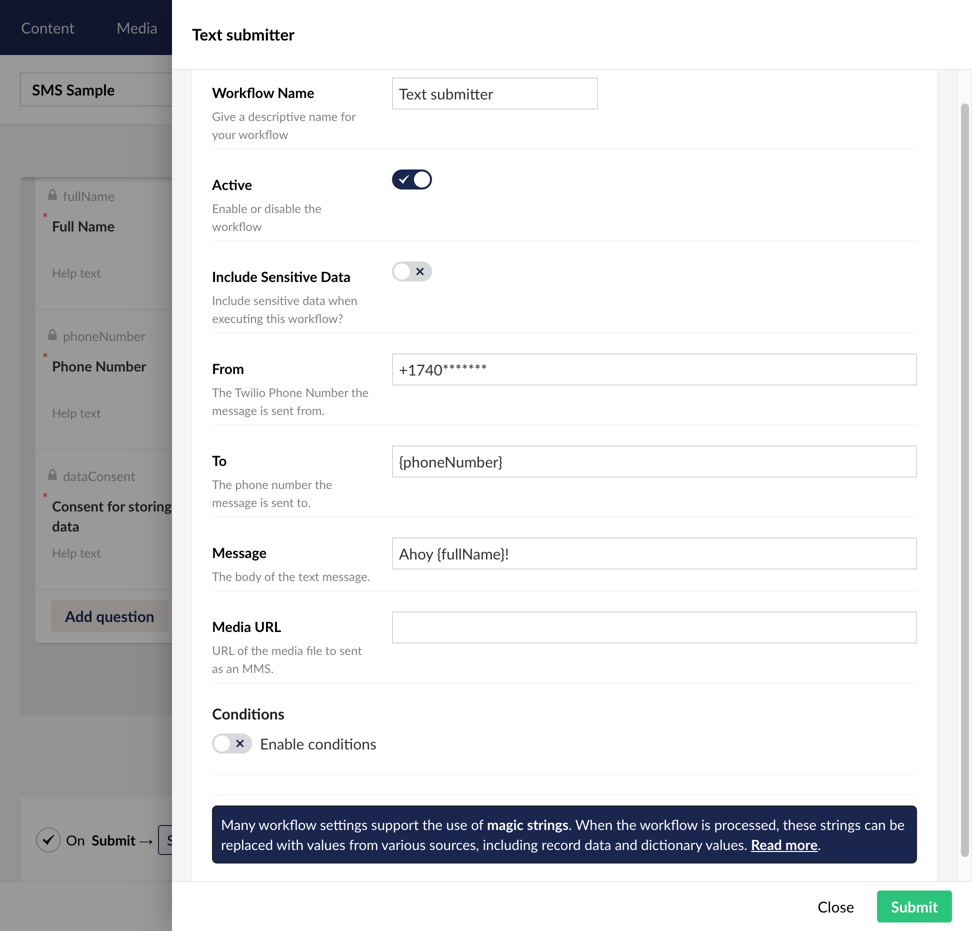
The workflow is configured like the screenshot below:

The "Text submitter" workflow with the "From" text field configured with a Twilio Phone Number, the "To" field configured to "{phoneNumber}", and the "Message" configured as "Ahoy {fullName}!". There's also a "Media URL" field that is empty.

The From field has to be configured with a Twilio Phone Number that you own using E.164 formatting.

By configuring the To field with the {phoneNumber} Magic String, the phone number that is submitted as part of the form will be used for this field. The same applies to the Message field. As a result, when a user submits their phone number and name, they will receive a text message with a greeting.

Warning

Depending on your use case this workflow makes sense, but be careful with sending SMS based on the data submitted by anonymous users. This could be easily abused and could hurt your reputation.

If the Media URL field is configured, Twilio will send an MMS with the media found at the URL.

To try this out using the repo, clone the GitHub repository, start the project, and log in as bob@localhost as the email and bob@localhost as the password. Update the workflow to use your own Twilio Phone Number, then navigate to https://localhost:44378/ and submit the form.

Make the From field a dropdown

To improve the user experience for the Umbraco editor, you can change the From text field to a dropdown with the available Twilio Phone Numbers in your account. 

To do this, head back to the MessageWorkflow.cs and change the View property "dropdownlist" on the setting attribute of the FromPhoneNumber property, like this:


[Setting("From", Description = "The Twilio Phone Number the message is sent from.", View = "dropdownlist")]
public string FromPhoneNumber { get; set; }

Then override the Settings() method like this:


public override Dictionary<string, Setting> Settings()
{
    var settings = base.Settings();

    using var scope = serviceScopeFactory.CreateScope();
    var twilioClient = scope.ServiceProvider.GetRequiredService<ITwilioRestClient>();
    var incomingPhoneNumbers = IncomingPhoneNumberResource.Read(client: twilioClient);
    var preValues = string.Join(",", incomingPhoneNumbers.Select(p => p.PhoneNumber.ToString()));
    settings[nameof(FromPhoneNumber)].PreValues = preValues;
    return settings;
}

This code will create a scope and retrieve the Twilio client from the DI container like you did in the Execute method. Then, to get the Twilio Phone Numbers that you are leasing is retrieved using IncomingPhoneNumberResource.Read. These phone numbers are then joined together as a comma separated list and set as the PreValues of the FromPhoneNumber setting.

Now the Umbraco editor can't accidentally enter a phone number that you don't own or accidentally misformat it.

Next steps

Congratulations on extending Umbraco Forms with Twilio! Twilio offers a lot of other communication APIs which you can use to extend Umbraco or to integrate into any of your .NET applications.

Want to keep learning? Check out these tutorials:

Niels Swimberghe is a Belgian American software engineer and technical content creator at Twilio, and a Microsoft MVP in Developer Technologies. Get in touch with Niels on Twitter @RealSwimburger and follow Niels’ personal blog on .NET, Azure, and web development at swimburger.net.


Tech Tip: JetBrains Rider

Check it out here