This article is about how you can use OpenID Connect in Umbraco to connect to an external login provider. It is focused on members and not users.
Umbraco has always had excellent user and member management, but if you are working on a composable DXP solution it is probably better to use an external system for that. External login providers is a fairly new feature that has been added to Umbraco 9.3.
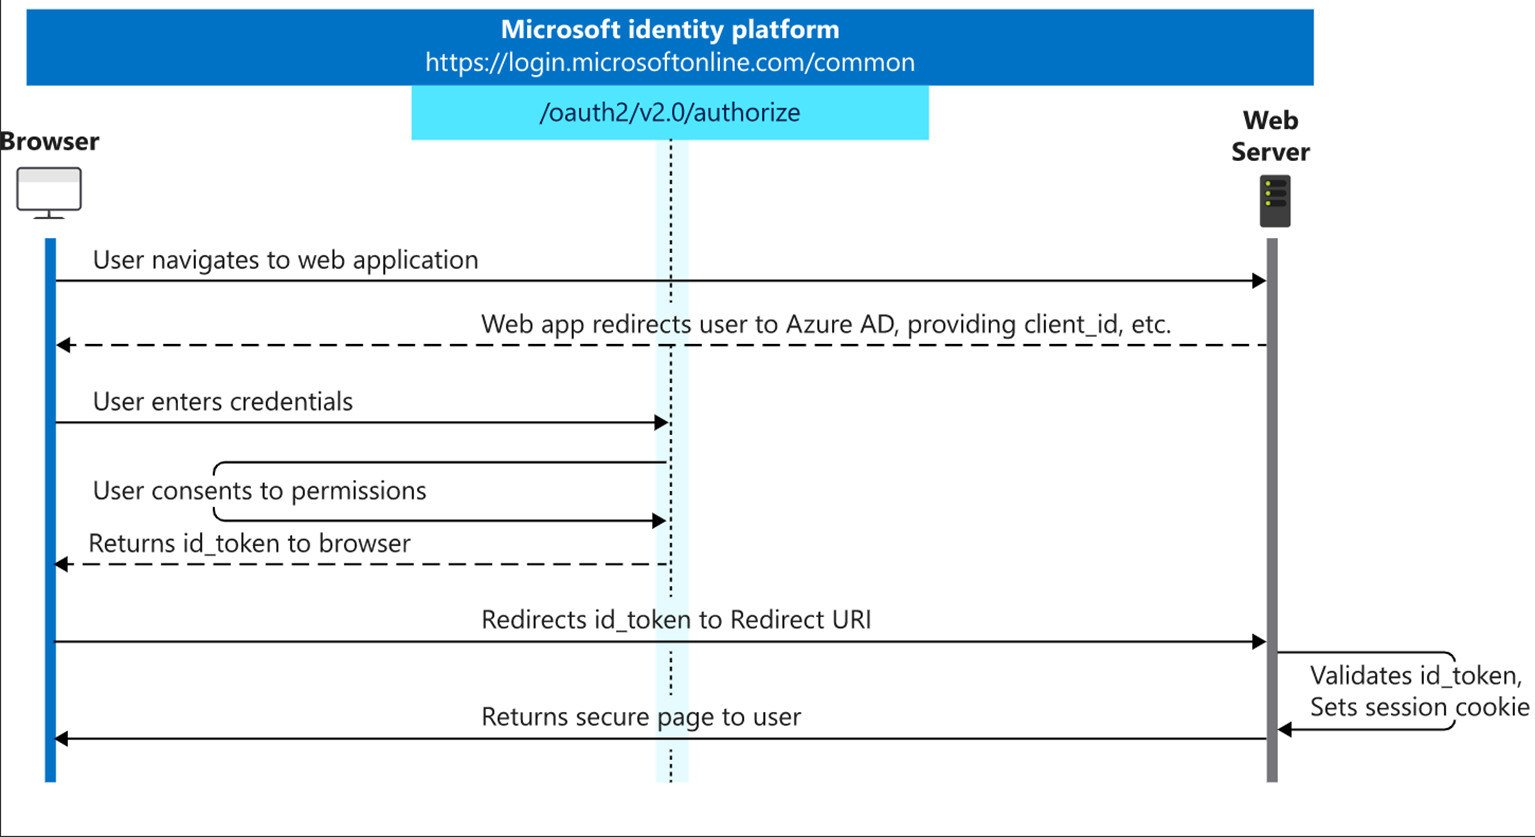
OpenID Connect 1.0 is an identity layer on top of the OAuth 2.0 protocol. It allows Clients to verify the identity of the End-User based on the authentication performed by an Authorization Server, as well as to obtain basic profile information about the End-User in an interoperable and REST-like manner.
OpenID Connect allows clients of all types, including Web-based, mobile, and JavaScript clients, to request and receive information about authenticated sessions and end-users. The specification suite is extensible, allowing participants to use optional features such as encryption of identity data, discovery of OpenID Providers, and logout, when it makes sense for them.
If you use an external login provider in Umbraco it will also go through all these steps. The id_token at the bottom of the image is important. We’re going to need that in our implementation later. The external login provider can also return user attributes. For example an address or role. Those are called claims.
External login providers
Both the Umbraco backoffice users and website members support external login providers for performing authentication of your users or members. This could be any OpenID Connect provider such as Azure Active Directory, Identity Server, or Google. Since 9.3 the Umbraco core has APIs available to connect with external login providers. No external packages are required anymore. The implementation in this article will connect with Auth0 as the external login provider and will also use these new APIs.
Auto linking
Umbraco requires the users or members to exist in Umbraco. With auto linking when you login on the external login provider the user or member will be created in Umbraco. It has events to change groups based on claims. So you can use roles from the external login provider and that way give users or members in Umbraco different rights.
Umbraco implementation
There is some great documentation about implementing external login providers in Umbraco. I have created the Umbraco OpenID Connect example package based on this documentation. It has a few extras which aren’t in the documentation. For example logout. There even is a reference to my example package added to the official documentation. In this section I will explain how this example package works. Below are 6 code snippets, each with an explanation of what the code does.
public void Configure(MemberExternalLoginProviderOptions options)
{
    options.AutoLinkOptions = new MemberExternalSignInAutoLinkOptions(
        // Must be true for auto-linking to be enabled
        autoLinkExternalAccount: true,

        defaultCulture: null,

        // Optionally specify the default "IsApprove" status. Must be true for auto-linking.
        defaultIsApproved: true,

        // Optionally specify the member type alias. Default is "Member"
        defaultMemberTypeAlias: "Member",

        // Optionally specify the member groups names to add the auto-linking user to.
        defaultMemberGroups: new List<string> { "example-group" }
    )
    {
        // Optional callback
        OnAutoLinking = (autoLinkUser, loginInfo) =>
        {
            // You can customize the user before it's linked.
        },
        OnExternalLogin = (user, loginInfo) =>
        {
            // You can customize the user before login.

            return true; //returns a boolean indicating if sign in should continue or not.
        }
    };
}
Auto link options. These are the options when a member is created in Umbraco and linked to the member from the external login provider. You can give a default member group. Based on claims you can give extra member groups in the events.
public static IUmbracoBuilder AddOpenIdConnectAuthentication(this IUmbracoBuilder builder)
{
    builder.Services.ConfigureOptions<OpenIdConnectMemberExternalLoginProviderOptions>();

    builder.AddMemberExternalLogins(logins =>
    {
        logins.AddMemberLogin(
            memberAuthenticationBuilder =>
            {
                memberAuthenticationBuilder.AddOpenIdConnect(
                    // The scheme must be set with this method to work for the umbraco members
                    memberAuthenticationBuilder.SchemeForMembers(OpenIdConnectMemberExternalLoginProviderOptions.SchemeName),
                    options =>
                    {
                        var config = builder.Config;
                        options.ResponseType = "code";
                        options.Scope.Add("openid");
                        options.Scope.Add("profile");
                        options.Scope.Add("email");
                        options.Scope.Add("phone");
                        options.Scope.Add("address");
                        options.RequireHttpsMetadata = true;
                        options.MetadataAddress = config["OpenIdConnect:MetadataAddress"];
                        options.ClientId = config["OpenIdConnect:ClientId"];
                        // Normally the ClientSecret should not be in the Github repo.
                        // These settings are valid and only used for this example.
                        // So it's ok these are public.
                        options.ClientSecret = config["OpenIdConnect:ClientSecret"];
                        options.SaveTokens = true;
                        options.TokenValidationParameters.SaveSigninToken = true;
OpenID Connect configuration. On line 3 we can see the auto link options from the previous code example. Your external login provider has data like clientId and clientSecret. Those need to be configured here. This is a pretty default OpenID Connect configuration.
options.Events.OnTokenValidated = async context =>
{
    var claims = context?.Principal?.Claims.ToList();
    var email = claims?.SingleOrDefault(x => x.Type == ClaimTypes.NameIdentifier);
    if (email != null)
    {
        // The email claim is required for auto linking.
        // So get it from another claim and put it in the email claim.
        claims?.Add(new Claim(ClaimTypes.Email, email.Value));
    }

    var name = claims?.SingleOrDefault(x => x.Type == "user_displayname");
    if (name != null)
    {
        // The name claim is required for auto linking.
        // So get it from another claim and put it in the name claim.
        claims?.Add(new Claim(ClaimTypes.Name, name.Value));
    }

    if (context != null)
    {
        // Since we added new claims create a new principal.
        var authenticationType = context.Principal?.Identity?.AuthenticationType;
        context.Principal = new ClaimsPrincipal(new ClaimsIdentity(claims, authenticationType));
    }

    await Task.FromResult(0);
};
Once you’re logged in on the external login provider you will be redirected back to Umbraco. There you have the data of the external login and you can map it to the data Umbraco needs. For example add some extra claims. Claims are user attributes. They can be an email, name or role for example. Umbraco needs certain claims so they are transformed here.
options.Events.OnRedirectToIdentityProviderForSignOut = async notification =>
{
    var protocolMessage = notification.ProtocolMessage;

    // Since we're in a static extension method we need this approach to get the member manager.
    var memberManager = notification.HttpContext.RequestServices.GetService<IMemberManager>();
    if (memberManager != null)
    {
        var currentMember = await memberManager.GetCurrentMemberAsync();

        // On the current member we can find all their login tokens from the external login provider.
        // These tokens are stored in the umbracoExternalLoginToken table.
        var idToken = currentMember?.LoginTokens.FirstOrDefault(x => x.Name == "id_token");
        if (idToken != null && !string.IsNullOrEmpty(idToken.Value))
        {
            // Some external login providers need the IdTokenHint.
            // By setting the IdTokenHint the user can be redirected back from the external login provider to this website.
            protocolMessage.IdTokenHint = idToken.Value;
        }
    }

    await Task.FromResult(0);
};
Login is easy. Logout is hard. Logout needs to happen on 2 domains. The website and the external login provider. So you first logout on the website and then redirect to the external login provider to logout there as well. In this event you can send data to the external login provider when you logout. Most external login providers require some additional data. For example the id_token. This way the external login provider knows that the person that tries to logout is the same person that logged in before. If the id_token is valid you’ll be redirected back to the website.
[HttpPost]
[ValidateAntiForgeryToken]
[ValidateUmbracoFormRouteString]
public async Task<IActionResult> HandleLogout([Bind(Prefix = "logoutModel")]PostRedirectModel model)
{
    if (ModelState.IsValid == false)
    {
        return CurrentUmbracoPage();
    }

    var isLoggedIn = HttpContext.User?.Identity?.IsAuthenticated ?? false;

    if (isLoggedIn)
    {
        // Trigger logout on the external login provider.
        await this.HttpContext.SignOutAsync("UmbracoMembers.OpenIdConnect");

        // Trigger logout on this website.
        await _signInManager.SignOutAsync();
    }

    // Don't return RedirectToCurrentUmbracoPage.
    // That will override the location header which is set by the external login provider logout.
    // So by returning EmptyResult() this will still redirect to the external login provider to logout there.
    return new EmptyResult();
}
Like I mentioned in the code example above this one you need to be redirected to the external login provider if you want to logout. The default Umbraco logout controller does not support this. Because it uses RedirectToCurrentUmbracoPage it overrides the redirect to the external login provider. So only use that if the members are only in Umbraco and not in an external login provider. Use a custom logout controller to trigger logout on the external login provider. If you’re not logged out on the external login provider it will login you again automatically.
In the appsettings.json file in the example project below the ConnectionStrings you will find the OpenIdConnect settings. These are the only setting you need to change to connect to a different external login provider. These are the settings for connecting to Auth0. Normally the ClientSecret should not be public. These settings are only used for this example package. So it’s ok.
YouTube demo
This YouTube video is a working demo using the above 6 code snippets. It shows how to login with the external login provider in Umbraco and also how you can run the Umbraco OpenID Connect example package. In the video I also explain again how everything works.
Connect 2 websites to the same external login provider.
In this video I will first login on website 1. After that I will login on website 2 with the same member. Since both websites use the same external login provider it also supports Single Sign-On (SSO). So if you are logged in to website 1 you will automatically be logged in to website 2.
The auto link feature creates the member in Umbraco and links the external login member. The member is created the first time they login with the external login provider. The problem with the current solution is that users/members need to exist in 2 systems. Umbraco and the external login provider. This makes it harder to use the external login provider as a single source of truth for all users/members. If the external login provider has thousands of users/members you don't want them inside Umbraco as well. When you authenticate users/members through external providers, Umbraco could create and authenticate a virtual user/member with proper access rights. This user/member exists only as long as the user session lasts.
As soon as you use external login providers with Umbraco, there are several components that you no longer have to build yourself. For example, the login screen, register, forgot password, but also Two Factor Authentication (2FA) if you want to use it.
Members are also stored outside of Umbraco. That can be useful if you want to use Single Sign-On (SSO) as I demonstrated here. This fits perfectly in a composable DXP solution.
The only drawback is that there will probably be additional costs. If you only store the members in Umbraco, it is free. External login providers usually have a free tier, but can get expensive if you have a lot of members.
Github repository
As I mentioned before, there is also a Github repository. The Umbraco OpenID Connect example package shows how OpenID Connect can be used for members in Umbraco. It's a complete Umbraco solution with a SQLite database. Everything is already configured correct so you can download the project and run it.
Everything I've learned about OpenID Connect and Umbraco is in this example. It's free and open source. Go try it out!