How to build OpenAPI documentation in .NET Core from code attributes, using .NET 7, Swashbuckle and the SwaggerUI
Introduction
In this article, I will explore using Swashbuckle and C# code attributes to automatically generate OpenAPI documentation.
Documenting APIs is important. Whilst back-end developers with access to the codebase can explore C# code to understand what a method is doing, anyone consuming the API can not. They need documentation to understand what an action is doing, how to build the request, what responses is returned and so on.
Documenting the API reduces the amount of work needed to connect decoupled services. The formal specification for API documentation is OpenAPI (formally known as Swagger). Microsoft defines Swagger as a "language agnostic specification for describing Rest APIs".
Documentation includes:
All the methods and parameters that the API supports.
Details of authorisation required.
Terms of use, contact info and a licence to use the API can be included.
OpenAPI can also be consumed by an API mocking tool allowing integration and unit testing.
When coupled with SwaggerUI it can help with the following:
EDIT: As part of this year's 24Daysin Poornima has written about the OpenAPI documentation and Swagger specification here.
C# and OpenAPI
If you develop with C# then the good news the tools to build an OpenAPI/ Swagger specification are available as NuGet packages (and they’re open source).
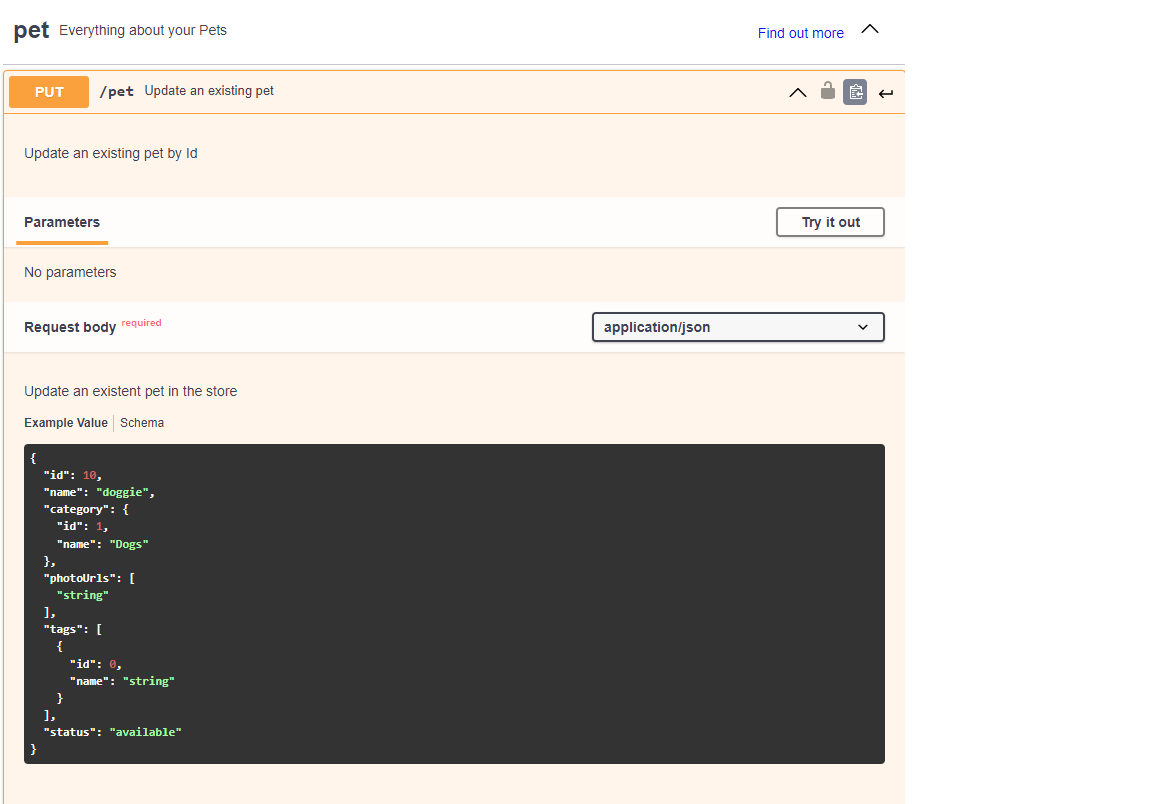
The code samples below are based on generating the “Update Pet” endpoint detailed in the example Swagger Documentation "Swagger Pet Store" and are for ASP.NET Core 7.
The screenshot below shows the endpoint and action this article is going to use to illustrate how to use Swashbuckle to generate OpenAPI documentation:
The Code
Project Initialization
In Visual Studio 2022 create a new project, using the “ASP.NET Core Empty Project” template and the .NET 7.0 framework.
The following NuGet packages are required for using Swashbuckle to generate the OpenAPI documentation and to use the SwaggerUI:
Swashbuckle.AspNetCore - this provides an embedded version of the Swagger UI. Enabling:
The code behind the API to be tested in the development environment.
Developers to view the Swagger Documentation being generated.
Swashbuckle.AspNetCore.Annotations - an opt-in package that provides a set of custom attributes that can be added to the code base to enrich the generated Swagger. Used in these examples to:
Read and document attributes.
Improve the SwaggerResponse documentation.
Swashbuckle.AspNetCore.Newtonsoft is an opt-in package which supports Newtonsoft.Json serializer behaviours. Used in these examples to serialize enums.
Middleware
In Program.cs the Swagger generator needs to be configured:
builder.Services.AddSwaggerGen(c =>
			{
				c.SwaggerDoc("v1", new OpenApiInfo { Title = "Pet Store API", Version = "v1"});
			});
The OpenApiInfo class has additional properties on it which can be used to expose licensing and contact information.
To ensure that the Swagger Documentation is only available in the development environment add:
if (app.Environment.IsDevelopment())
{
	app.UseSwagger();
	app.UseSwaggerUI();
}
Debugging
In this code sample, the UI will be the Swagger UI. To enable this update launchSettings.json profiles section to include "launchUrl": "swagger".
Directly via [YourDomain]/Swagger/[version]/swagger.json. Where [version] is the version configured when initialising the SwaggerDoc in the middleware.
End Points
A controller is used to define the endpoints. For an API controller in C#, each controller is decorated with [ApiController] and inherits from ControllerBase
The controller also needs a route to the endpoint to be defined.
For the sample code, a PetController is created:
[ApiController]
[Route("[controller]/[action]")]
public class PetController : ControllerBase
Actions
Each method in the controller corresponds to an action exposed by the controller. Each method is created in response to an HTTP request. This means they must be decorated with the HTTP Action they respond to e.g.
Before the action to Update an existing pet is created, a Status enum and a Pet Model are required as the Update action consumes these.
The code for the Status Enum is:
public enum Status
{
    Available,
    Pending,
    Sold
}
And the code for the Pet Model is:
namespace PetApi.Model
{
    public class Pet
    {
        public int Id { get; set; }
        public string Name { get; set; }
        public string[] PhotoUrls { get; set; }
        public Status Status { get; set; }
    }
}
Next up an Update method which uses the Pet model is required:
[HttpPost]
public IActionResult Update([FromBody]Pet request)
{
    return null;
}
Swagger Documentation Test
If the project is run now, it is possible to test and review the API. A few things are missing:
Descriptions - no descriptions on actions, controllers or models.
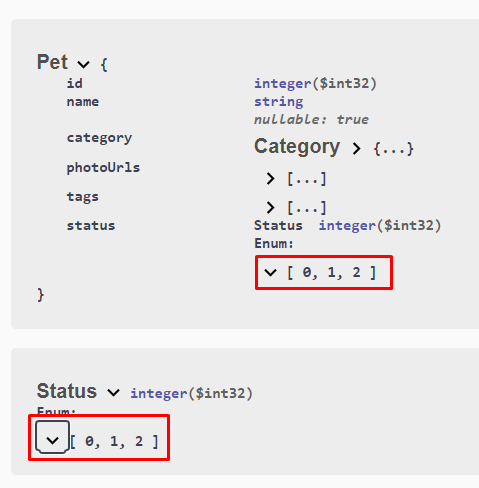
Enums - the status enum is shown as an array of numbers and separate to the Pet model.
Example text - The pet model is missing the example text. Adding example text will make it easier for mocking and testing via the SwaggerUI.
To add descriptions to the documentation, the XML Tag <summary> should be used:
/// <summary>
/// Everything about your Pets
/// </summary>
[ApiController]
[Route("[controller]/[action]")]
public class PetController : ControllerBase
{
/// <summary>
/// Update an existing pet by id
/// </summary>
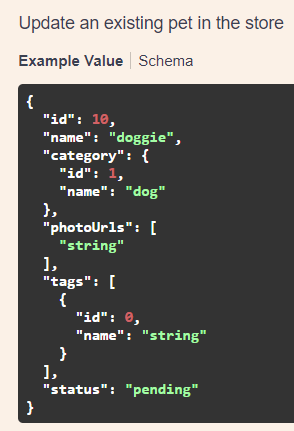
/// <param name="request">Update an existing pet in the store</param>
[HttpPut]
public IActionResult Update([FromBody]Pet request)
{
return null;
}
}
If the code were run at this point the descriptions would be missing. To ensure they and any attributes added to the code are included in the OpenAPI Documentation, add the following to the .csproj file:
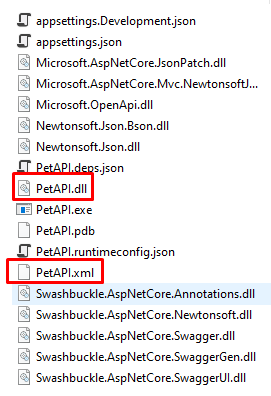
Now when the code is built an XML file with the same name as the project is built in the bin directory:
Configuring the Middleware for Descriptions
The middleware in program.cs now needs to be updated to ensure that descriptions are read from the summary. First, the XML file generated at build time by setting GenerateDocumentationFile to true needs to be consumed by the Swagger Generator. To do this get a path to the file:
var xmlFile = $"{Assembly.GetExecutingAssembly().GetName().Name}.xml";
var xmlPath = Path.Combine(AppContext.BaseDirectory, xmlFile);
Then reference this when configuring the AddSwaggerGen method using c.IncludeXmlComments(xmlPath):
builder.Services.AddSwaggerGen(c =>
{
	c.SwaggerDoc("v1", new OpenApiInfo { Title = "Pet Store API", Version = "v1"});
	c.IncludeXmlComments(xmlPath);
});
Now when the code is run there are comments against the actions but not against the endpoint. To ensure the end point comments are included when configuring IncludeXmlComments set the includeControllerXmlComments property to true:
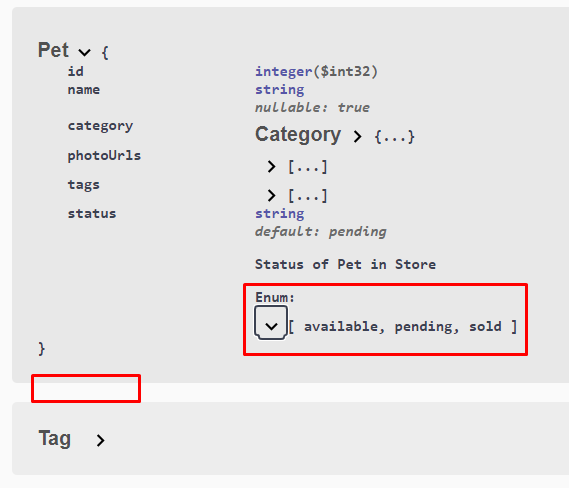
The enums in the documentation are currently shown as numbers, they do not show the human-readable values for them:
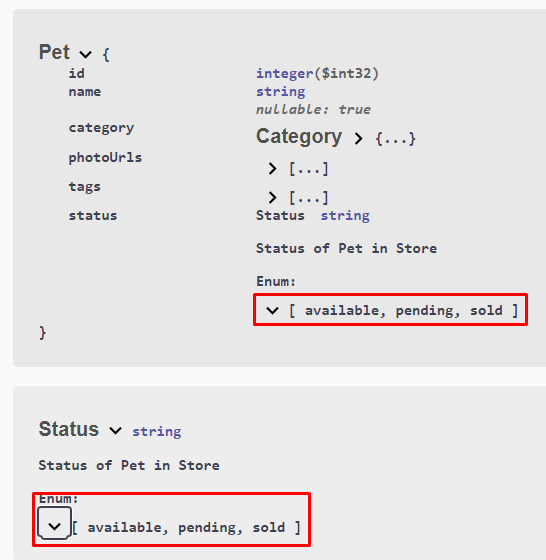
To add a description for an enum, use the XML Tag <summary>:
/// <summary>
/// Status of Pet in Store
/// </summary>
public enum Status
{
    /// <summary>
    /// Available
    /// </summary>
    Available,
    /// <summary>
    /// Pending
    /// </summary>
    Pending,
    /// <summary>
    /// Sold
    /// </summary>
    Sold
}
Configuring the Middleware for Enums
To serialize an enum the middleware needs to be configured to use the Newtonsoft.Json serilaizer. To do this call the AddNewtonsoftJson() method should be appended to AddControllers()call:
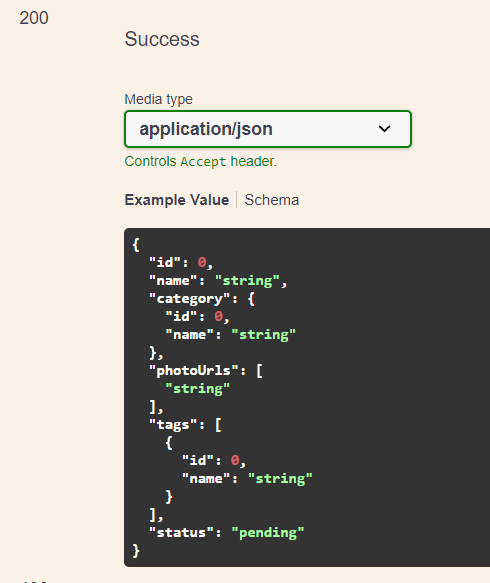
The SwaggerUI allows default values to be configured for examples for testing. This is shown via the Example Value Schema. When the current project is run the example schema shows empty or default values for examples.
And the swagger.json file shows there are no example properties on the Pet model.
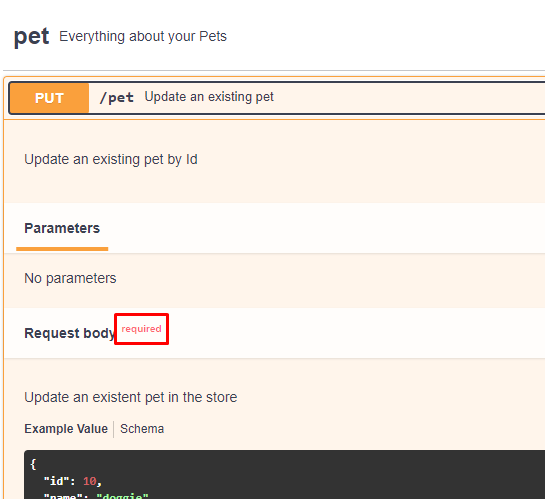
The required parameters on an action are shown in the SwaggerUI by a red required label:
Required parameters are decorated with the [Required] attribute:
public IActionResult Update([Required][FromBody]Pet request)
Adding required to a parameter on action also ensures the swagger.json file has the required attribute for that parameter on the action:
"/Pet/Update": {
      "put": {
        "tags": [
          "Pet"
        ],
        "summary": "Update an existing  pet by id",
        "requestBody": {
          "description": "Update an existing pet in the store",
          "content": {
            "application/json": {
              "schema": {
                "$ref": "#/components/schemas/Pet"
              }
            }
          },
          "required": true
        },
Model
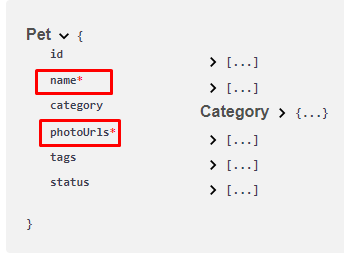
Required properties on a model are shown in the SwaggerUI with a red asterisk.
Required properties are decorated with the [Required] attribute:
[Required]
public string Name { get; set; }
Adding required to a property on action also ensures the swagger.json file has the required attribute for that property:
"Pet": {
    "required": [
      "name",
      "photoUrls"
    ]
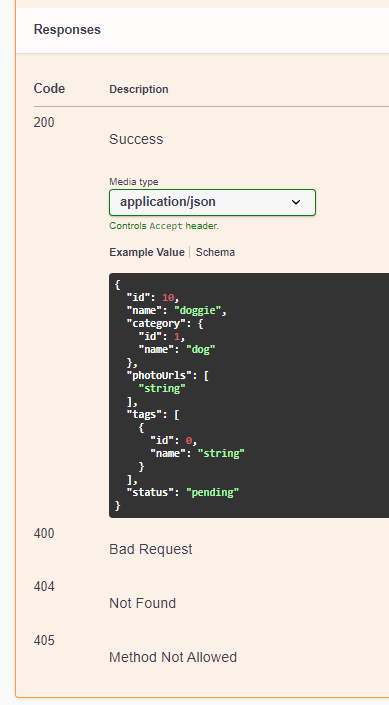
Response Codes
The use of Swashbuckle.AspNetCore.Annotations allows the method to be decorated with SwaggerResponse to detail for each status code returned. It also ensures that type definitions for errors are only returned if they are supplied. Examples are:
[SwaggerResponse(StatusCodes.Status200OK, Type = typeof(Pet),Description = "Successful operation")]
[SwaggerResponse(StatusCodes.Status400BadRequest,  Description = "Invalid Id Supplied")]
[SwaggerResponse(StatusCodes.Status404NotFound, Description = "Pet not found")]
[SwaggerResponse(StatusCodes.Status405MethodNotAllowed, Description = "Validation exception")]
Configuring the Middleware for SwaggerReponse
For the SwaggerReponseattribute to be included in the documentation and the SwaggerUI add the following to the AddSwaggerGen initialization c.EnableAnnotations():