A practical, problem-solving guide on how to import Block List items programmatically in Umbraco 17 instead of manually creating them in the backoffice.
When working with Umbraco, Block List editors are one of the most flexible ways to structure repeating content. They’re powerful, clean, and editor-friendly, but can be a bit tricky to populate programmatically.
Recently, I faced a similar challenge:
I had a timeline component which utilised the Block List editor to populate the various events on the timeline as blocks.
Manually adding each block through the Umbraco backoffice was theoretically possible… but realistically, it was going to be slow and repetitive.
So instead of entering every item manually, I built a custom import API endpoint to generate all the Block List items automatically.
Let’s dive in and find out how to solve this problem.
Quick Project Setup
Before jumping into Block List imports, let’s first set up a small test project to experiment.
For this walkthrough, we’ll spin up an Umbraco 17 RC2 site and install the Clean starter kit, as it gives us a few pages and blocks to work with so we’re not starting from a blank install.
Shout-out to Paul Seal for creating both the Package Script Writer and the Clean starter kit. These tools make spinning up Umbraco sites incredibly easy.
You can also run them manually as shown below:
# Ensure we have the version specific Umbraco templates
dotnet new install Umbraco.Templates::17.0.0-rc2 --force

# Create solution/project
dotnet new sln --name "UmbraTest"
dotnet new umbraco --force -n "UmbraTest"  --friendly-name "Administrator" --email "admin@example.com" --password "1234567890" --development-database-type SQLite
dotnet sln add "UmbraTest"


#Add starter kit
dotnet add "UmbraTest" package clean

#Add Packages
#Ignored Clean as it was added as a starter kit

dotnet run --project "UmbraTest"
Script to spin up a test Umbraco 17 website.
Creating the Content Structure
With the project running, the next step is to set up the content structure we’ll be importing into.
In the backoffice:
Create a new Element Type called Timeline Item, at the path Document Types > Elements > Content Models > Timeline with the following fields:
Event Name — Textstring
Period — Textstring (this will hold something like "1990–1995")
Next, head over to Data Types and create a new one:
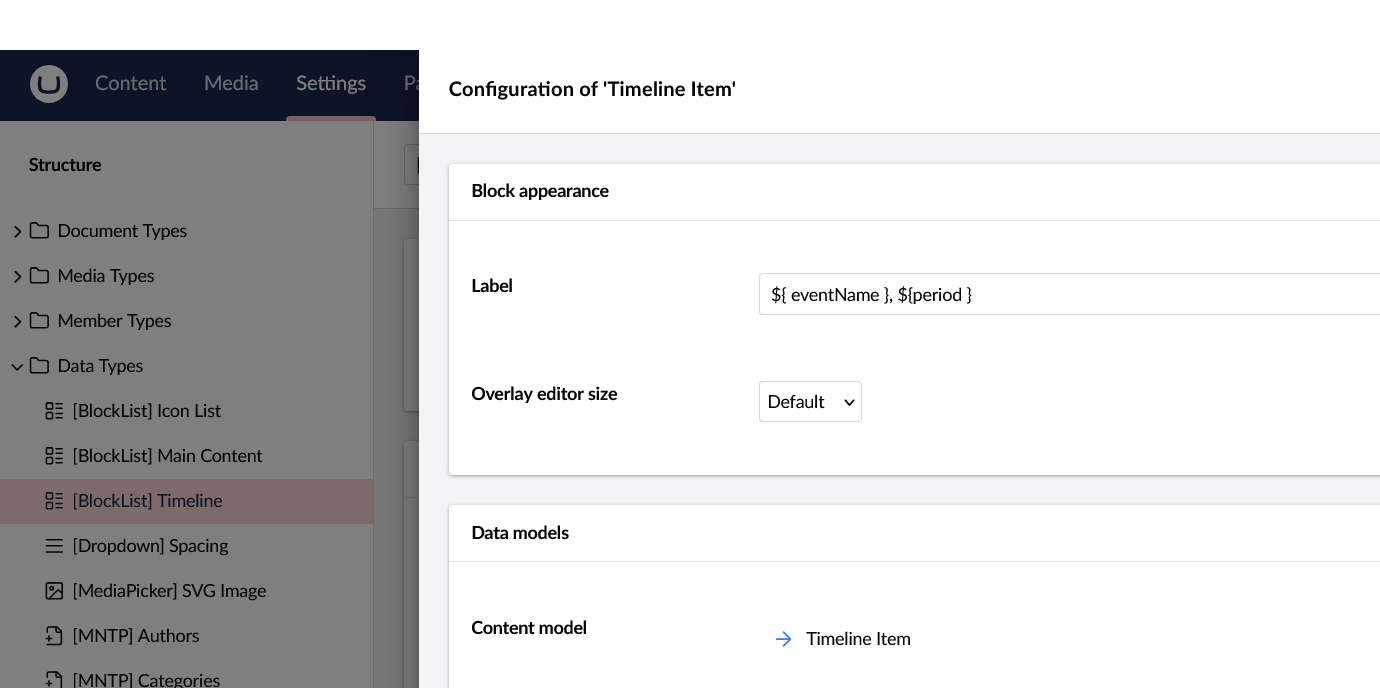
Name: [BlockList] Timeline
Property Editor: Block List
Available Blocks: Pick the Timeline Item element.
(Optional) Set the Label of the Timeline Item to ${ eventName }, ${period }.
Now assign this Block List to a page.
Go to Document Types > Pages.
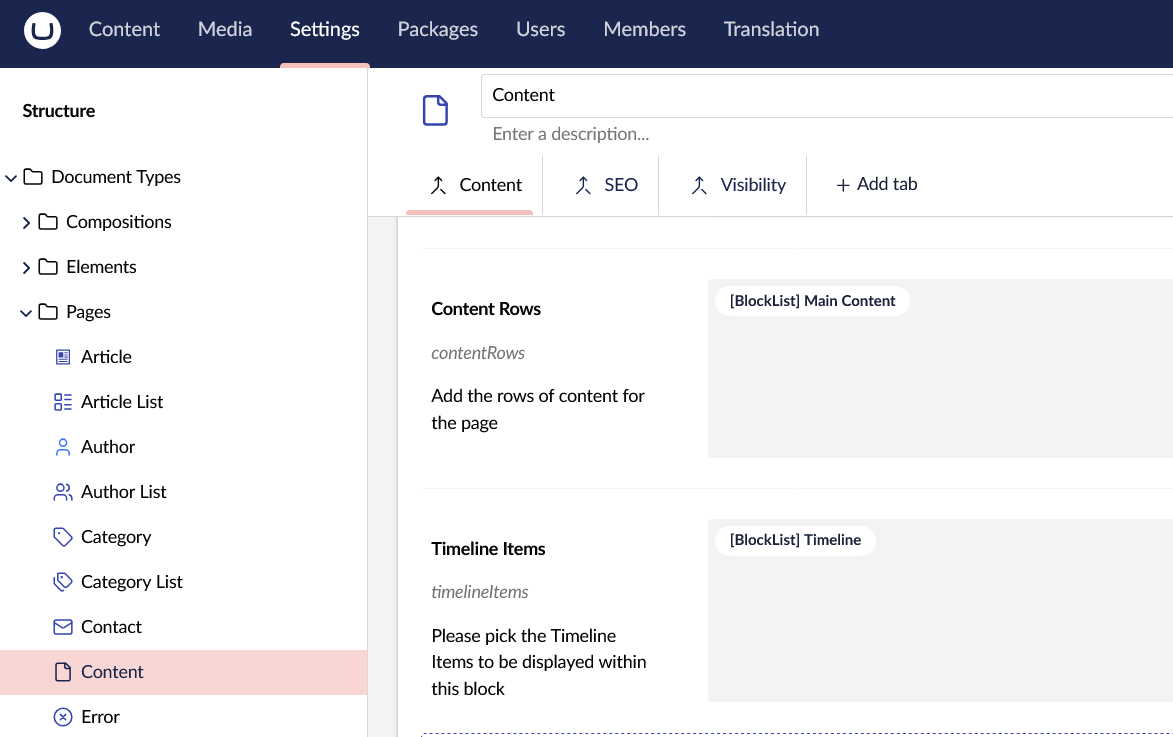
Open the Content document type.
Add a new property called Timeline Items.
Set its Property Editor to the [BlockList] Timeline we created in the previous step.
Understanding Block List values
Before looking at the code, it’s important to understand how Block List values are structured.
A Block List stores three pieces of data:
layout
It defines the order of blocks and ties each item to a UDI. This is basically the index of blocks.
Even if you're not using settings, Umbraco expects this key to exist, because the Block List format includes:
content block
settings block
Building the Timeline Import API
Now that we understand how Block List values are structured (layout, contentData, settingsData), we can start putting the import logic together.
To handle the import, we’ll create a small API endpoint that accepts a JSON payload and writes the data into the Timeline Items Block List property on the selected page.
The Request Body
To keep things organised, the API uses two simple models to represent the incoming JSON.
Create a class ImportModel.cs within the Umbraco solution.
public class ImportModel
{
    public string PageGuid { get; set; }
    public string BlockListAlias { get; set; }
    public List<TimelineImportModel> Timelines { get; set; } = new List<TimelineImportModel>();
}

public class TimelineImportModel
{
    public string Name { get; set; }
    public string StartDate { get; set; }
    public string EndDate { get; set; }
}
The Controller
Inside your Umbraco project, add a Controllers folder if it doesn’t already exist, create a new file named TimelineImportController.cs.
This controller accepts a JSON payload of timeline items, converts them into the required Block List JSON structure, and then saves and publishes the updated page.
Here’s the full controller code:
[ApiController]
[Route("/umbraco/api/timelineimport")]
public class TimelineImportController : Controller
{
    readonly IContentService _contentService;
    readonly IContentTypeService _contentTypeService;

    public TimelineImportController(
        IContentService contentService,
        IContentTypeService contentTypeService
        )
    {
        _contentService = contentService;
        _contentTypeService = contentTypeService;
    }

    [HttpPost("import")]
    public IActionResult Import([FromBody] ImportModel importModel)
    {
        try
        {
            if (!Guid.TryParse(importModel.PageGuid, out var pageId))
                return BadRequest("Invalid pageGuid value.");

            // find the page that contains the Block List we want to update
            var page = _contentService.GetById(pageId);

            if (page == null)
                return NotFound("Page not found.");

            // ensure the Block List property actually exists on this Document type
            if (!page.Properties.Contains(importModel.BlockListAlias))
                return BadRequest($"Property '{importModel.BlockListAlias}' does not exist.");

            // get the element type used for each timeline block
            var timelineItemType = _contentTypeService.Get("timelineItem");

            if (timelineItemType == null)
                return NotFound("timelineItem Element Type not found.");

            // These three lists form the core of a Block List value
            var layout = new List<Dictionary<string, string>>();
            var contentData = new List<Dictionary<string, string>>();
            var settingsData = new List<Dictionary<string, string>>();

            foreach (var item in importModel.Timelines)
            {
                var contentUdi = Udi.Create("element", Guid.NewGuid()).ToString();
                var settingsUdi = Udi.Create("element", Guid.NewGuid()).ToString();

                // Layout entry describes the block's position + content reference
                layout.Add(new Dictionary<string, string>
                {
                    { "contentUdi", contentUdi },
                    //{ "settingsUdi", settingsUdi } // Settings UDI can be added here if your blocks use settings
                });

                // content dictionary will store the properties defined on the element type
                var contentDict = new Dictionary<string, string>
                {
                    { "contentTypeKey", timelineItemType.Key.ToString() },
                    { "udi", contentUdi },
                    { "eventName", item.Name },
                    { "period", $"{item.StartDate?.ToString() ?? ""} - {item.EndDate?.ToString() ?? ""}" }
                    // add more block-level properties as needed
                };

                contentData.Add(contentDict);

                // settings data (if any)
                //var settingsDict = new Dictionary<string, string>
                //{
                //    { "contentTypeKey", timelineItemType.ToString() },
                //    { "udi", settingsUdi },
                //    // settings props
                //    { "settingAlias1", item.Setting1 },
                //};

                //settingsData.Add(settingsDict);
            }

            // build final Block List JSON structure
            var blockListObject = new
            {
                layout = new Dictionary<string, object>
                {
                    { "Umbraco.BlockList", layout }
                },
                contentData,
                settingsData
            };

            var json = JsonConvert.SerializeObject(blockListObject);

            // save the Block List JSON back to the content item
            page.SetValue(importModel.BlockListAlias, json);
            _contentService.Save(page);

            _contentService.Publish(page, ["*"]);

            return Ok("Timeline items imported successfully.");
        }
        catch (Exception ex)
        {
            return StatusCode(500, $"Import failed: {ex.Message}");
        }
    }
}
Testing the Timeline Import API
With the controller and models in place, we can now test the import endpoint.
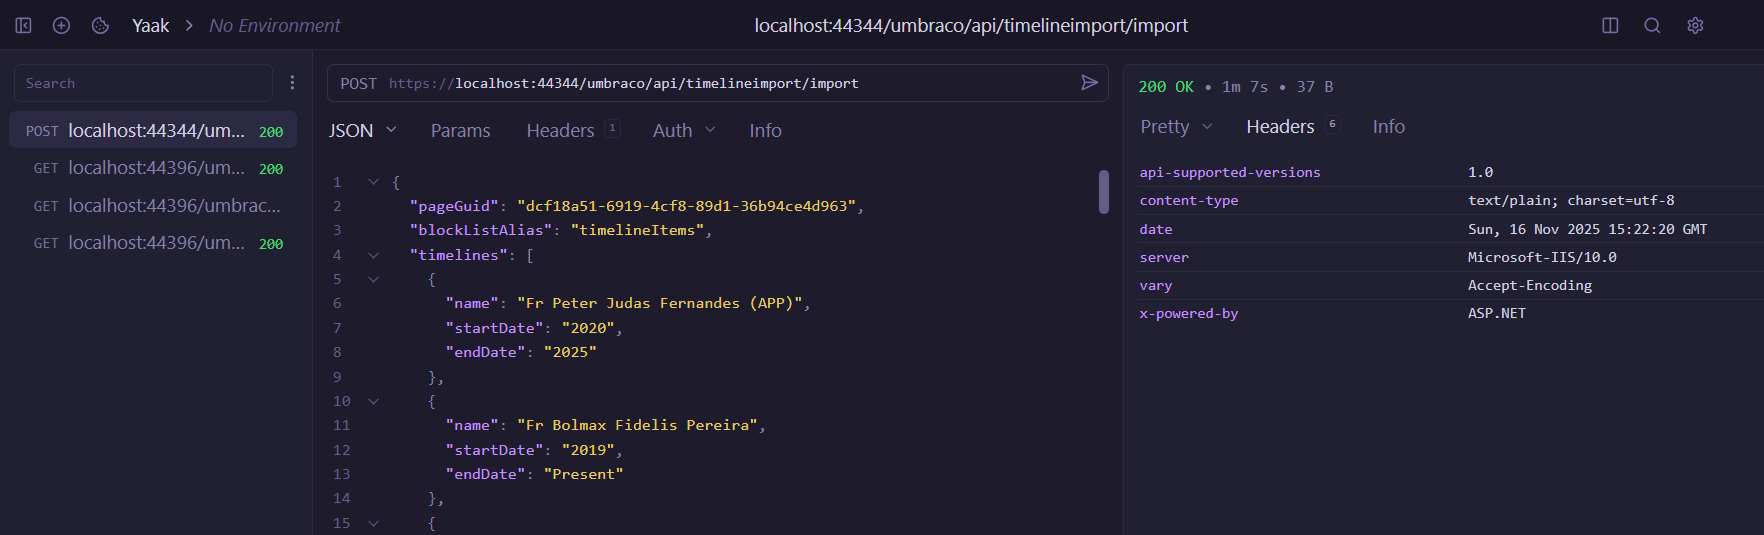
Endpoint URL
Rebuild the project and get the site running up again.
If you're running the site locally, the endpoint will look like:
POST https://localhost:44344/umbraco/api/timelineimport/import
(Your port may differ based on your setup.)
Sample Payload
The import API expects a JSON body matching the ImportModel and TimelineImportModel structure.
Here’s a simple example you can use for testing:
Replace "pageGuid" with the actual GUID of your Content node.
(You can copy it from the Umbraco backoffice > Info tab.)
Hit Send.
What to Expect
If everything is correct, the response should be:
Timeline items imported successfully.
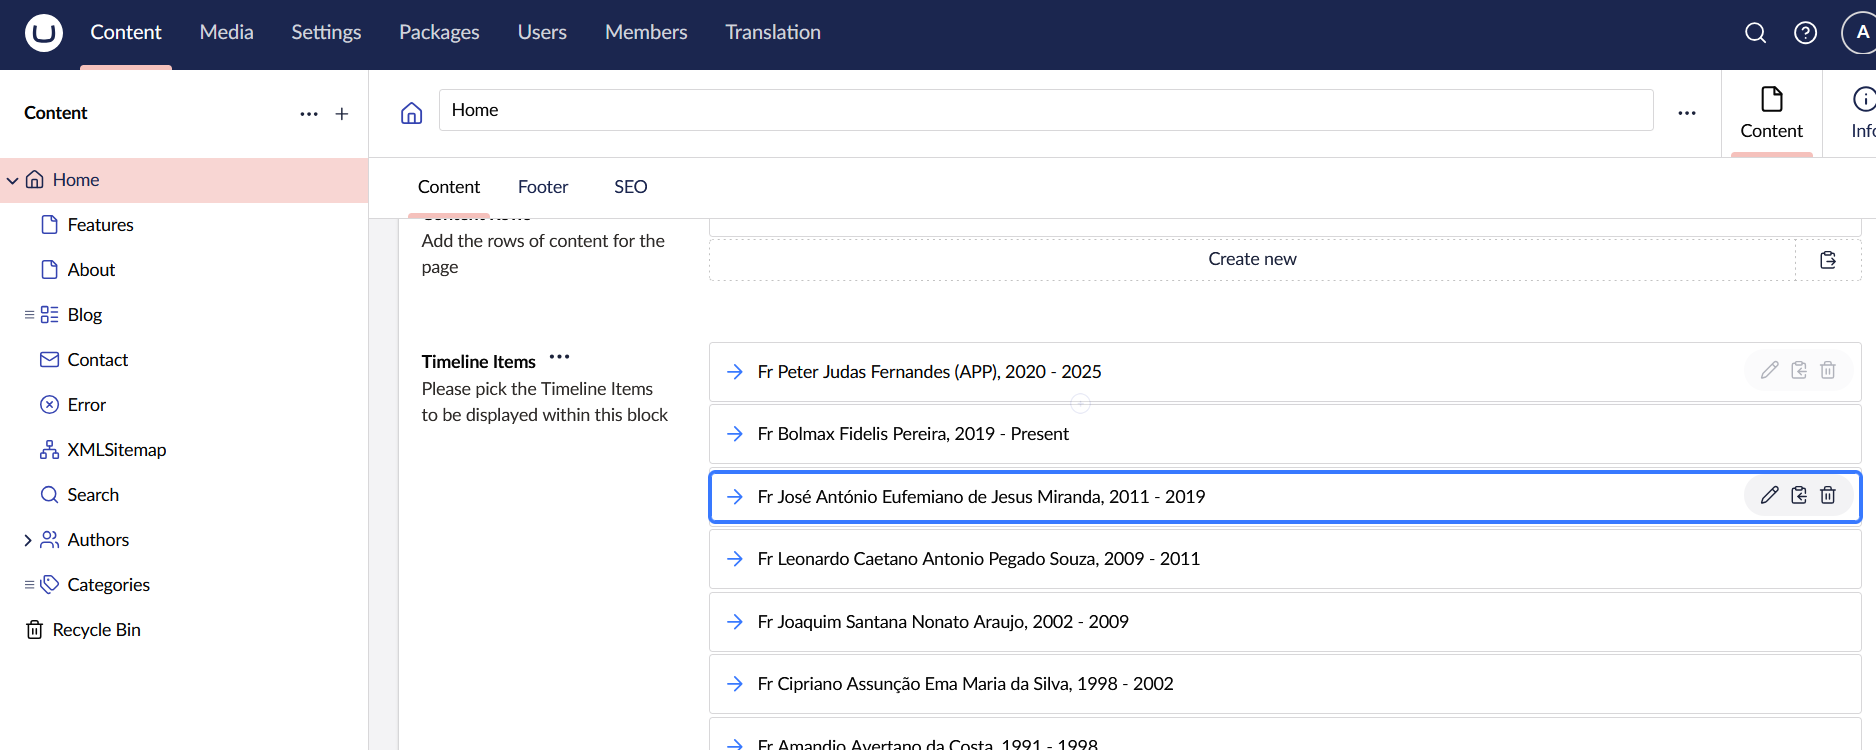
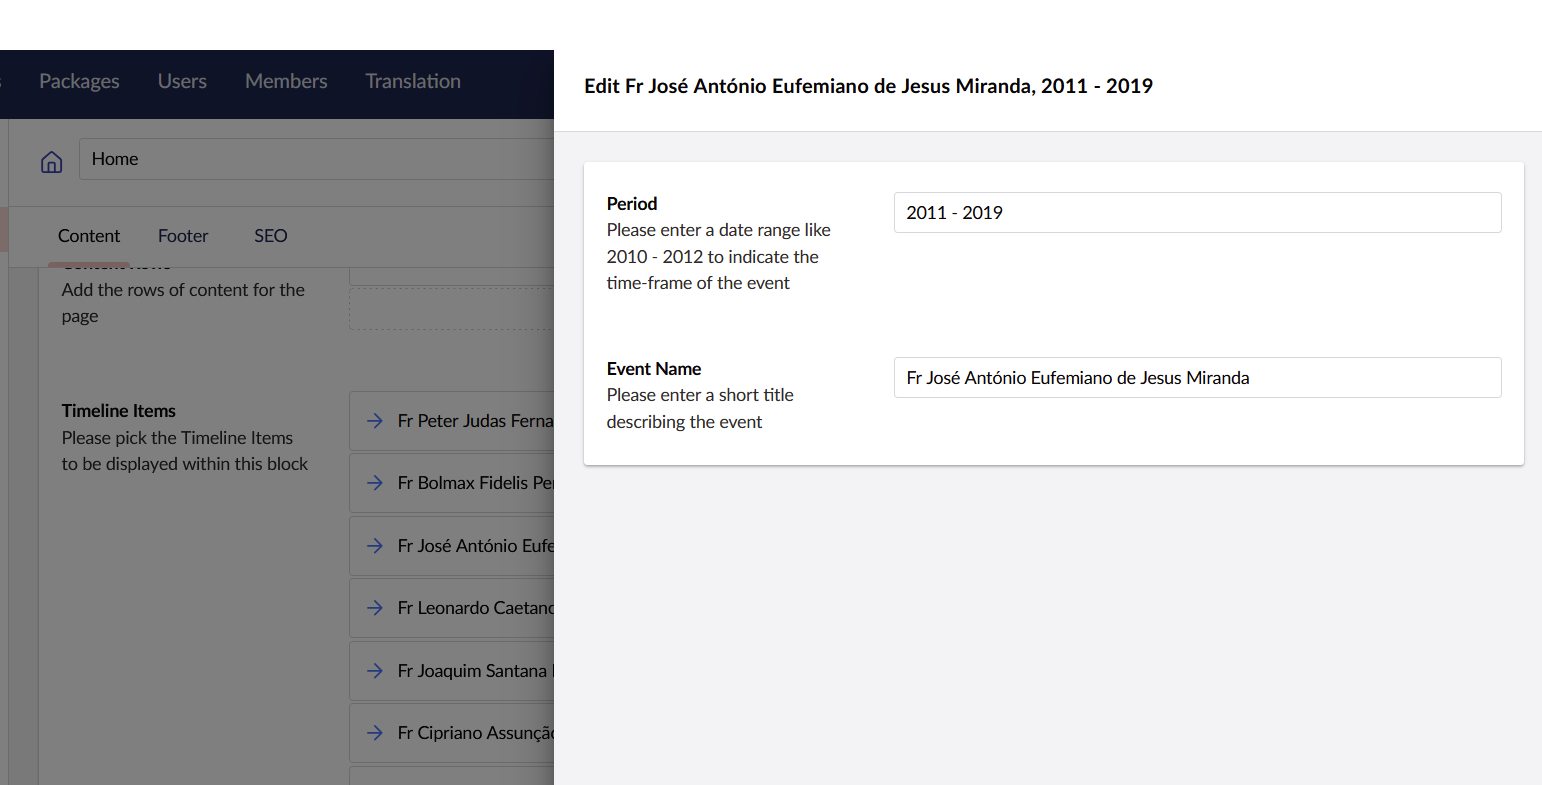
Go to the page in the Umbraco backoffice.
Open the Timeline Items property.
You should now see each imported entry appear as a block, populated with:
Event Name
Period
Bonus: Doing the Same in Umbraco 13?
If you're on Umbraco 13 and want to build Block List items programmatically, I’ve added a small code sample in this GitHub Gist: Umbraco 13 Block List Import Example
Wrapping Up
That's it! No manual clicking. No creating blocks one by one. The importer does it all for you.
Hopefully this little walkthrough gives you some ideas of how you can use the same approach in your own projects. If you spot ways it could be improved, or you’ve solved the same problem differently, I’d honestly love to hear about it.

![The [BlockList] Timeline datatype](https://07efacca-227c-4df1-a870-863f26a5f9a9.azurewebsites.net/media/0acaehct/image-1.png)