A great customization integrates seamlessly — and the Context API makes that possible. In this article, I’ll show you how it works and how you can make the most of it.
Imagine you’re at a restaurant, sitting at a table with your friend. You can speak with your friend because you share the same table. You can also talk to the waitress because you’re both inside the same restaurant.
But you can’t talk to guests at other tables or to staff in a completely different restaurant — your communication only works within the context you’re in. Because the other participants share this context, communication becomes much simpler.
For example, if you say you’d like “dish number 5,” the waitress immediately understands what you mean. There is no need to specify which restaurant’s menu you’re referring to.
This form of communication is how the various parts of the Umbraco Backoffice UI communicate. The system that enables this is called the Context API.
The various participants are called Contexts, and you, as an Extension, can communicate with all of them. But there is one limitation: you can only communicate with the Contexts your Extension is located within. Contexts that surround your code.
Similarly to the restaurant metaphor, you can only talk to your friend at the same table, and the waitress can only serve you when you are in the same restaurant.
A Context is a Controller that is provided for a certain scope. Such a scope is defined by the DOM, in other words, the component hierarchy. If your code is running from a Component within the scope, you can communicate with the Context; when you're outside, you cannot.
This limits you to only communicating with relevant parts of the application. Additionally, this makes it very easy to communicate with the relevant Controllers. You dont need to know what specifies your location, it's contextual.
The front-end architecture of v.14+ enables you to insert UI or logic into almost any spot you would want. And once you have succeeded in displaying it at the right place, you may want to communicate with its surroundings. This can be to existing parts of the Backoffice, other extensions that you brought in, or even extensions coming from other packages.
Doing so is easier and more flexible than before because of the Context API. Since nearly everything in the Backoffice communicates through this, it’s now available for others to use.
To help you learn how to communicate via the Context API, and inspire you on what can be achieved, this article will guide you through how the Context API works — How to start communicating, who can communicate to whom, and some examples of how such communication could look.
Talk to the Backoffice
If you like to alter the existing experience, such as adding initial data or implementing additional validation rules, it can be done via the Context API.
This is because all the logic of the Backoffice is publicly available and exposed as Contexts.
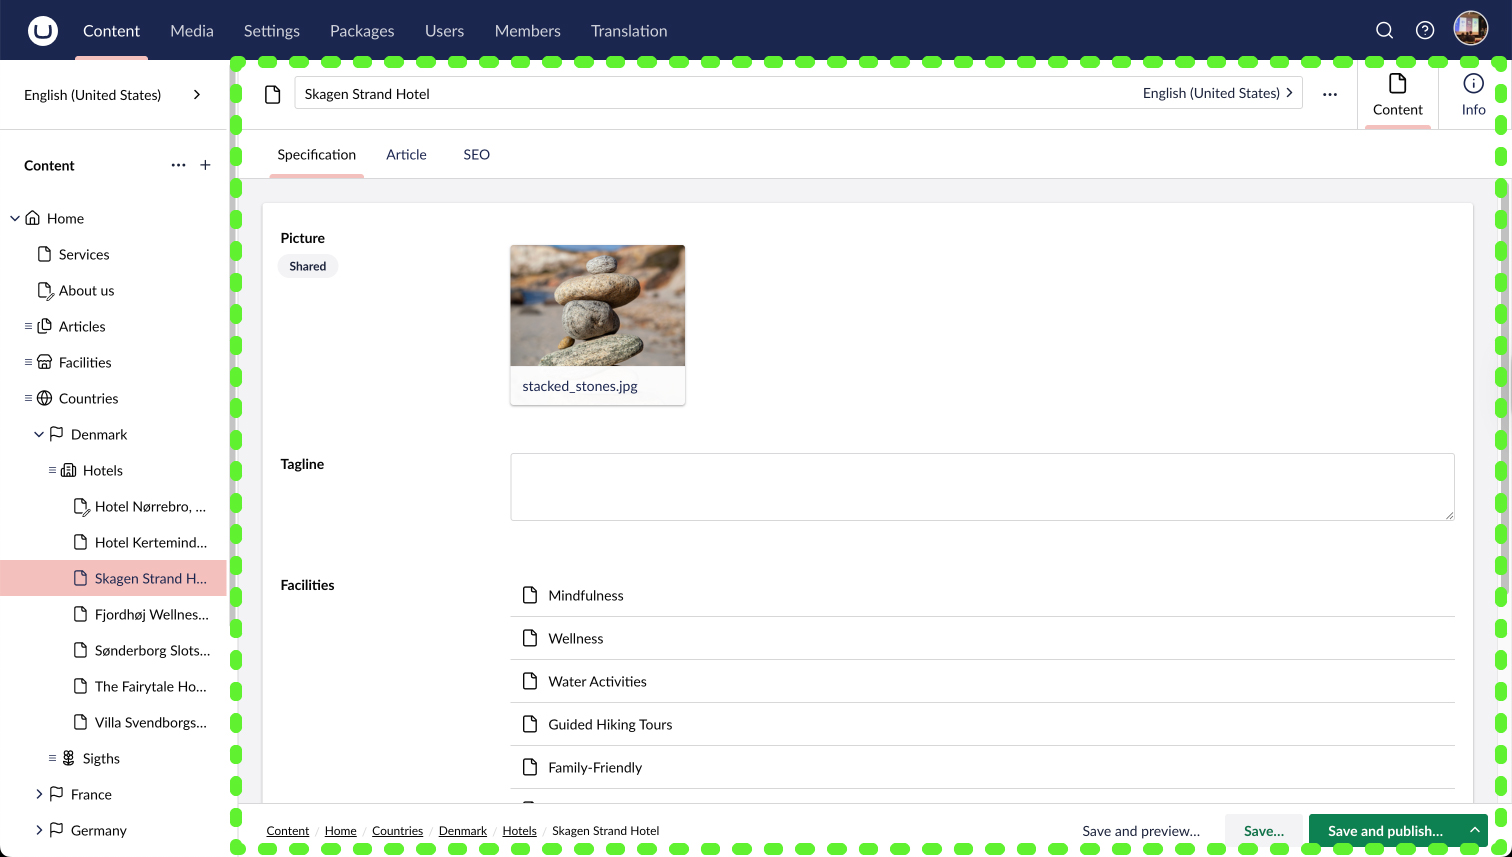
The editing experience of the Backoffice takes place in Workspaces. Workspaces are a generic term used for all the various spaces that contain an editorial experience. The primary one of Umbraco is the Document Workspace, which we use to create & edit Documents.
The main Controller of a Workspace is exposed as a Context; we refer to it as the Workspace Context. This enables anything within the Workspace to communicate with it.
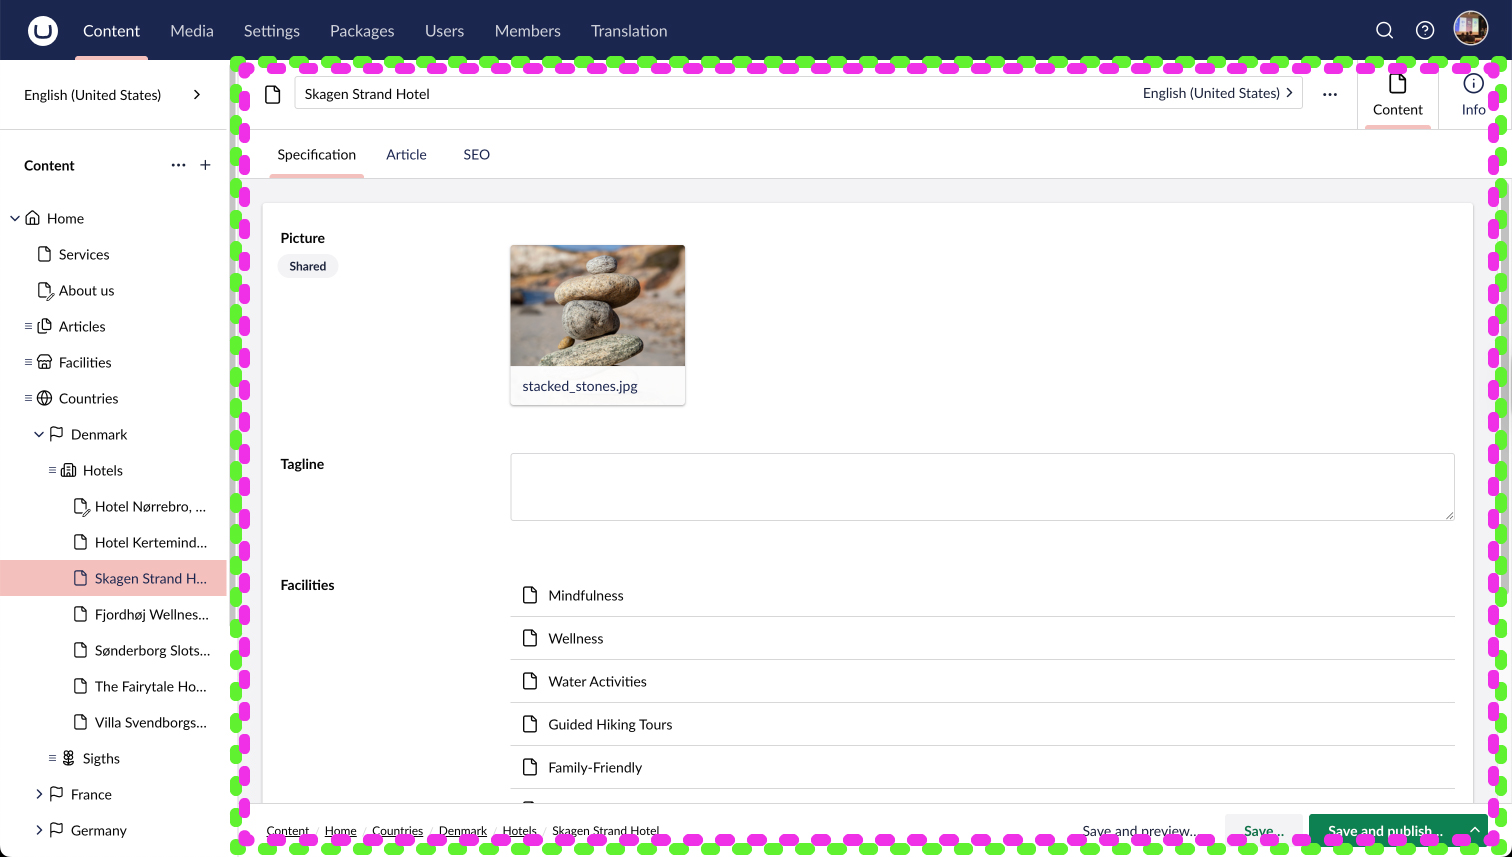
The workspace is the part highlighted by the green border. The context is available for the same scope.
To understand how it works and how you can take part, I will use the first input, the document name input, of the Document Workspace as an example.
The name input for a Document retrieves the name value from the Workspace Context, and when the user enters a new name, it updates the name of the Workspace Context.
The Workspace Context serves as the hub for the data of the entity being edited within.
Similarly to the name input, any UI or logic within the Workspace can also read or write data. The following example demonstrates how to set a default name for the document when creating a new document.
Document Name Customization
In this example, we will inject logic into a Workspace and then use the Context API to talk with the Document Workspace Context to set a name when a new Document is created.
The most general option for adding logic to a Workspace is via an Extension-Type called Workspace Context. This enables us to add a Controller in the same scope as Workspace Contexts.
Because our Controller will be initialized in the scope of the Workspace Context, it will be able to talk with the Document Workspace Context via the Context API.
The purple highlight demonstrates where our custom Workspace Context will appear and the green highlight represents the Document Workspace Context
First, let’s add a Controller as a Workspace Context Extension containing a console.log(‘hello world’) to verify that we have added the Controller successfully.
The rest of the article assumes you are comfortable adding Extension Manifests in v.14+. If you are new to this, then please read about Extension Manifests here.
Notice how Extension Conditions are used to declare when this extension should be initialized. In this case, we set it to appear when we are editing Documents.
The Workspace Context Extension-Type takes an API, which is the Controller implementation, a JS class:
import { UmbControllerBase } from "@umbraco-cms/backoffice/class-api";
import type { UmbControllerHost } from "@umbraco-cms/backoffice/controller-api";

// The Example Workspace Context Controller:
export class ExampleWorkspaceContextNameManipulation extends UmbControllerBase {
  constructor(host: UmbControllerHost) {
    super(host);

    console.log("Hello");
  }
}

// Declare a api export, so Extension Registry can initialize this class:
export { ExampleWorkspaceContextNameManipulation as api };
Once constructed, this will print “hello world” in our console, but only when we are creating a new Document.
Consume Context
Let’s continue the work of our Controller, making it consume the Workspace Context.
In this case, there is no need to limit the logic to only work for the Document Workspace Context, this should just as well work for the other Content Types, like Media and Members. Therefore, I will use the Context Token: UMB_CONTENT_WORKSPACE_CONTEXT
If you needed this only to consume the Document Workspace Context, then the token should be: UMB_DOCUMENT_WORKSPACE_CONTEXT
import { UmbControllerBase } from "@umbraco-cms/backoffice/class-api";
import type { UmbControllerHost } from "@umbraco-cms/backoffice/controller-api";
import { UMB_CONTENT_WORKSPACE_CONTEXT } from "@umbraco-cms/backoffice/content";
// The Example Workspace Context Controller:
export class ExampleWorkspaceContextNameManipulation extends UmbControllerBase {
constructor(host: UmbControllerHost) {
super(host);
this.consumeContext(UMB_CONTENT_WORKSPACE_CONTEXT, async (workspace) => {
await workspace?.isLoaded();
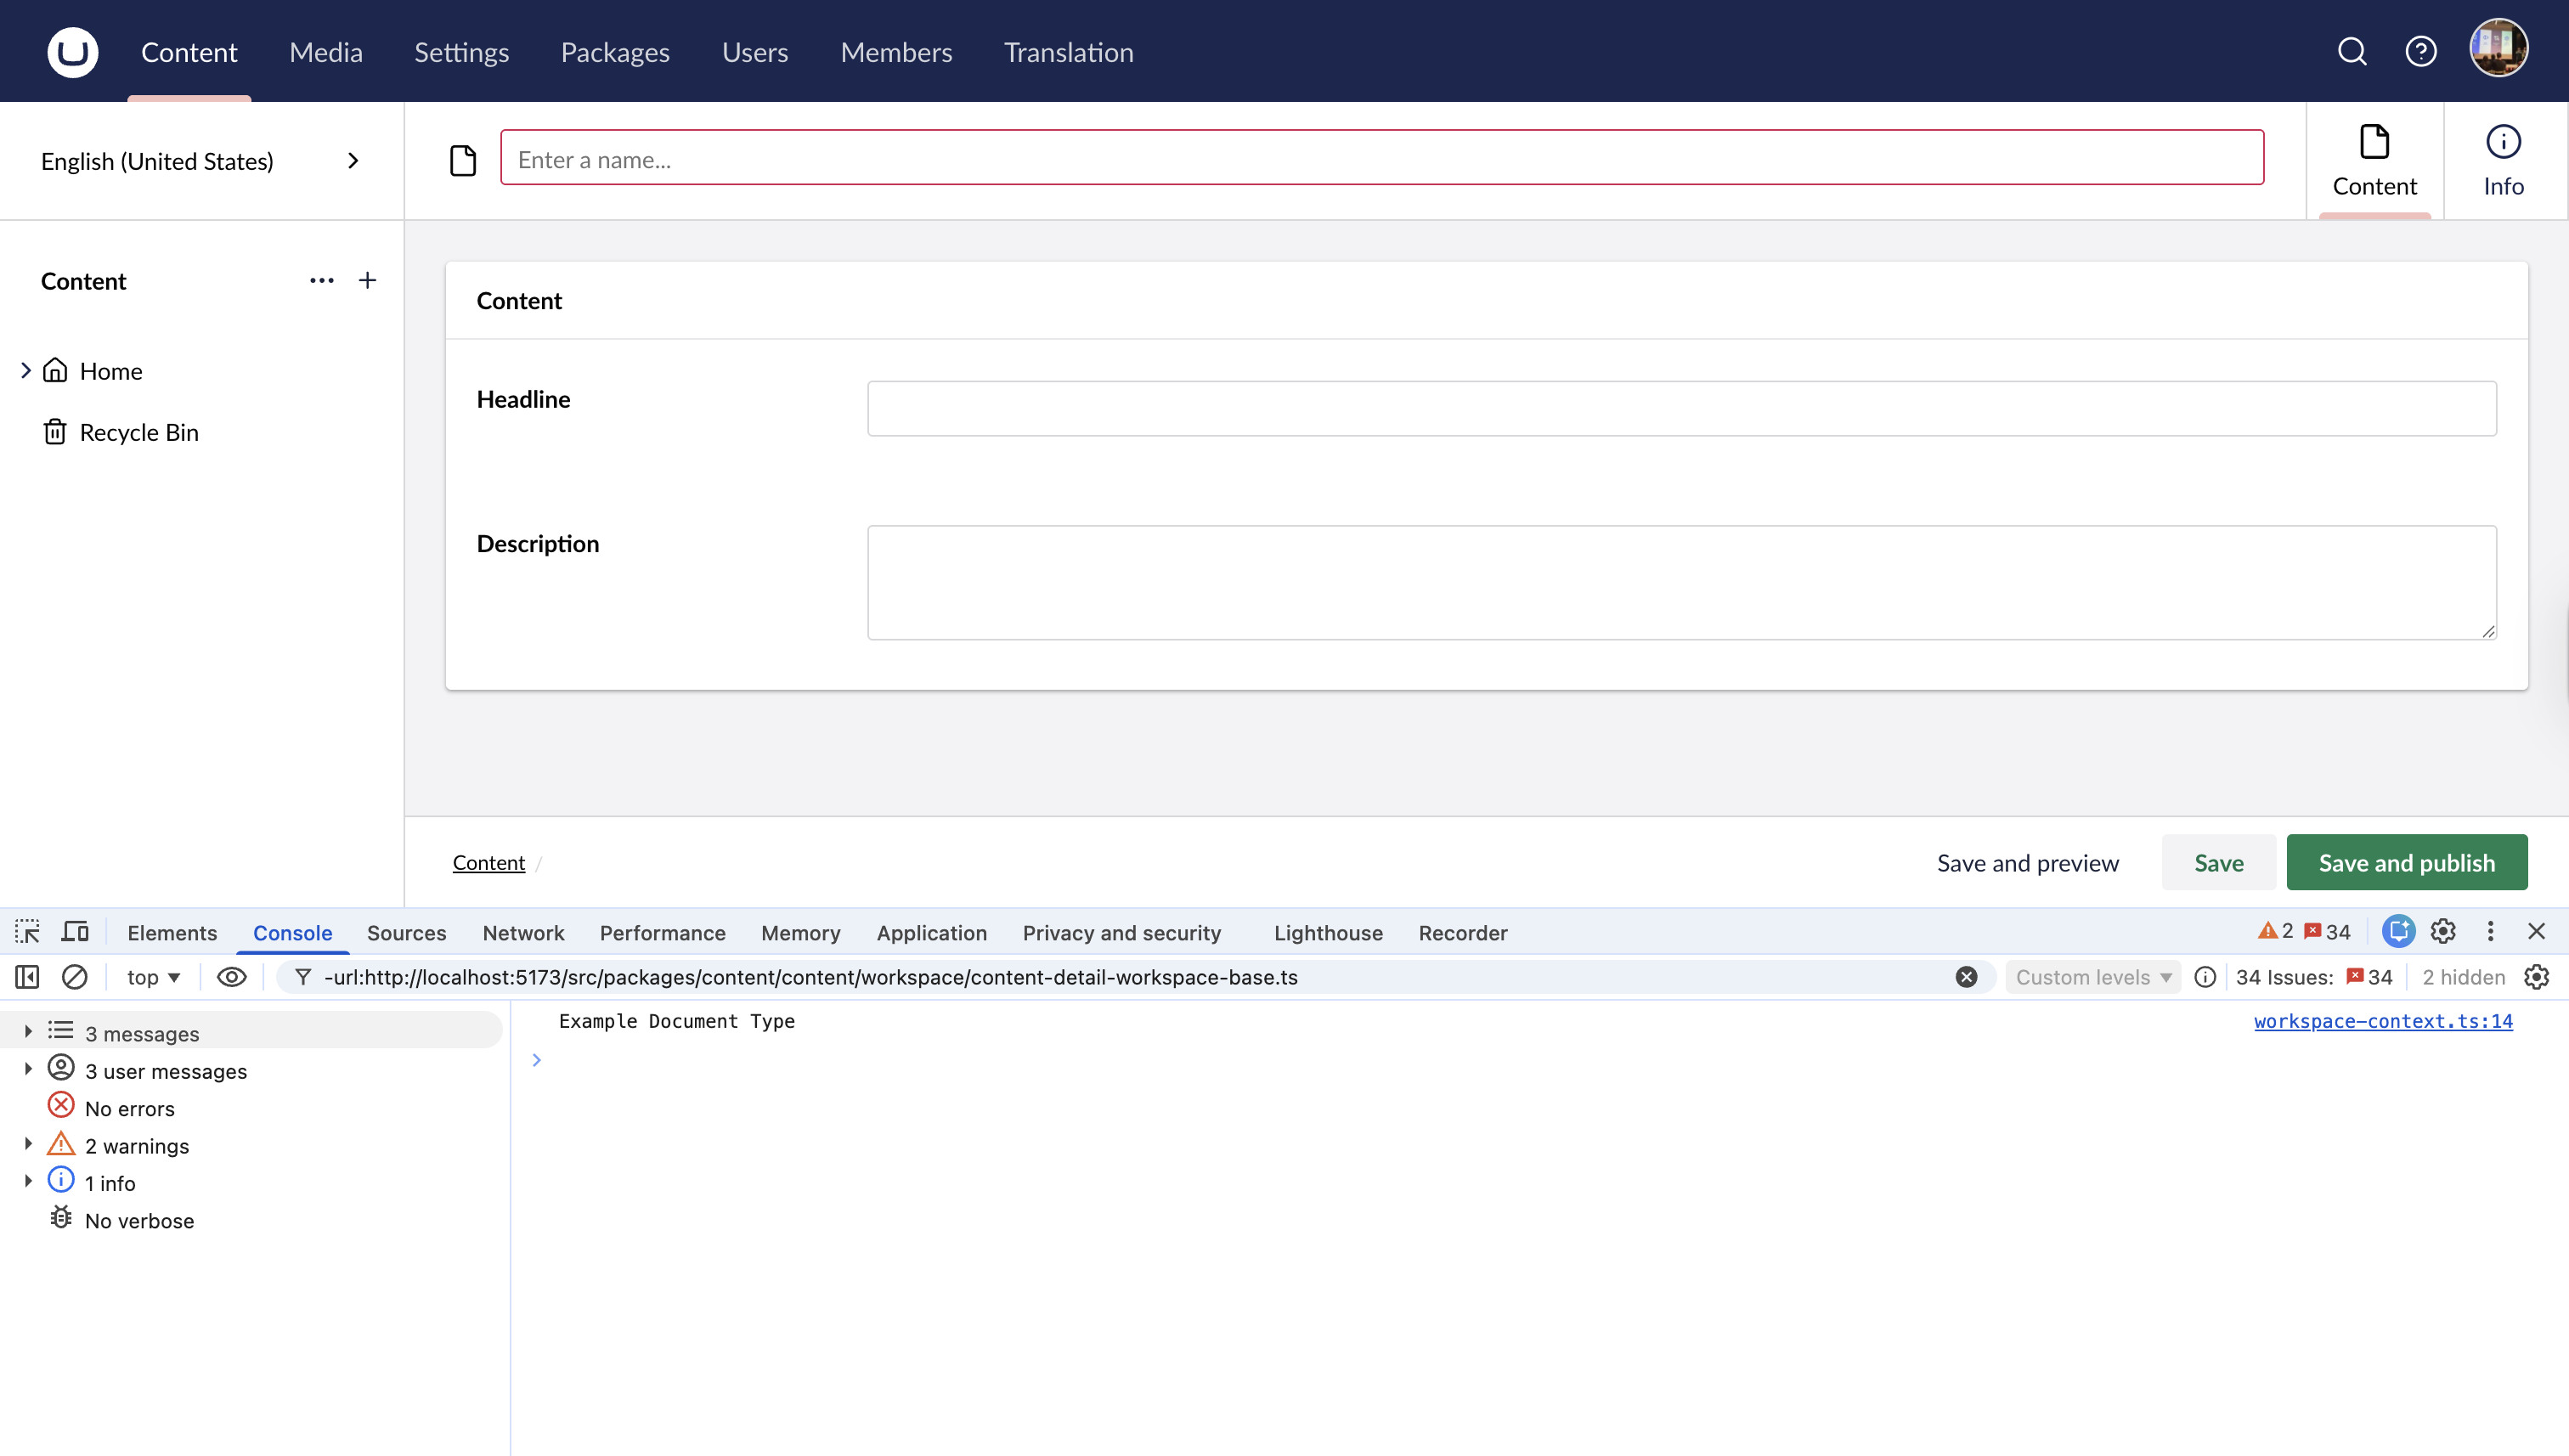
console.log(workspace?.structure.getOwnerContentTypeName());
});
}
}
// Declare a api export, so Extension Registry can initialize this class:
export { ExampleWorkspaceContextNameManipulation as api };
Notice that we now see the Document Type name logged in the console.
Now that we have established contact with the present Content Workspace Context, we have access to many things. Like reading data, setting data, and performing actions.
To finish this example, we will call the setName method on the Workspace Context:
import { UmbControllerBase } from "@umbraco-cms/backoffice/class-api";
import type { UmbControllerHost } from "@umbraco-cms/backoffice/controller-api";
import { UMB_CONTENT_WORKSPACE_CONTEXT } from "@umbraco-cms/backoffice/content";
import { UmbVariantId } from "@umbraco-cms/backoffice/variant";

// The Example Workspace Context Controller:
export class ExampleWorkspaceContextNameManipulation extends UmbControllerBase {
  constructor(host: UmbControllerHost) {
    super(host);

    this.consumeContext(UMB_CONTENT_WORKSPACE_CONTEXT, async (workspace) => {
      if (!workspace) return;
      await workspace.isLoaded();
      // Set the name if it's already empty (We do not want to overwrite if it's a Blueprint)
      // Notice we need to provide a Variant-ID to getName, as Document names are variant specific.
      // Here we get the Invariant name — this will need to be extended if you are looking to support multiple variants.
      const variantId = UmbVariantId.CreateInvariant();
      const name = workspace.getName(variantId);
      if (name === undefined) {
        const manipulatedName = `New Document - ${new Date().toLocaleDateString(
          "en-GB"
        )}`;
        workspace.setName(manipulatedName, variantId);
      }
    });
  }
}

// Declare a api export, so Extension Registry can initialize this class:
export { ExampleWorkspaceContextNameManipulation as api };
Communicate between extensions
Suppose you have two elements that are not within each other, and you would like them to communicate with each other. The Context API is also a good case for this, but you need to clarify what the scope of this logic should be. And once you have that clarified, you must establish a Context that acts as the mediator between them.
Such a Context will be similar to the one we did in the above example.
The following example will bring custom logic that other extensions will hook into.
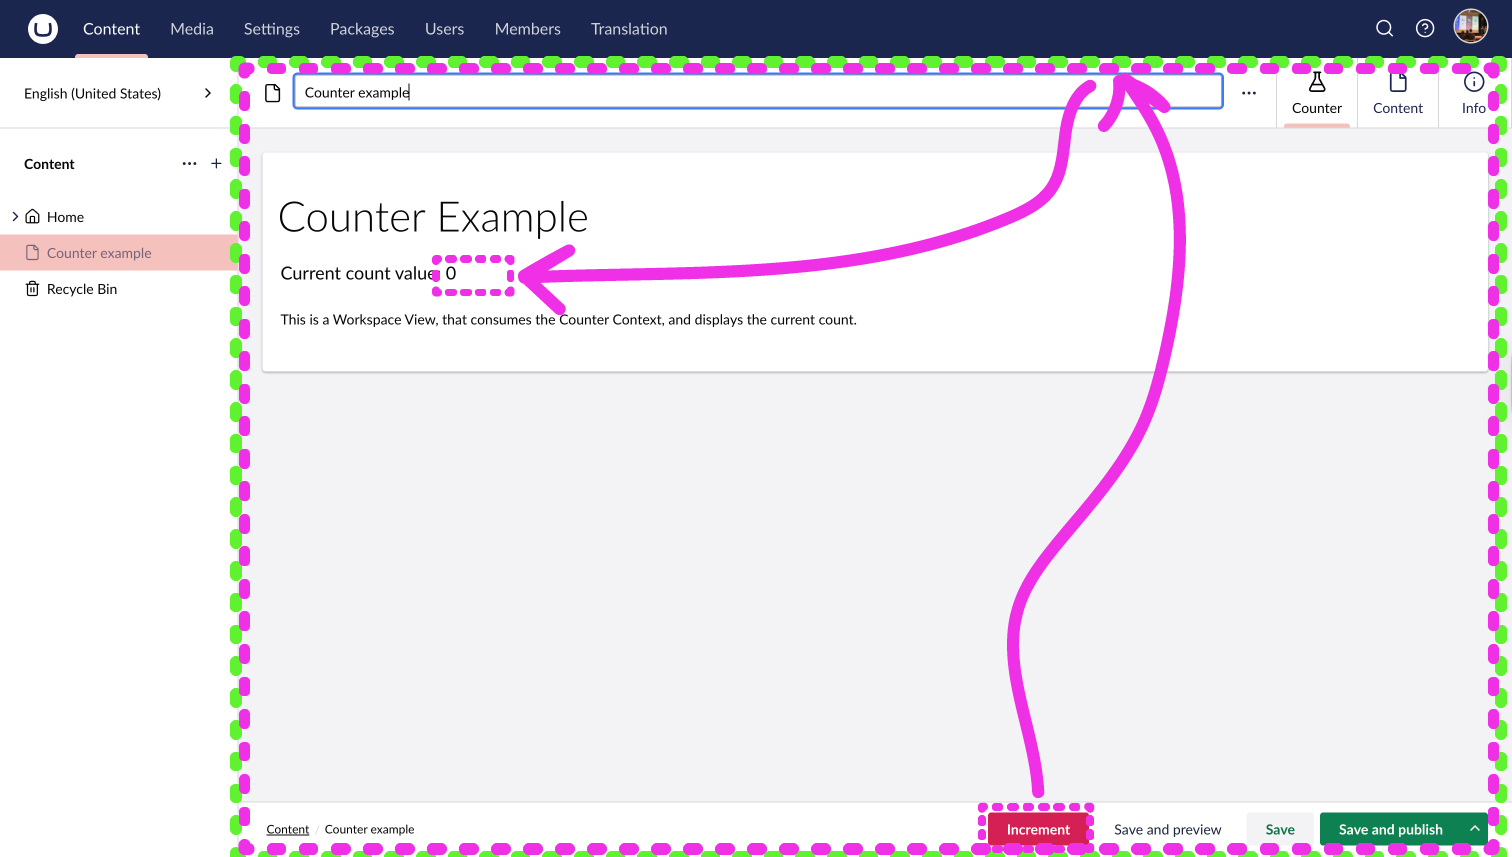
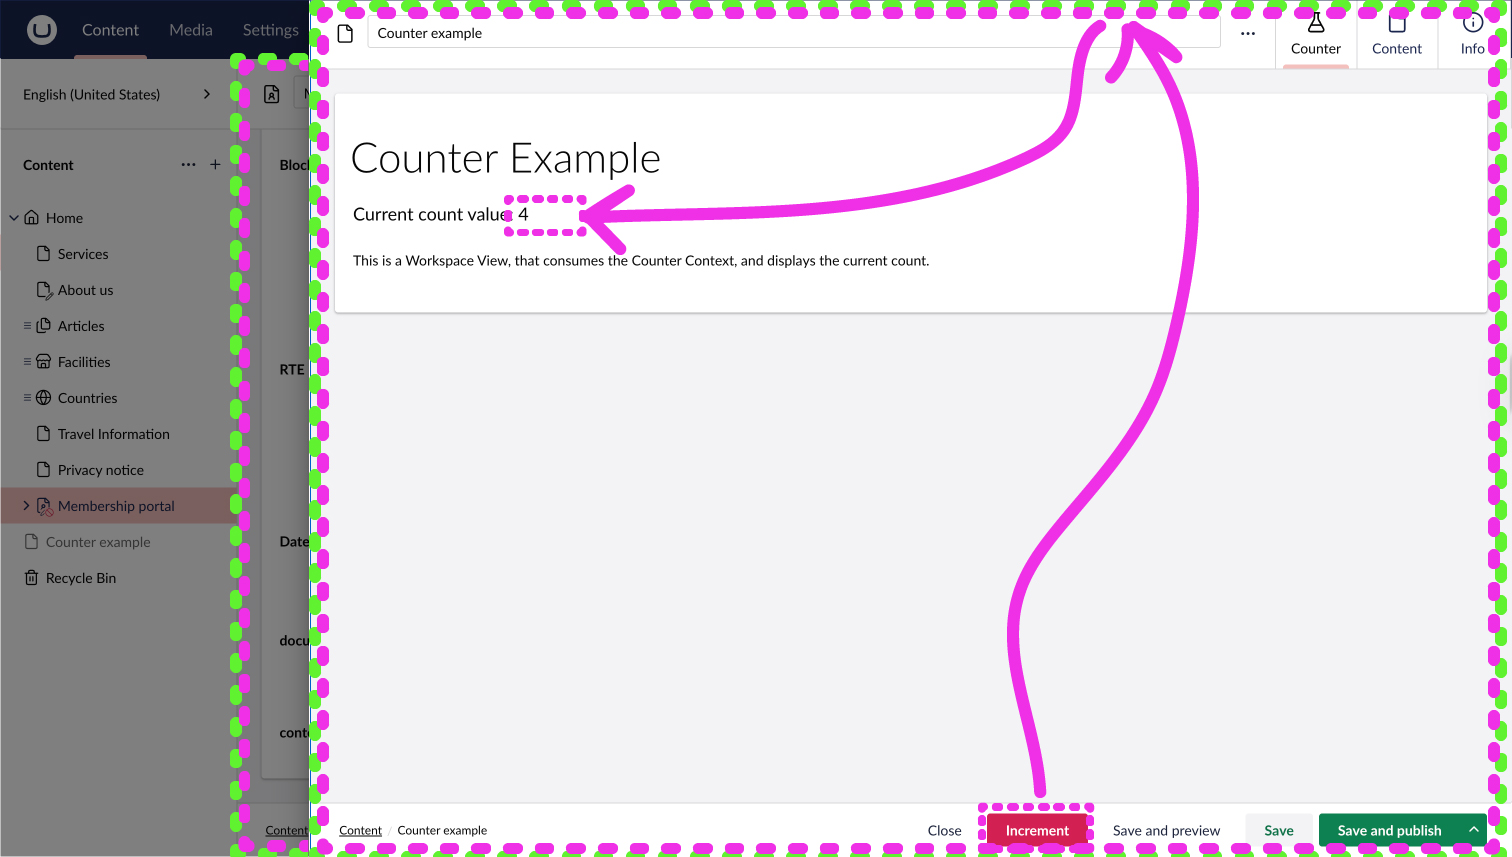
For this, we will make a Workspace Context that holds a Count. We will bring a Workspace Action that increases the count and a Workspace View that displays the current count.
The Workspace Action, seen in the bottom will communicate to our custom Workspace Context. The Workspace View will observe the current count and display it.
Similar to the previous example, we will set up a Workspace Context Extension. This time, the API will contain a State holding the current count number. Additionally, it will bring two methods, one for increasing the count and one for resetting.
This manifest is very similar to the one previously. Do notice this time I have only defined one Condition.
import { UmbContextBase } from "@umbraco-cms/backoffice/class-api";
import type { UmbControllerHost } from "@umbraco-cms/backoffice/controller-api";
import { UmbNumberState } from "@umbraco-cms/backoffice/observable-api";
import { EXAMPLE_COUNTER_CONTEXT } from "./counter_workspace_context_token.js";

// The Example Workspace Context Controller:
export class ExampleWorkspaceContextCounterElement extends UmbContextBase {
  // We always keep our states private, and expose the values as observables:
  #counter = new UmbNumberState(0);
  readonly counter = this.#counter.asObservable();

  constructor(host: UmbControllerHost) {
    super(host, EXAMPLE_COUNTER_CONTEXT);
  }

  increment() {
    this.#counter.setValue(this.#counter.value + 1);
  }

  reset() {
    this.#counter.setValue(0);
  }
}

// Declare a api export, so Extension Registry can initialize this class:
export { ExampleWorkspaceContextCounterElement as api };
Different from the above, our class is no longer just an Umbraco Controller, but I made it an Umbraco Context. Meaning now it will be provided as a Context available for others to consume via the Context-API.
To consume this custom Workspace Context, we use a Context Token. Notice how the Context Token is used as the second argument to `super` in the Workspace Context class above.
import { UmbContextToken } from "@umbraco-cms/backoffice/context-api";
import type { ExampleWorkspaceContextCounterElement } from "./counter_workspace_context_api.js";

// Declare a Context Token that other elements can use to request the WorkspaceContextCounter:
export const EXAMPLE_COUNTER_CONTEXT =
  new UmbContextToken<ExampleWorkspaceContextCounterElement>(
    "UmbWorkspaceContext",
    "example.workspaceContext.counter"
  );
This Context Token is used both by the Context itself. And by the code that will consume this Context.
This gives Type Safety between the Context and the Consumer.
Next, let's add a Workspace Button that tells our Workspace Context to increase the count:
import { EXAMPLE_COUNTER_CONTEXT } from "./counter_workspace_context_token.js";
import {
  UmbWorkspaceActionBase,
  type UmbWorkspaceAction,
} from "@umbraco-cms/backoffice/workspace";

// The Example Incrementor Workspace Action Controller:
export class ExampleIncrementorWorkspaceAction
  extends UmbWorkspaceActionBase
  implements UmbWorkspaceAction
{
  // This method is executed when the user clicks the button:
  override async execute() {
    const context = await this.getContext(EXAMPLE_COUNTER_CONTEXT);
    if (!context) {
      throw new Error("Could not get the counter context");
    }
    context.increment();
  }
}

// Declare a api export, so Extension Registry can initialize this class:
export { ExampleIncrementorWorkspaceAction as api };
The Action API does not need to consume the Workspace Context, as it first needs a reference when the Action gets executed. Therefore, it’s first necessary to get the Context when the action gets executed.
Next, let's add a Workspace View that displays the count.
This Manifest points to an element, which is a JavaScript Web Component. We will write the Element with Lit, as that simplifies the code for writing a web component.
If you are new to Lit, then please read this Lit introductory article on Umbraco Docs.
import { EXAMPLE_COUNTER_CONTEXT } from "./counter_workspace_context_token.js";
import { UmbTextStyles } from "@umbraco-cms/backoffice/style";
import {
  css,
  html,
  customElement,
  state,
  LitElement,
} from "@umbraco-cms/backoffice/external/lit";
import { UmbElementMixin } from "@umbraco-cms/backoffice/element-api";

@customElement("example-counter-workspace-view")
export class ExampleCounterWorkspaceView extends UmbElementMixin(LitElement) {
  @state()
  private count = 0;

  constructor() {
    super();
    this.consumeContext(EXAMPLE_COUNTER_CONTEXT, (context) => {
      this.observe(context?.counter, (count) => {
        this.count = count;
      });
    });
  }

  override render() {
    return html`
      <uui-box class="uui-text">
        <h1 class="uui-h2" style="margin-top: var(--uui-size-layout-1);">
          Counter Example
        </h1>
        <p class="uui-lead">Current count value: ${this.count}</p>
        <p>
          This is a Workspace View, that consumes the Counter Context, and
          displays the current count.
        </p>
      </uui-box>
    `;
  }

  static override styles = [
    UmbTextStyles,
    css`
      :host {
        display: block;
        padding: var(--uui-size-layout-1);
      }
    `,
  ];
}

export default ExampleCounterWorkspaceView;

declare global {
  interface HTMLElementTagNameMap {
    "example-counter-workspace-view": ExampleCounterWorkspaceView;
  }
}
This Web Component consumes our custom Workspace Context, then it Observes the count, and sets the value on a property called count. Because the value of the count is set to a property that is declared with the Lit @state decorator, the Web Component will be updated when the observation receives a new count.
This gives an experience where the user can click the ‘increase’ action to increase the count in the Context and then the current count can be viewed inside the Workspace View:
I hope you can imagine how the counting logic could be replaced with anything of your interest. And how the concept can be applied to many other parts of the application.
Life cycle
A Workspace represents the scope of editing a single entity. And because multiple workspaces can be open at the same time, the Context-API is a gift that ensures your logic stays in scope with the related part.
The counter example from above would be initialized individually for each Workspace, helping you avoid conflicts in a situation like above.
Bringing logic via one of the specific extension types establishes a life cycle for your logic. When the user navigates to the relevant place, it will be initialized. And once the user leaves that place, it will be destroyed.
In this way, you can focus on the logic of your controller without worrying about the life cycle or having multiple instances running.
This means that when you bring a custom Workspace Context, your logic can focus purely on the entity of that workspace.
Summary
When you're looking to add logic to the Backoffice, then carefully consider the scope of the logic. This sets the scope for when it is initialized and what other Contexts it can consume.
If something needs to be integrated with the logic, then provide the Controller itself as a Context. Then any component within the scope can communicate with it.