Theme:

From AngularJS to Web Components: My Journey with the New Umbraco Backoffice

Join me as I navigate the switch from AngularJS to web components in Umbraco's new backoffice, tackling the learning curve and uncovering the perks of modern tools.

My job is primarily backend, but for years I have also worked with extensions in Umbraco because most frontenders I know will not touch AngularJs if they can get away with it!

So when I hear terms like Vite, Lit, Node Server, Manifests, state management, webcomponents, etc. they are pretty foreign to me.

So what to do?

I was lucky enough to get a spot at a workshop being held before Umbraco's Codegarden earlier this year, where two community members - Phil Whittaker and Jon Whitter - held a workshop introducing people in how to create extensions in the new backoffice.

The workshop was great, and I left feeling a bit more motivated to try it out, but I also left with an overwhelming feeling of it now being a much much bigger task to create an extension.

I was introduced to a pattern with repositories, stores, controllers, etc., and for me who was used to having 1-2 AngularJS controllers with pretty basic JavaScript it sounded like a big change.

Which begs the question...

How big are the changes, really?

This was a question I set out to answer after feeling pretty discouraged by the learning curve. After going through some documentation I decided to just try to make extensions I had made before in earlier versions of Umbraco and then rewriting them into webcomponents.

And thus the Extension Comparisons repo was made: https://github.com/jemayn/ExtensionComparisons

In this repo I've set up a solution with 4 projects:

  1. Website running Umbraco 13
  2. Razor class library (RCL) for extensions to the v13 website
  3. Website running Umbraco 14
  4. RCL for extensions to the v14 website
Note

RCLs take all C# code and compiles it into a DLL for your website, and takes all assets in the wwwroot folder and place them into wwwroot in the website by default, but the output path can be changed via settings.

This makes it perfect for creating extensions, as after a quick setup the files will automatically be placed in the right spots, and you can keep your extension isolated from other code.

In the repo I have a few basic examples of doing the same thing in v13 and v14.

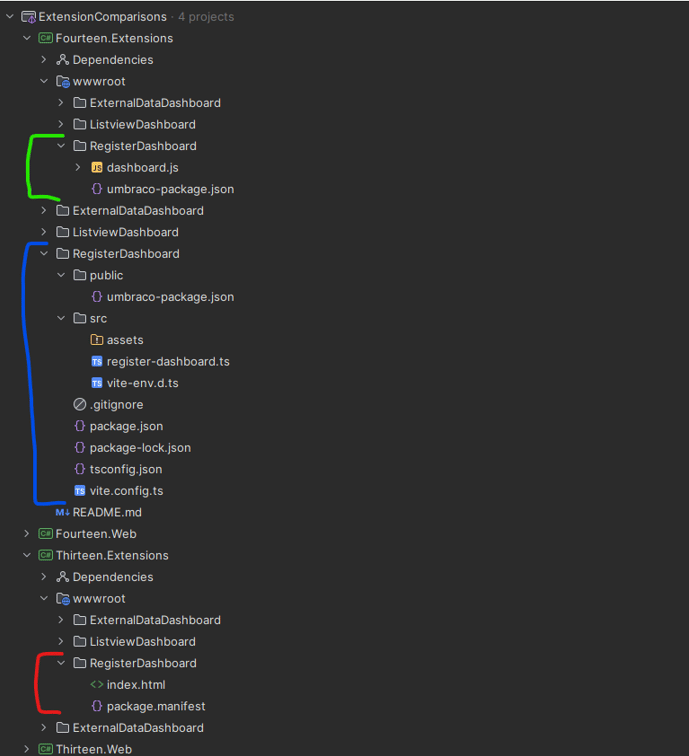
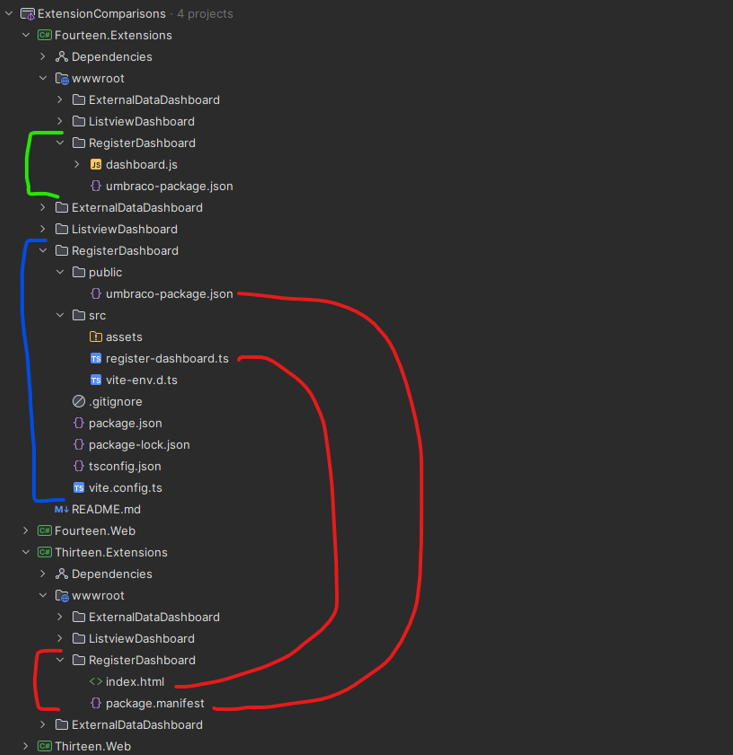
So if I want to see the difference in how to register a simple dashboard I have the same example for both versions:

Solution structure

The red part is the v13 code - in this case it is a package.manifest to register the extension and a view to show for the dashboard.

The green part is the compiled v14 code - in this case it is an umbraco-package.json file which is the replacement for package.manifest, and a compiled js file with the webcomponent for our dashboard.

The blue part is the npm package that is compiled into the green part, and it is when seeing this large amount of files that translates to 2 files before that I was sceptical.

But then again, most of this has been auto generated through the command:

npm create vite@latest Client -- --template lit-ts

So even if there are a bunch of files, most of them are config and build related files, that I haven't touched after generation, and some of them have only been changed to fx show where the build output should be, in the end the web component file - register-dashboard.ts contains both a javascript controller and the view for it, so in this case we only really care about what is in these files after the initial setup:

Comparing file structure in old vs new extensions

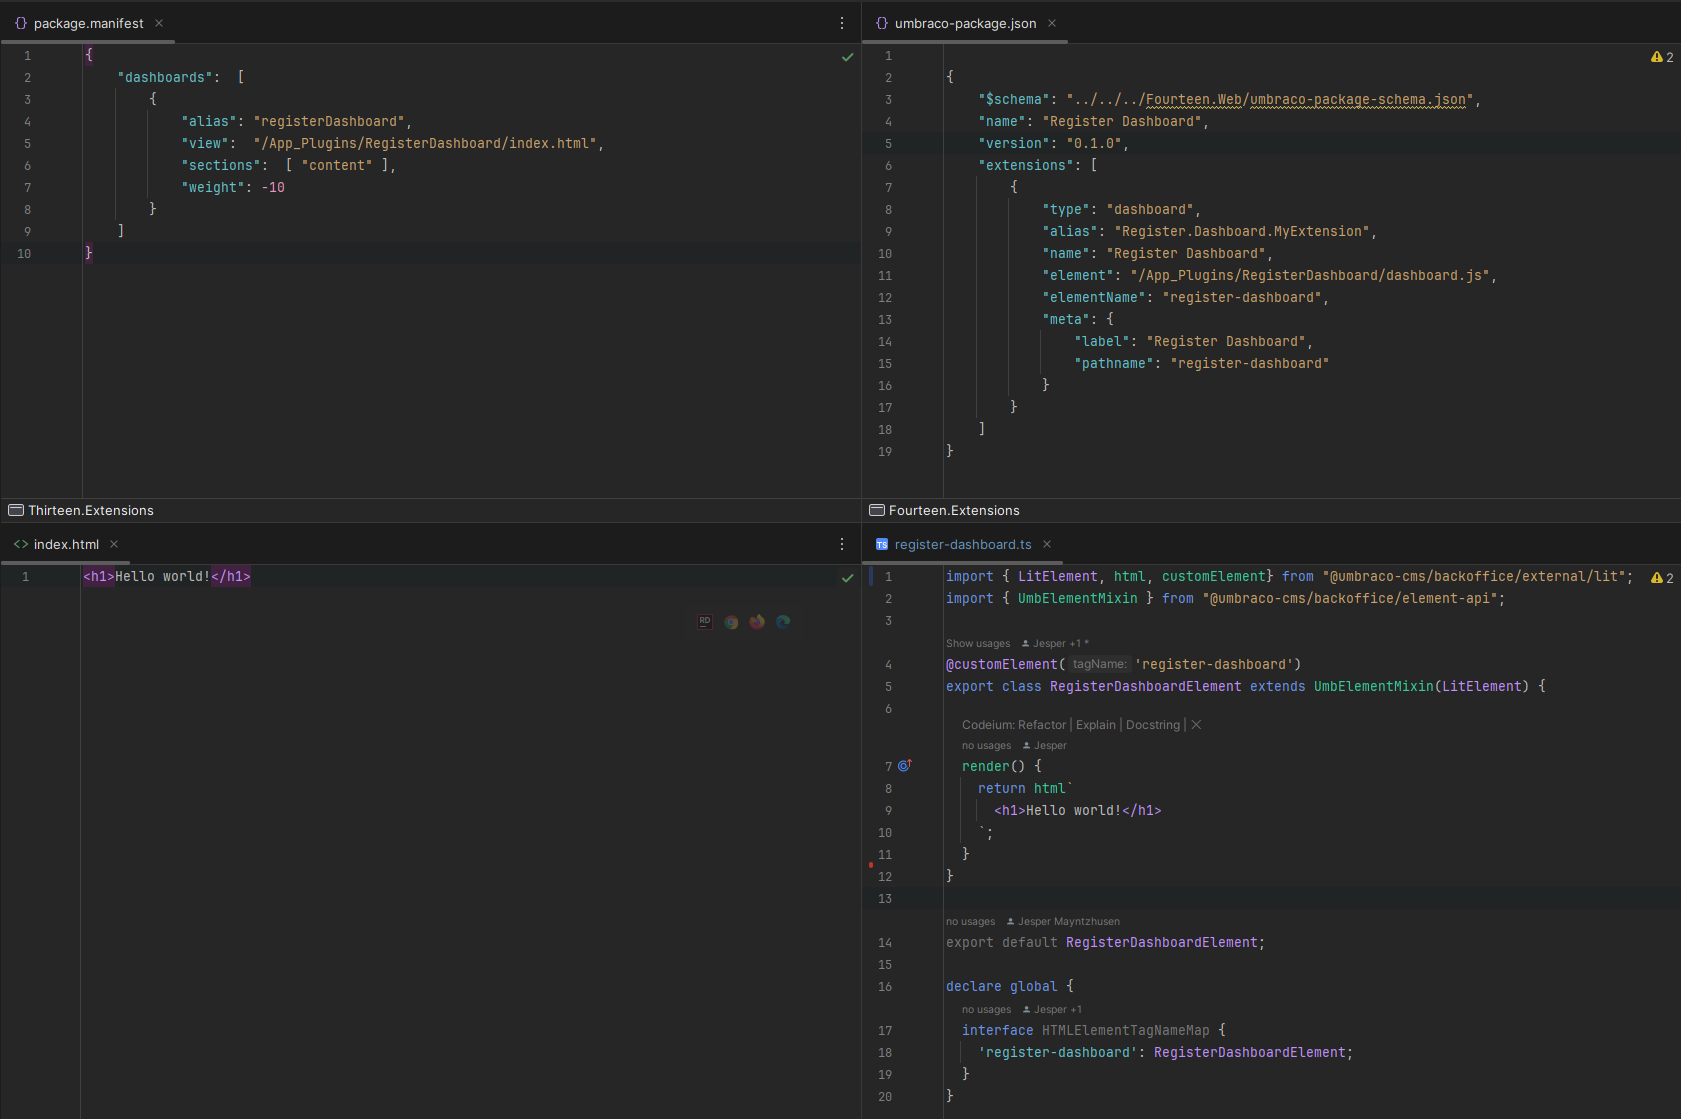
When looking at what is in those files it is also not that different:

Comparing extension files between versions

The v14 way on the right is a bit more verbose, but also has schema and typesafety so it is actually a lot easier to work with.

Feel free to browse the different examples and their differences in the repo: https://github.com/jemayn/ExtensionComparisons

Let's talk about some of my findings so far.

Very different - Setting up an extension

The old way

The basic steps for registering an extension used to be these:

  1. Create a package.manifest file in the App_Plugins folder
  2. Register the type of extension you want based on the package.manifest schema
  3. Point to an entrypoint view for the extension
  4. Register any additional CSS/JS needed (typically at least an AngularJS controller used in the view)

This means that it was quite fast to get something up and running, but it was also "just" HTML and JavaScript where you could use AngularJS and make use of Umbraco's AngularJS services and components if you happened to know how to call them - the documentation was sparse and there were no automated help or typesafety for it.

The new way

The basic steps for registering an extension are now these:

  1. Run npm create vite@latest Client -- --template lit-ts to start a new node project for your extension
  2. Run npm install
  3. Run npm install -D @umbraco-cms/backoffice
  4. Remove all unneeded svg and view files added with the standard example code
  5. Add an umbraco-package.json and register the type of extension you need, point it to your web component file
  6. Create a new vite.config.ts, make sure to set the output location to somewhere where it can be placed into App_Plugins, also make sure to exclude Umbracos packages in the build as they are already available in the backoffice
  7. Remove the example code in the web component file and replace with your extension code

This requires a bit more setup, but that setup also has good scaffolding tools available to generate the boilerplate code you need to be able to work with a webcomponent.

Very different - Fetching data from your own API controller

The old way

This is how you used to be able to call an API controller from your extension and ensure only calls coming from the backoffice were authorized:

Make a controller inheriting from UmbracoAuthorizedApiController


public class SecureApiController : UmbracoAuthorizedApiController 
{
    [HttpGet]
    public string GetMessage() 
    {
        return "This is a message from a secure API controller!";
    }
}

It would automatically route to domain/umbraco/backoffice/api/[controllername]/[methodname], so could call the above example like this from an AngularJs controller:


$http.get("backoffice/api/SecureApi/GetMessage").then(function (response) {
    vm.message = response.data;
});

This was easy, but it also requires manually matching the URL, and when it didn't connect for some reason it was a pain to debug why!

The new way

Setting this up is quite a bit more complicated than it used to be, however, once its setup it is super easy and quick to update our client whenever the backend APIs change!

Umbracos controllers have aligned more with standard .NET, and we can now use a standard controller with some swagger attributes and an Umbraco authorization attribute to only allow backoffice users access:

Setting up a controller:


[ApiController]
[BackOfficeRoute("umbracoextensions/api/v{version:apiVersion}")]
[ApiVersion("1.0")]
[Authorize(Policy = AuthorizationPolicies.SectionAccessContent)]
[ApiExplorerSettings(GroupName = "Umbraco.Extension")]
[MapToApi("Umbraco.Extension")]
public class SecureApiController : ControllerBase
{
    [HttpGet("getMessage")]
    public string GetMessage() 
    {
        return "This is a message from a secure API controller!";
    }
}

Add the controller to Swagger:


public class Composer : IComposer
{
    public void Compose(IUmbracoBuilder builder)
    {
        builder.Services.Configure<SwaggerGenOptions>(opt =>
        {
            opt.SwaggerDoc("Umbraco.Extension", new OpenApiInfo
            {
                Title = "Umbraco ExtensionBackoffice API",
                Version = "1.0",
            });

            opt.OperationFilter<UmbracoExtensionOperationSecurityFilter>();
        });
    }
}

public class UmbracoExtensionOperationSecurityFilter : BackOfficeSecurityRequirementsOperationFilterBase
{
    protected override string ApiName => "Umbraco.Extension";
}

Now that the controller is in Swagger we can generate a TypeScript client automatically based on the swagger definition by using a node package:


npm install @hey-api/client-fetch -D
npm install @hey-api/openapi-ts -D
npm install cross-env -D

And then adding a new command to the package.json so we can just run it if the C# API changes then it will update the TS client based on the swagger changes:


"scripts": {
  ...,
  "generate": "cross-env NODE_TLS_REJECT_UNAUTHORIZED=0 openapi-ts -i https://localhost:44372/umbraco/swagger/Umbraco.Extension/swagger.json -o src/client -c @hey-api/client-fetch"
},

Now we have a TS client, but we need to add some logic to our extension to ensure our required auth token is passed along on requests otherwise it will not work. For that there is a new extension type called entrypoint, which is registered like this in the umbraco-package.json:


"extensions": [        
    {
        "type": "entryPoint",
        "alias": "ExternalData.EntryPoint.MyExtension",
        "name": "External Data Entry Point",
        "js": "/App_Plugins/ExternalDataDashboard/externaldatadashboard.js"
    }
]

And the JS it points to is then a compiled version of:


import { UmbEntryPointOnInit } from '@umbraco-cms/backoffice/extension-api';
import { ManifestDashboard } from '@umbraco-cms/backoffice/extension-registry';
import { UMB_AUTH_CONTEXT } from '@umbraco-cms/backoffice/auth';
import { client } from './client';

export const onInit: UmbEntryPointOnInit = async (_host, extensionRegistry) => {

    _host.consumeContext(UMB_AUTH_CONTEXT, async (auth) => {
        if (!auth) return;

        const config = auth.getOpenApiConfiguration();
        client.setConfig({
            baseUrl: config.base,
            credentials: config.credentials
          });

          client.interceptors.request.use(async (request, _options) => {
            const token = await config.token();
            request.headers.set('Authorization', `Bearer ${token}`);
            return request;
          });
    });
};

Where it takes the UMB_AUTH_CONTEXT which is part of the backoffice and gets an authentication token that is added onto all requests.

This is definitely more work, but once it's done it is so very nice to be able to have a generated client for all API requests with proper TypeScript models returned!

Somewhat different - Controller structure

The old way

You used to have a view with some HTML and some AngularJS tags to have enriched content based on a controller.

Within the controller you could declare properties and functions that could then be used within the view based on binding the controller to that view.

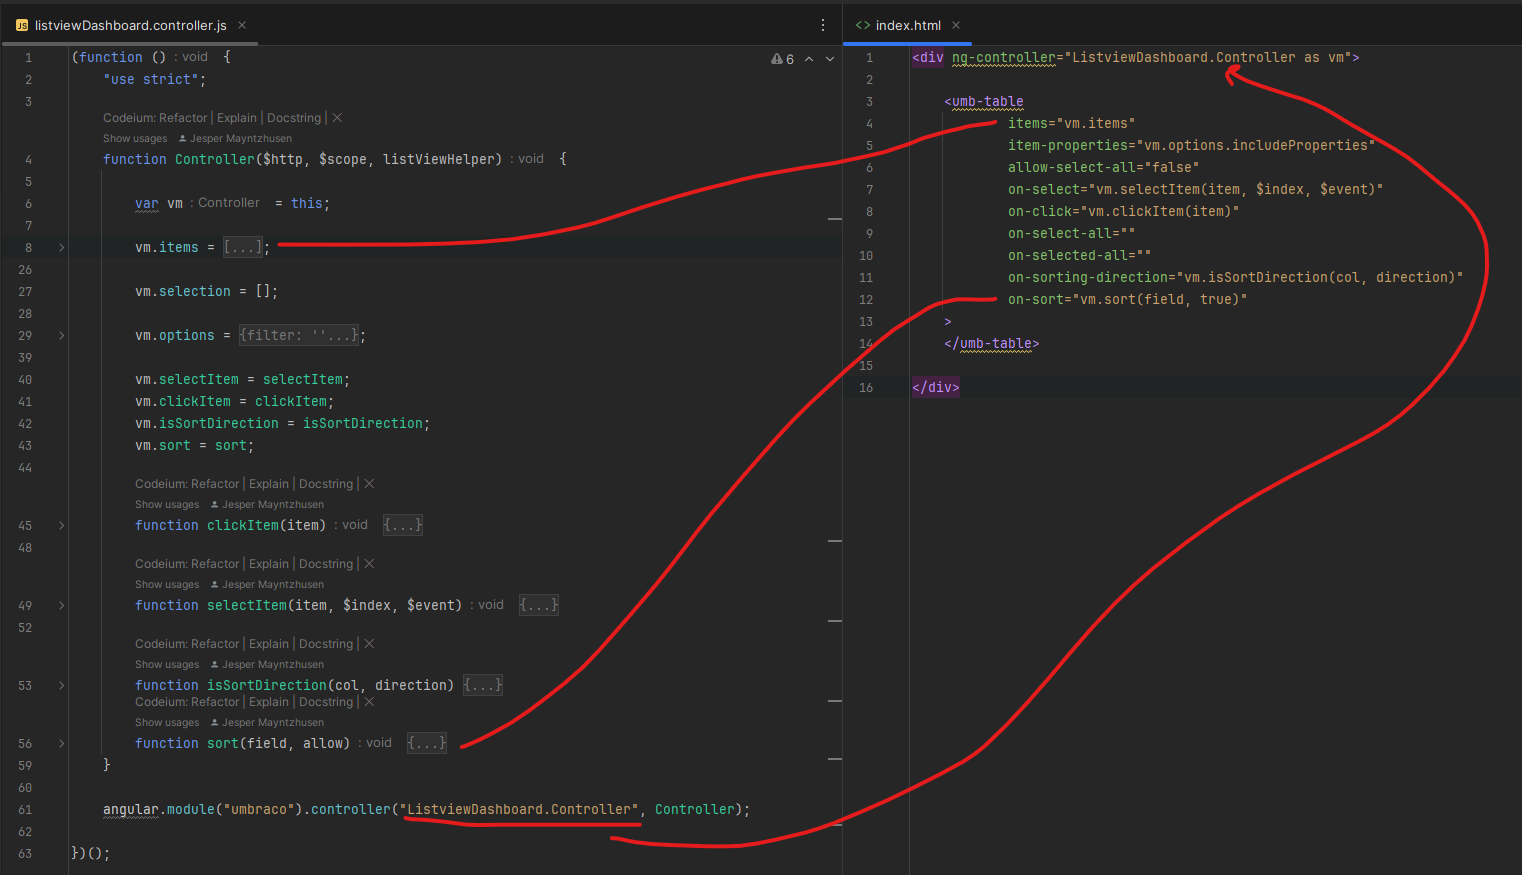
So if you tried e.g. to create a custom listview you would have something like this where based on function names and binding the controller to the view you could use your controller properties and functions within your view:

Binding properties in AngularJS

The new way

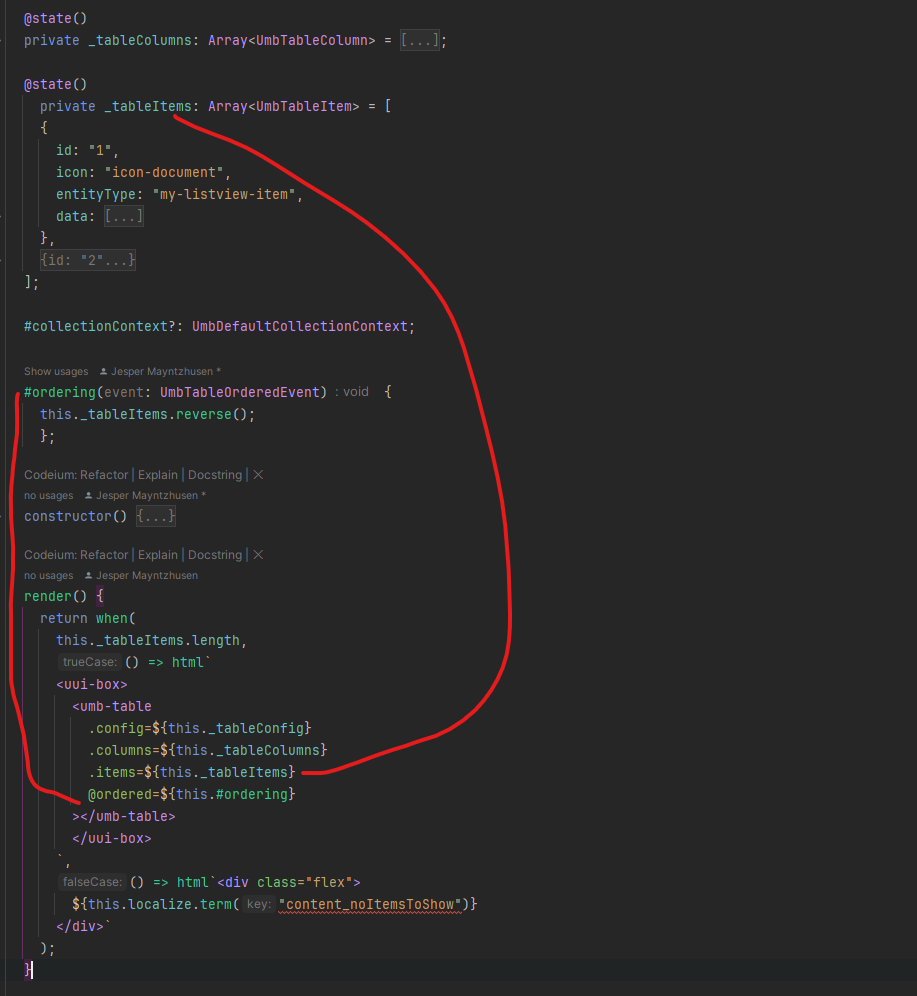
Now everything is in one web component, where besides your JS properties and functions you will also have a default render and styles function for HTML and CSS, within which you can add your JavaScript properties in a very similar fashion to what AngularJS had:

Binding properties in Lit component

Tip

One important thing to consider is how easy it is in the new way to componetize your extension.
It was very common before to put large amounts of code into a view and controller, but now that everything is web components you should really consider creating smaller components that are used within the "main" one, especially if you have some reusable components that are duplicated!

Basically the same - Development process

The old way

In the old backoffice there was no need to build your files, just point to the view, JS and CSS files you want to include and start adding things to them.

The new way

Now your files need to be built into a webcomponent, but once that is set up you can add an npm run watch command to have it auto compile your code, so you essentially have the same development experience except it will now also tell you if it cannot build your files so you will get errors quicker.

Basically the same - Reusing Umbraco components

The old way

For extensions to the old backoffice you could reuse Umbracos AngularJS components, if you wanted to resuse for example a table you could go find the umb-table component in the AngularJS docs here: https://apidocs.umbraco.com/v13/ui/#/api

Then add some code that looks like this:


<umb-table
    items="vm.items"
    item-properties="vm.options.includeProperties"
    allow-select-all="false"
    on-select="vm.selectItem(item, $index, $event)"
    on-click="vm.clickItem(item)"
    on-select-all=""
    on-selected-all=""
    on-sorting-direction="vm.isSortDirection(col, direction)"
    on-sort="vm.sort(field, true)">
</umb-table>

Fast and easy, but sometimes it would be hard to figure out how to use these components if they required you to pass something along to their properties.
And the old backoffice rarely used them in a way where it was easy to see and copy their way of working.

The new way

For the new backoffice Umbraco released a Storybook which is an interactive library of web components you can look through and copy from:
https://uui.umbraco.com/

Makes it very simple to test out and take components you want, like the umb-table:


<umb-table
  .config=${this._tableConfig}
  .columns=${this._tableColumns}
  .items=${this._tableItems}
  @ordered=${this.#ordering}
></umb-table>

Tip

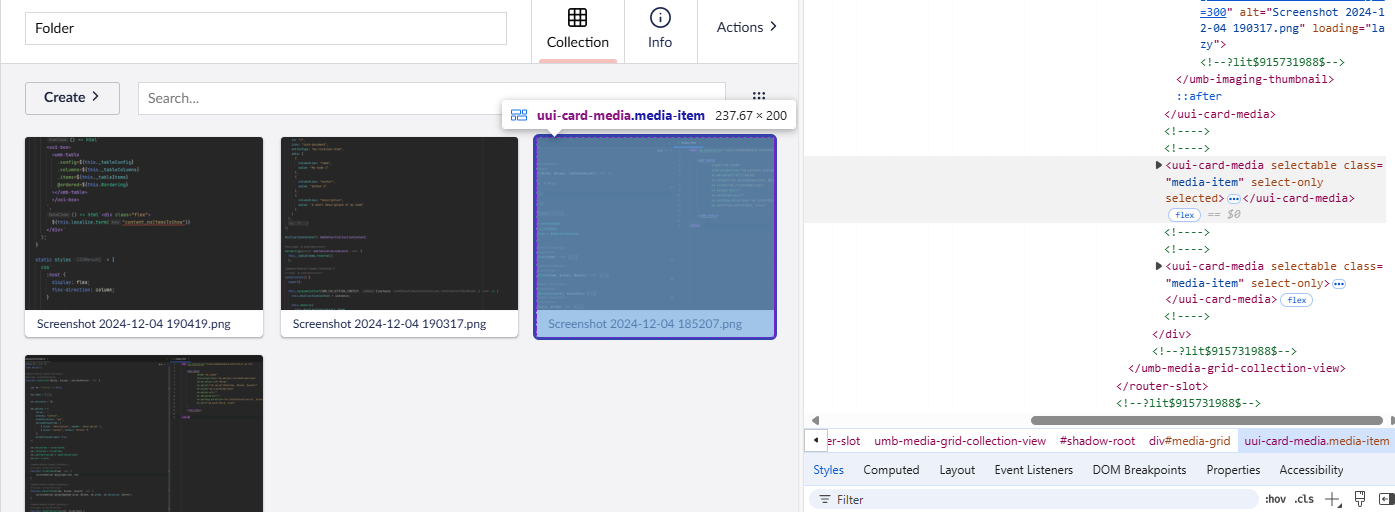
Allmost all UI in the new backoffice is made as an extension, so if you want a card like the one used in the media section listview for example:

Tip

Then you can go to the Umbraco.Ui Github repo and find the component with that name and immediately see how it's made and also find a link to Storybook for that component: https://github.com/umbraco/Umbraco.UI/tree/v1/contrib/packages/uui-card-media

Outro

Switching from AngularJS to the new world of web components in Umbraco can seem like a big leap. At first, the new setup can look like a tangled mess of files and jargon.

But the payoff?

Better structure, easier maintenance, and powerful tools that make development a smoother ride. My Extension Comparisons repo - https://github.com/jemayn/ExtensionComparisons - is there for anyone curious or feeling the same initial feeling of being overwhelmed.

Dive in, experiment, and see for yourself how shifting to web components can open up new possibilities. Trust me, once you get the hang of it, you won’t look back!