Theme:

Simple(r)? CI/CD for Umbraco Cloud

Tagged with:
Git
GitHub
Umbraco Cloud

Umbraco Cloud is really very good. There was a time when I couldn’t imagine myself typing that, but here we are. It’s a testament to how much work Umbraco has put into improving Umbraco Cloud to make it the solid and feature-rich solution it is today.

One thing that I spent a long time struggling to fit into my Umbraco Cloud workflow was CI/CD. After trying a few things, I settled on a process that I really liked and was ready to share with the world. Then Umbraco announced Umbraco CI/CD Flow.

Umbraco CI/CD Flow looks great, and you should totally check it out. It’s not a perfect fit for me though - I really can’t do without hotfixes and, having settled on a simpler process, it feels a bit like using a sledgehammer to crack a nut.

So here I present an alternative approach. If you’ve looked at the Umbraco CI/CD Flow docs and found them a bit overwhelming, or you just want a really straightforward pipeline to deploy frontend assets to Cloud, you might find this approach a good fit for you.

First let’s look at two of the big challenges with CI/CD and Umbraco cloud and how we can overcome them: integrating Umbraco’s Cloud repositories into our CI/CD workflows, and handling frontend assets.

Working with Umbraco Cloud’s Repositories

An Umbraco Cloud site is a git repository and that’s crucial to how Cloud works, especially the ability to auto-update - Cloud’s killer feature. To deploy to Umbraco Cloud, you push your changes from your own clone of that repository and that kicks off a build (of your C# code) and then deployment.

The Cloud docs say this:

Umbraco Cloud repositories are only deployment repositories and should not be used as source code repositories

This is partially true. You really don’t want to be using the Cloud-hosted repository as your working version of the repository. You should be using a copy hosted somewhere like GitHub, Azure DevOps etc. 

BUT, the repo stored in Cloud will get updates - upgrades and patches from Umbraco and maybe the odd hotfix where you’ve been forced to modify Umbraco’s schema live on production 😬. So we need a way to bring those changes back into our working copy of the repo. It’s not just a deployment repository - it’s still, and always will be, our single source of truth when it comes to an Umbraco Cloud site’s source code.

So let's treat it that way. Consider our copy of the repo as a working fork of the Umbraco Cloud repo, and:

  1. Pull periodically from the upstream Umbraco Cloud repo
  2. Make changes to the working repo
  3. Push changes back to the Umbraco Cloud repo
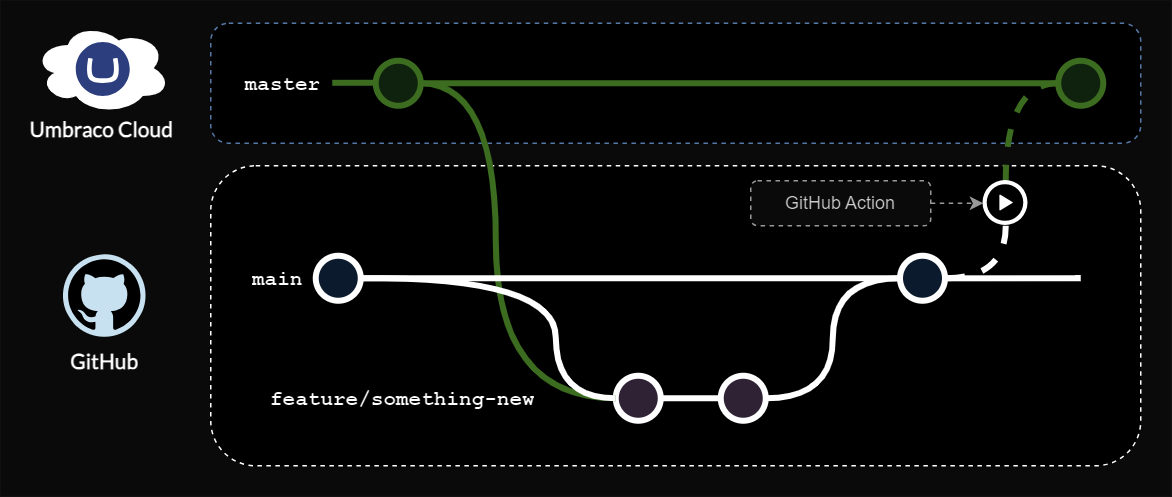
An example commit graph showing an Umbraco cloud repository synchronizing with a GitHub hosted working repository.

Here's a simplified commit graph of what the above workflow might look like.

Which branching strategy/git workflow you choose to use in your working copy of the repo is then totally up to you - but you really should have a well defined workflow and you can’t go too far wrong with either Gitflow or GitHub Flow.

Automating the git workflow

Automating the pulling and pushing (deployment) to Umbraco Cloud is straightforward. Using GitHub Actions as an example, you'll need an action to pull/push as necessary using git.

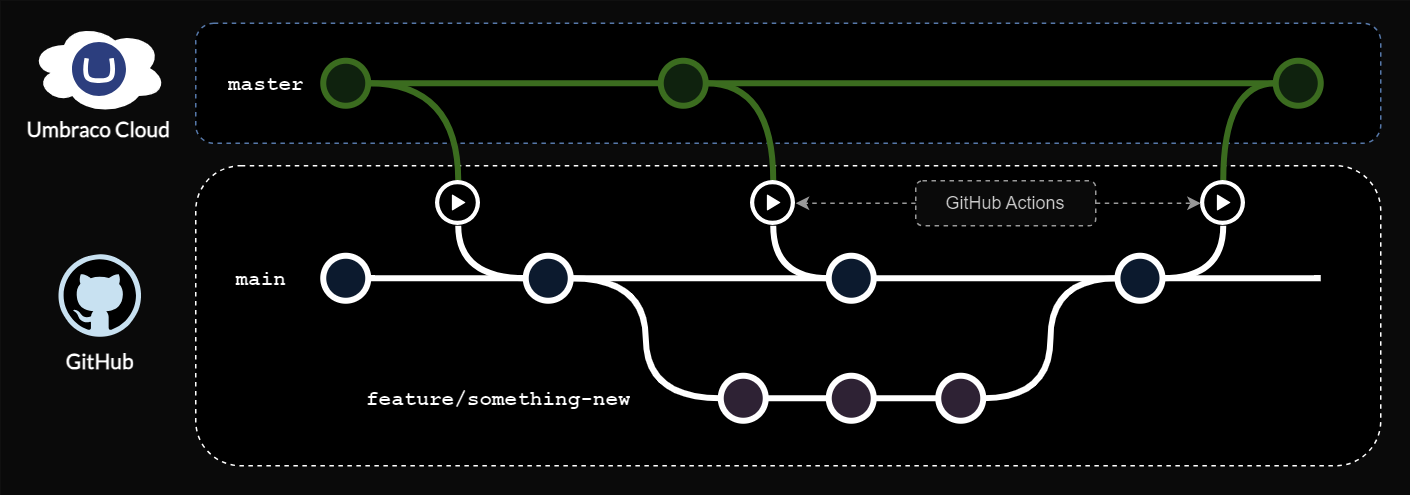
An example commit graph showing an Umbraco cloud repository synchronizing with a GitHub hosted working repository, using GitHub Actions.

We can take the example commit graph, and see how GitHub Actions might help up automate that.


name: Pull From Umbraco Cloud
on:
  workflow_dispatch: # Allows manual triggering of the workflow from the Actions tab
  schedule:
    - cron: '0 0 * * *' # Runs daily at midnight UTC

jobs:
  pull-from-umbraco-cloud:
    runs-on: ubuntu-latest
    steps:
      - run: echo 'The "Build Frontend" workflow passed'
      - uses: actions/checkout@v4
        with:
          fetch-depth: 0 # we need to fetch all history to be able to merge
      - name: 'Merge from Umbraco Cloud'
        run: |
          git config user.name "github-actions[bot]"
          git config user.email "41898282+github-actions[bot]@users.noreply.github.com"
          git remote add cloud https://jasons-email-address%40example.com:${{ secrets.UMBRACO_CLOUD_PASSWORD }}@scm.umbraco.io/uksouth01/my-website.git
          git fetch cloud
          git merge cloud/master -m "Merge from umbraco cloud [skip actions]"
          git push

This example GitHub action will pull changes from Umbraco Cloud.

Notice it adds [skip actions] to the commit message. This prevents the merge from triggering other actions, which in my case would result in an unnecessary extra deployment to Cloud.

Also notice the encoded email and Umbraco Cloud password, which I've saved as a secret.

 I should at this point say that I don’t actually use the snippet above. It works, but I have two rules (for myself, and in the teams I run):

  1. merges into main/development branches must be completed by a person
  2. merge commits must be tested on a developer’s local environment.

So I always start by manually pulling changes from the Umbraco Cloud repo and merging them into the most appropriate branch locally (perhaps a release branch, or just the feature branch that I’m working on).


name: Deploy To Umbraco Cloud
on:
  workflow_run:
    workflows: [Build]
    types: [completed]
    branches: ['master']

jobs:
  deploy-to-umbraco-cloud:
    runs-on: ubuntu-latest
    if: ${{ github.event.workflow_run.conclusion == 'success' }}
    steps:
      - run: echo 'The "Build Frontend" workflow passed'
      - uses: actions/checkout@v4
        with:
          fetch-depth: 0
      - name: 'Push to Umbraco Cloud'
        run: |
          git config --global user.name "Jason's Github Action"
          git config --global user.email 'JasonElkin@users.noreply.github.com'
          git push https://jasonelkin86%40gmail.com:${{ secrets.UMBRACO_CLOUD_PASSWORD }}@scm.umbraco.io/uksouth01/my-website.git master

This action automates deployment to Cloud with a simple git push.

If there are conflicts this will fail. That means we will need to reconcile changes from the upstream Umbraco cloud repository before trying again. If you always start working on the site by pulling from the Cloud repo first, then the chances of this happening are small.

That’s all the moving parts you need for a basic CI/CD workflow with Umbraco Cloud. Now you can add any extra build/test steps that might need to run before deploying to Umbraco Cloud. For example, you probably want to include a build step for your frontend… more on that below.

An example commit graph showing an Umbraco cloud repository synchronizing with a GitHub hosted working repository, with only deployments to Umbraco Cloud automated.

Here's what the "semi-automatic" workflow I use looks like.

Note

A note about testing.

Umbraco Cloud builds your C# source code when you push - and we have no control of or access to that build step (which happens on Umbraco’s servers). This means that you cannot test the actual binaries that will end up being deployed. This is a limitation of Umbraco Cloud whether you use CI/CD Flow, this approach, or any other. This doesn’t matter for the vast majority of sites but it is important to understand for the few times when it might matter.

Managing Frontend Assets

On a push to a Cloud site’s master branch, the .NET portion of the code will get built and deployed on Umbraco Cloud’s servers.

The downside of this is that the only obvious way to deploy frontend assets to an Umbraco site is to include them in the repository. This is a problem when your CSS and JS is compiled using frontend tooling because then you need to store the compiled output in the repository, which may change on every build. This makes for messy repositories and a lot  of unnecessary merge conflicts.

There are a few ways around this. One is to not host your frontend assets in Umbraco cloud at all but deploy them to static hosting somewhere, maybe a subdomain or a reverse proxy for a path like /assets. These are solid options, but it complicates the hosting setup and Umbraco Cloud can host those files perfectly well. My preferred approach is to sideload the frontend assets on cloud.

Sideloading onto Cloud

The steps here are pretty simple.

  1. Build the frontend in your CI pipeline
  2. Store the frontend assets as an artifact
  3. Have Umbraco Cloud download the artifacts at build or runtime.

The important part of my GitHub action below zips up the frontend and stores it for later.


name: Build
on:
  push:
    branches: ['master']
  pull_request:
    branches: ['master']

jobs:
  build-frontend:
    runs-on: ubuntu-latest

    defaults:
      run:
        working-directory: ./src/frontend

    strategy:
      matrix:
        node-version: [20.x]

    steps:
      - uses: actions/checkout@v4
      - name: Use Node.js ${{ matrix.node-version }}
        uses: actions/setup-node@v4
        with:
          node-version: ${{ matrix.node-version }}
          cache: 'npm'
          cache-dependency-path: './src/frontend/package-lock.json'
      - run: npm ci
      - run: npm run build --if-present
      - name: Upload build output
        uses: actions/upload-artifact@v4
        with:
          name: frontend-assets
          path: ./src/UmbracoProject/wwwroot/app

This is a an example of what a build might look like, which only builds the frontend assets.

Now we need to choose whether to download that zip file at build time or runtime.

At runtime

TL;DR: I wouldn't generally recommend this approach, unless you have complex requirements and, after all, this article is about simplifying CI/CD”so I really recommend sideloading assets at build time.

I used to do it at runtime as part of booting the site, using the GitHub .NET client octokit.net

One of the big differences between ASP.NET and ASP.NET Core is that ASP.NET Core is just a regular .NET console application underneath, and we are in complete control of booting our site. So, you can have your app do all kinds of things before and/or alongside booting Umbraco.

I had quite a clever, but complicated, boot process which would download the frontend assets with fallbacks and other features like support for independent frontend and backend versioning. It was overkill for most of my needs so I don’t use that approach any more.

At build time

This is the simplest option and works much more like a “normal” pipeline build. If the Umbraco Cloud build fails to download the assets, then the build itself fails and the site doesn’t get deployed.

Here’s the powershell script I use, which is invoked in a PreBuild event in my UmbracoProject.csproj


$PAT = "<your Personal Access Token goes here>"
$params = @{
  'Uri'     = 'https://api.github.com/repos/JasonElkin/my-website/actions/workflows/build-frontend.yml/runs?status=success'
  'Headers' = @{
    'Authorization' = 'Bearer ' + $PAT
    'Accept'        = 'application/vnd.github.v3+json'
    'User-Agent'    = 'My-Website-Asset-Fetcher'
  }                
  'Method'  = 'GET'
} 
$tempFile = "./fe-artifact.zip"

$global:ProgressPreference="SilentlyContinue"

Write-Output "Fetching latest frontend build from Github"

Write-Output "Fetching latest workflow run"

$runs = Invoke-RestMethod @params

if ($null -eq $runs.workflow_runs) {
  Write-Output "No workflow runs found"
  return;
}

$artifactsUrl = $runs.workflow_runs[0].artifacts_url

Write-Output "Fetching artifact location"

$params.Uri = $artifactsUrl

$artifacts = Invoke-RestMethod @params

$latestArtifactUrl = $artifacts.artifacts[0].archive_download_url;

$params.Uri = $latestArtifactUrl

Write-Output "Downloading atifact to temp file: $tempFile"

Invoke-RestMethod @params -OutFile $tempFile

Write-Output "Extracting artifact to ./wwwroot/app"

Expand-Archive -path $tempFile  -DestinationPath ./wwwroot/app -Force

Write-Output "Cleaning up temp file"

Remove-Item -Path $tempFile

Write-Output "Frontend assets downloaded"

I pop this in /src/UmbracoProject


<Project Sdk="Microsoft.NET.Sdk.Web">
 <!-- ...   -->
  <Target Name="PreBuild" BeforeTargets="PreBuildEvent" Condition="$(configuration) == 'Release'">
    <Exec Command="powershell .\fetchAssets.ps1" />
  </Target>
  
</Project>

And this is all you need in UmbracoProject.csproj to invoke the powershell script.

You'll need to get a Personal Access Token and store it in the file (I don't think there's a nice way to store it and make it accessible at build time otherwise).

This file's verbose, this is useful for debugging. When Umbraco Cloud builds a site it forwards console messages back through git - if you’ve ever pushed to Umbraco Cloud via the command line you’ll have seen this. So when the GitHub action triggers the build via a git push, the responses from Cloud that we’d see in the console will all get saved in the logs for that GitHub Action’s run.

So there you have it

An animated gif of Alexander the Meerkat saying "Keep it Simples"

Simples.

Okay, there’s a lot of words here - much like the PowerShell script above, I too am rather verbose. But, when you look at it there's not actually all that much code or moving parts, or even that much process to get your head around.

Hopefully, like me, you’ll find this approach a helpful middle-ground between manually pushing things to Umbraco Cloud and the full-fat offering of Umbraco CI/CD Flow.

I’d love to know how people get on trying this approach, and am keen to update the process if anyone encounters any rough edges I’ve yet to come across, so please do reach out to me on the socials!