Theme:

Creating GitHub Actions to Simplify Umbraco Development

Tagged with:
GitHub
Umbraco Cloud

As a DevOps engineer we are tasked with keeping current with the latest technologies, methods, best practices and always automating wherever we can. Safely.

The aim of this post is to identify areas where we can utilize GitHub Actions to carry out tasks, that would most likely be done manually, to streamline and simplify Umbraco development.

I like to think creating your own GitHub actions is similar to creating your own Umbraco packages. It's a small piece of functionality that can be part of your Umbraco ecosystem to be shared with others to use. It's just a package for your deployment process instead of the CMS.

This post will touch lightly on creating your own custom action, but there is a lot to this that cannot be covered in a single blog post. After reading this I hope you feel empowered to have a go at creating your own custom Action and have the basics to get started. 
What is the difference between a GitHub Action, a Workflow and GitHub Actions?

We will be throwing a few terms around so let's define them beforehand. A workflow is the YAML file containing all the actions to achieve a goal, whether that be a deployment of a release or something small like adding an issue label to a pull request. This lives in the project/websites repository.

Your workflow is then comprised of multiple actions inside, these actions could be many things, perhaps posting a message to slack or sending a POST request somewhere. Or maybe managing the whole interaction between GitHub and Umbraco CI/CD? CrumpledDog/UmbracoCloudCICD

GitHub Actions is the name of the Product offering from GitHub who manages and provides the compute for running your workflows.

Action.yml is the YAML file that the custom action uses to define itself.

Why write your own Action?

Frustration, maybe you have a special use case that GitHub hasn’t implemented in their own suite of actions. For example: https://github.com/dawidd6/action-download-artifact. This action has a lot of useful features that the official one from GitHub took a long time to implement: https://github.com/actions/download-artifact

Another use case and very simple concept that is not natively supported in GitHub Actions is the notion of waiting. I currently use this action https://github.com/yogeshlonkar/wait-for-jobs to wait for other jobs if another job has finished quicker than expected and has a dependent job. The alternative is getting Workflows to remotely trigger another Workflow.

With a public repository, anyone can use your custom action in their Workflows. If you develop an action highly used by others you are then showered with a wealth of ideas, and potentially pull requests, from the community to make it better. As opposed to something like Azure DevOps where most of the official tasks are closed source (ahem deploying to IIS). You can have a mini community around your custom action if it solves a major issue in the developer community.

Getting Started

There are two approaches to writing your Action.

The simplest approach is an action.yml file that invokes scripts to execute such as PowerShell, Bash etc containing your logic.

Or a little more elaborate - but recommended - where we have our action.yml file but a Typescript project to invoke instead. GitHub provides a template for this: https://github.com/actions/typescript-action

The nice thing about the Typescript template is everything is there to get you started, the npm project is set up, there are example unit tests and the action.yml is configured for you to edit.

The idea

Before you can start you need an idea, for this post I will talk about a new GitHub Action I am currently working on that adds a wrapper around the uSync CLI. You can find it here: Actions uSync CLI

The uSync CLI (Jumoo/uSync.CommandLine: Remote command line tools for Umbraco) is a command line tool from Kevin Jump to remotely communicate with uSync.

Use case

All this custom action does is call the uSync CLI and invoke your chosen command. This enables you to invoke the uSync CLI inside of your Workflows. Here are some cool use cases:

  • Trigger a report and import doc type changes to an environment after a deployment
  • Trigger a pull of all content from an environment down to the deployment target
  • Content rich on-demand environments using Infrastructure as Code to build the website and uSync to enrich it with content
  • Use the ping command to check if the Umbraco site is healthy after a deployment
  • Rebuild the database cache remotely

See it in action

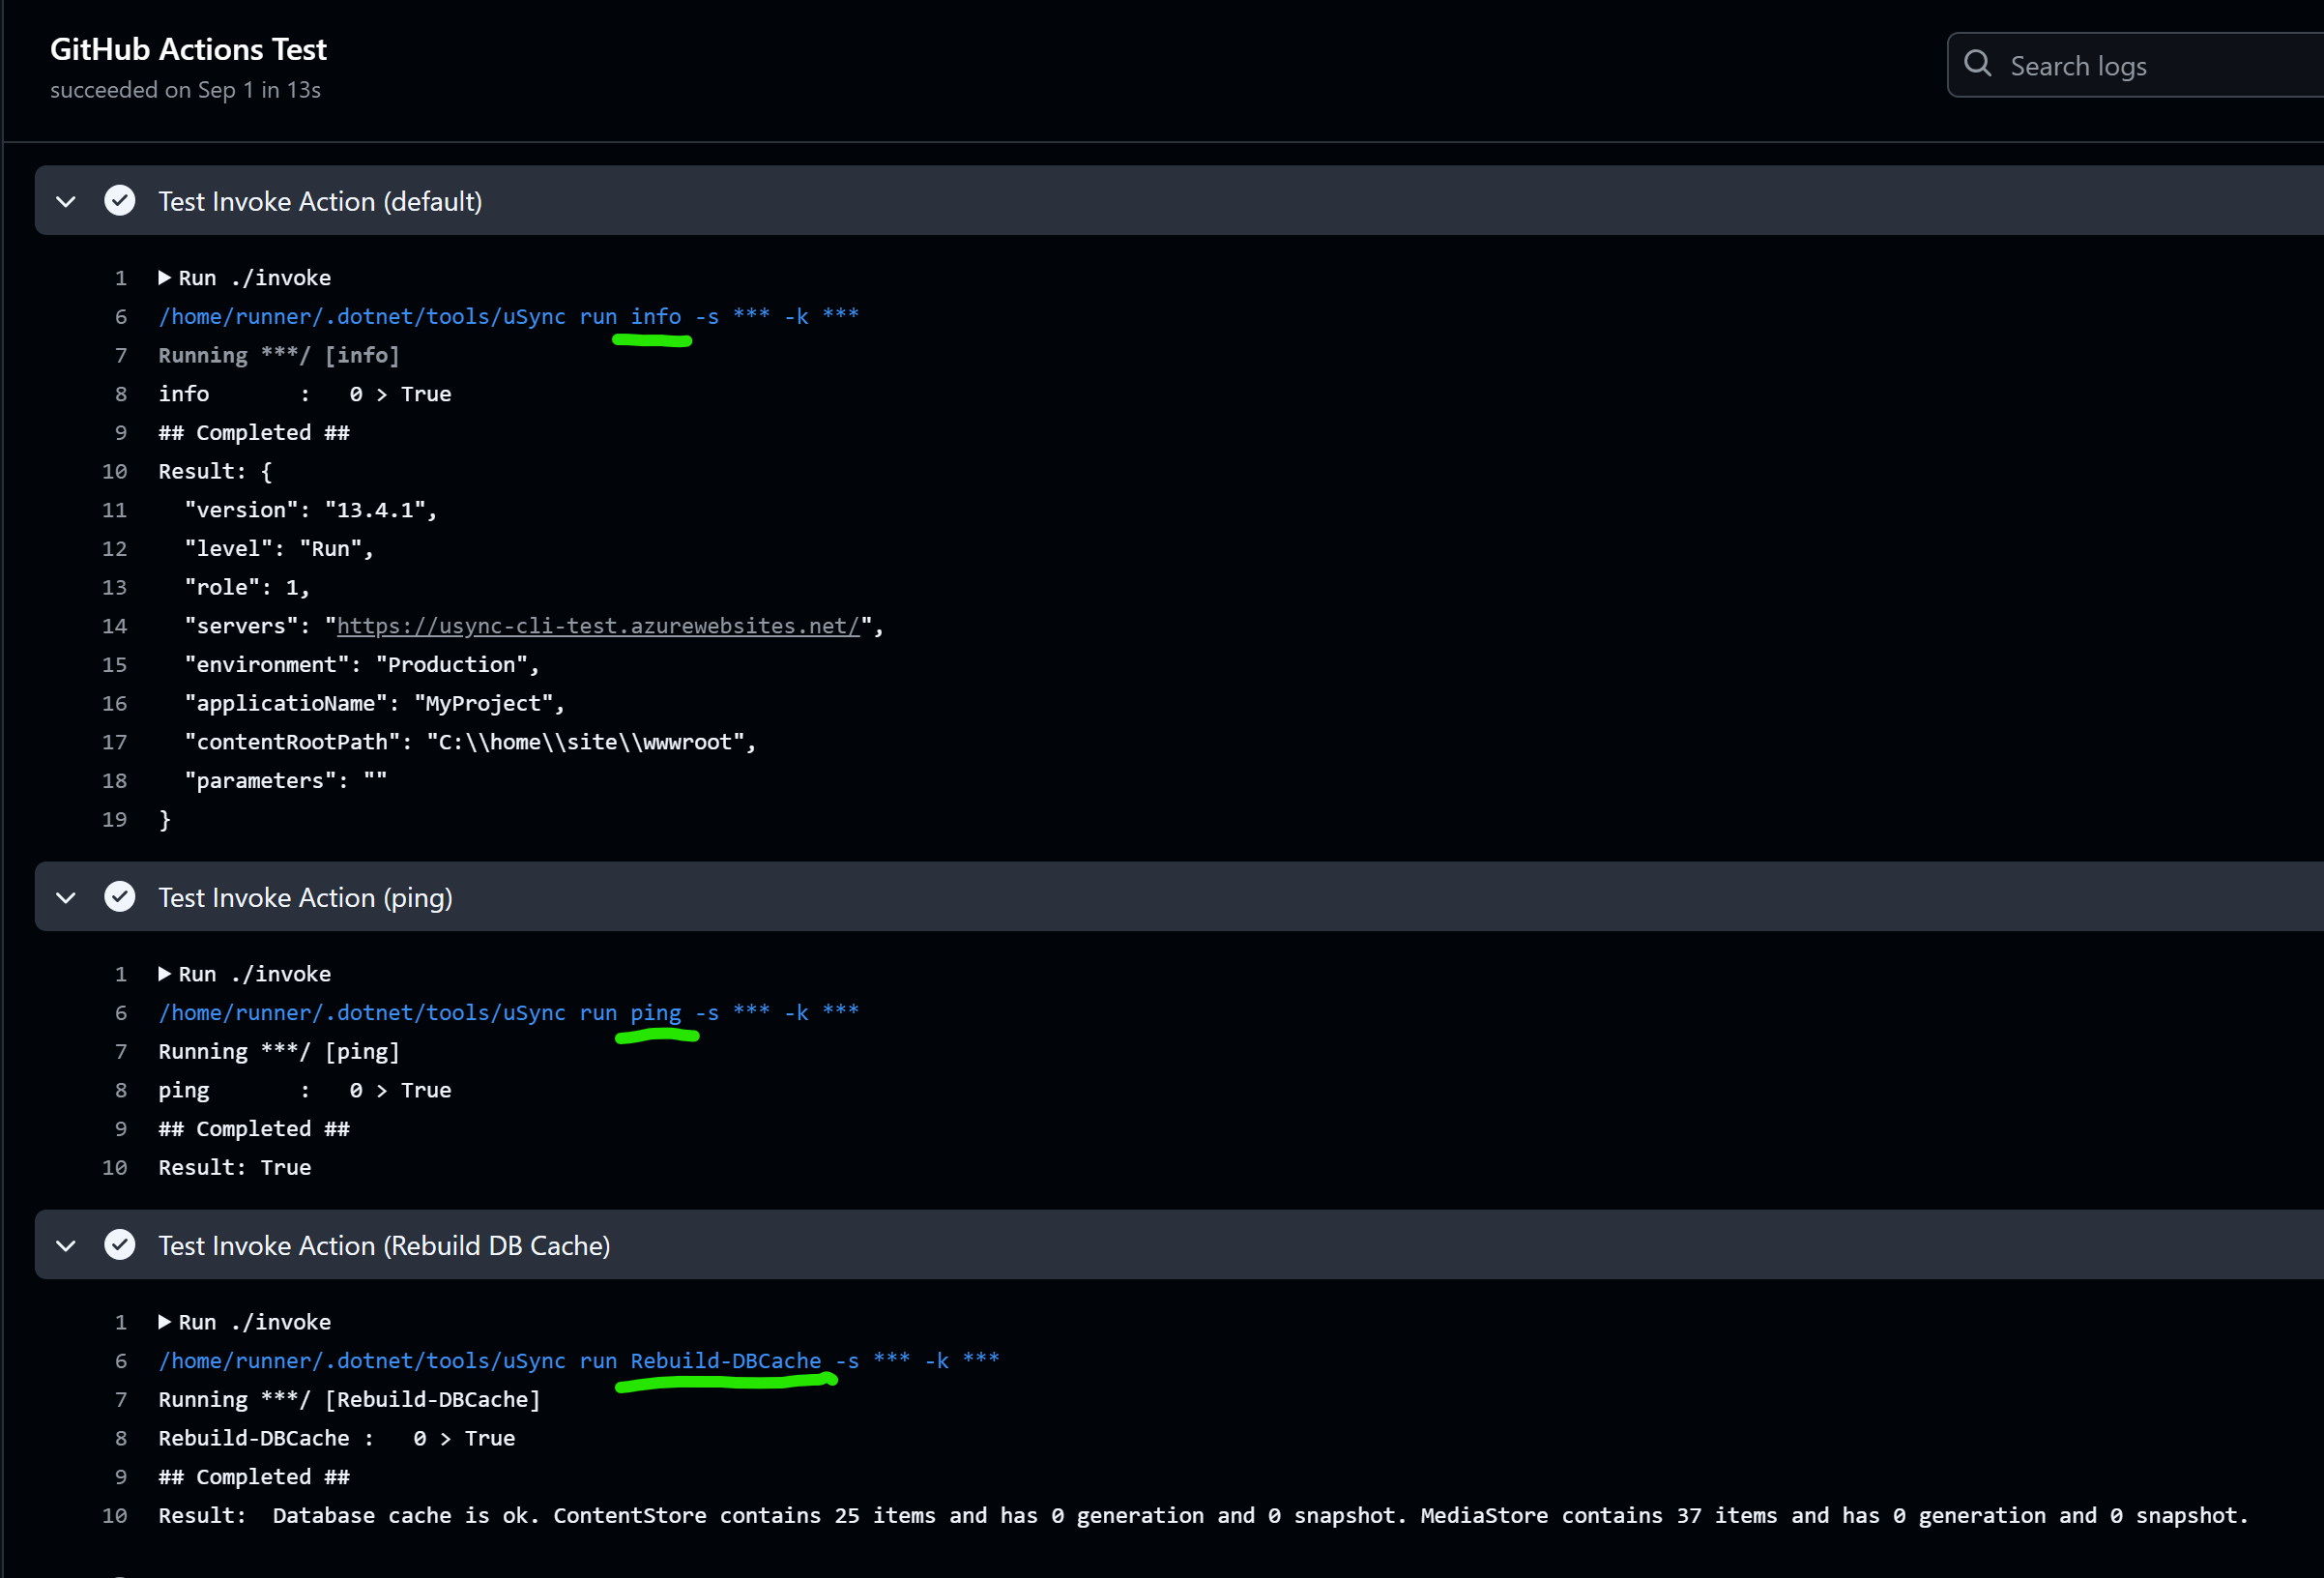
Below you can see I am invoking three commands (info, ping and Rebuild-DBCache) of the uSync CLI and getting responses back from my demo Umbraco site:

Getting into the YAML

Below is the YAML that ran the workflow in the screenshot. 

It is broken down into two commands: setup and invoke.

Setup will just install the uSync CLI and Invoke will invoke the command supplied, if no value is supplied the info command is run by default.


name: Continuous Integration

on:
  pull_request:
    branches:
      - main
  push:
    branches:
      - main

permissions:
  contents: read

jobs:
  test-action:
    name: GitHub Actions Test
    runs-on: ubuntu-latest

    steps:
      - name: Checkout
        id: checkout
        uses: actions/checkout@v4

      - name: Test Setup Action
        id: setup-action
        uses: mattou07/actions-uSync-cli/setup@main

      - name: Test Invoke Action (default)
        id: invoke-action-default
        uses: mattou07/actions-uSync-cli/invoke@main
        with:
          server: ${{ secrets.TARGETURL}}
          key: ${{ secrets.HMAC }}

      - name: Test Invoke Action (ping)
        id: invoke-action-ping
        uses: mattou07/actions-uSync-cli/invoke@main
        with:
          command: 'ping'
          server: ${{ secrets.TARGETURL}}
          key: ${{ secrets.HMAC }}

      - name: Test Invoke Action (Rebuild DB Cache)
        id: invoke-action-rebuildDBCache
        uses: mattou07/actions-uSync-cli/invoke@main
        with:
          command: 'Rebuild-DBCache'
          server: ${{ secrets.TARGETURL}}
          key: ${{ secrets.HMAC }}

Getting into the YAML pt 2.

Wait there is a part 2? Yes, the YAML you saw earlier is for your project or Umbraco website. Depending on what your action does you may need two tasks or more. In our case, I need an install and an invoke task.

The YAML below defines the install task and is located in the repo for the action.

The main thing to pay attention too here is the last lines where we run ../dist/setup/index.js

We have our own script to install the uSync CLI which we invoke through /dist/setup/index.js. You could have anything here such as a Powershell script or command if you wanted.


name: 'uSync.CLI-action'
description:
  'A Github action wrapper for https://github.com/Jumoo/uSync.CommandLine'
author: 'mattou07'

# Add your action's branding here. This will appear on the GitHub Marketplace.
branding:
  icon: 'heart'
  color: 'red'

# Define your inputs here.
inputs:
  dotnet-version:
    description:
      'Optional SDK version(s) to use. If not provided, will install global.json
      version when available. Examples: 2.2.104, 3.1, 3.1.x, 3.x, 6.0.2xx'
    required: false

# Define your outputs here.
outputs:
  version:
    description: 'Version of uSync CLI installed.'

runs:
  using: node20
  main: ../dist/setup/index.js

Next here is the YAML defining the invoke task. Similar to the last code snippet we end up running: ../dist/invoke/index.js.

But, additionally, we are grabbing parameters from the user and providing a default if no parameters are supplied. The arguments we need are:

  • Command - such as ping or info
  • Server - the url of your Umbraco Backoffice
  • Key - Required HMAC key to authenticate with uSync

name: 'uSync.CLI-action Info'
description:
  'A Github action wrapper for https://github.com/Jumoo/uSync.CommandLine'
author: 'mattou07'

# Add your action's branding here. This will appear on the GitHub Marketplace.
branding:
  icon: 'heart'
  color: 'red'

# Define your inputs here.
inputs:
  command:
    description:
      'The command you would like to run from the uSync CLI (Defaults to info
      command)'
    required: false
    default: 'info'

  server:
    description: 'URL to for the Umbraco website to target'
    required: true

  key:
    description: 'HMAC Key for authentication'
    required: true

# Define your outputs here.
outputs:
  version:
    description: 'Version of uSync CLI installed.'

runs:
  using: node20
  main: ../dist/invoke/index.js

Getting into the logic

Again this is not a tutorial on how to write an action but an overview of what I needed to do to get this to work.

Below is the TypeScript behind the setup task. I am using two npm libraries from GitHub, the main one to note is @actions/exec. Which I use to install the uSync CLI onto the machine like so:

await exec.exec('dotnet tool install uSync.Cli -g')


import * as core from '@actions/core'
import * as exec from '@actions/exec'

/**
 * The main function for the action.
 * @returns {Promise<void>} Resolves when the action is complete.
 */
export async function run(): Promise<void> {
  try {
    core.debug(`Checking for Dotnet`)
    await exec.exec('dotnet --version')

    core.debug(`Installing uSync.Cli`)
    await exec.exec('dotnet tool install uSync.Cli -g')

    let myOutput = ''
    let myError = ''
    const options: any = {}
    options.listeners = {
      stdout: (data: Buffer) => {
        myOutput += data.toString()
      },
      stderr: (data: Buffer) => {
        myError += data.toString()
      }
    }

    core.debug(`Attempt to invoke uSync.Cli version`)
    await exec.exec('uSync --version', options)

    // Set outputs for other workflow steps to use
    core.setOutput('version', myOutput)
  } catch (error) {
    // Fail the workflow run if an error occurs
    if (error instanceof Error) core.setFailed(error.message)
  }
}

If we take what we have learnt about the npm libraries in the previous snippet. We can start to get an understanding on how the invoke command works.

First I define my arguments: command, server and key

We then form our uSync run command and execute. Enabling any command to be past in as the uSync CLI matures.  


import * as core from '@actions/core'
import * as exec from '@actions/exec'

/**
 * The main function for the action.
 * @returns {Promise<void>} Resolves when the action is complete.
 */
export async function run(): Promise<void> {
  try {
    const command: string = core.getInput('command')
    const server: string = core.getInput('server')
    const key: string = core.getInput('key')

    let myOutput = ''
    let myError = ''
    const options: any = {}
    options.listeners = {
      stdout: (data: Buffer) => {
        myOutput += data.toString()
      },
      stderr: (data: Buffer) => {
        myError += data.toString()
      }
    }

    core.debug(`Running ${command} on target ${server}`)
    await exec.exec(
      `uSync run ${command}`,
      [`-s ${server}`, `-k ${key}`],
      options
    )

    // Set outputs for other workflow steps to use
    core.setOutput('version', myOutput)
  } catch (error) {
    // Fail the workflow run if an error occurs
    if (error instanceof Error) core.setFailed(error.message)
  }
}

Going forward, you could develop a dotnet tool or enjoy using someone else's and write a custom action around it.

Thanks and Happy Holidays!

I hope you enjoyed this post and were able to take something away from it to implement yourself. Currently I am working on an IIS Deployment action to manage Umbraco deployments to IIS.

Below are useful resources to aid you on your GitHub Actions journey: