Headless Personalization using uMarketingSuite

tagged with API Headless Package Segmentation Swagger

Headless architecture has emerged as a significant focus in the realm of web technologies over the past few years. Leveraging its flexibility and abstraction, Umbraco started their headless offerings by launching Umbraco Heartcore with its GraphQL & REST APIs. Several years later, the Umbraco CMS Core received the Content Delivery API with version 12 of the CMS. Extensions like Umbraco Commerce started offering Headless integrations as well with the release of their Storefront API… and after long demand from the community, it’s time for uMarketingSuite to join the field!

What is uMarketingSuite?

To save this article from turning into a sales-pitch, let’s keep it short; uMarketingSuite is a marketing solution for the Umbraco CMS, offering a range of functionalities like A/B Testing, 360 degrees profiling, lead scoring, Umbraco analytics and Personalization. As of November this year uMarketingSuite came out with their headless offering by releasing the uMarketingSuite Marketing API and its integrations with Umbraco’s Content Delivery API. What does all of that mean, what do I get out of it, and how do I get started? Let’s find out today!

The Goal

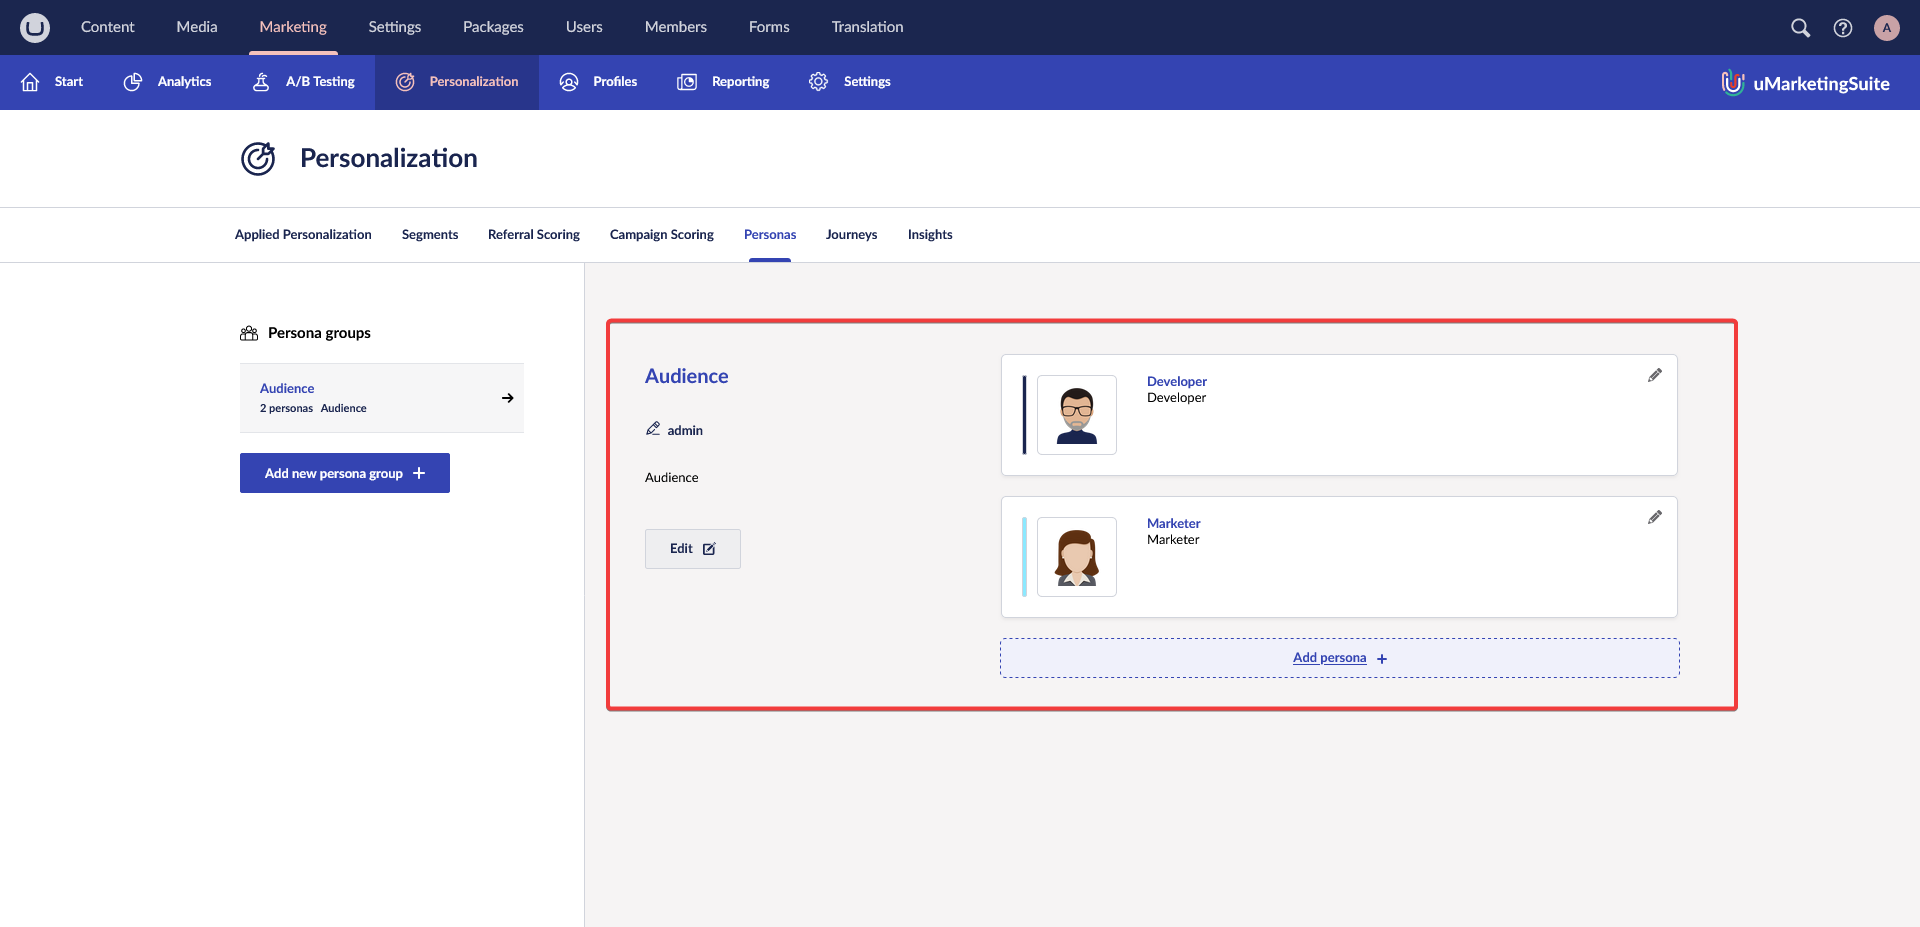
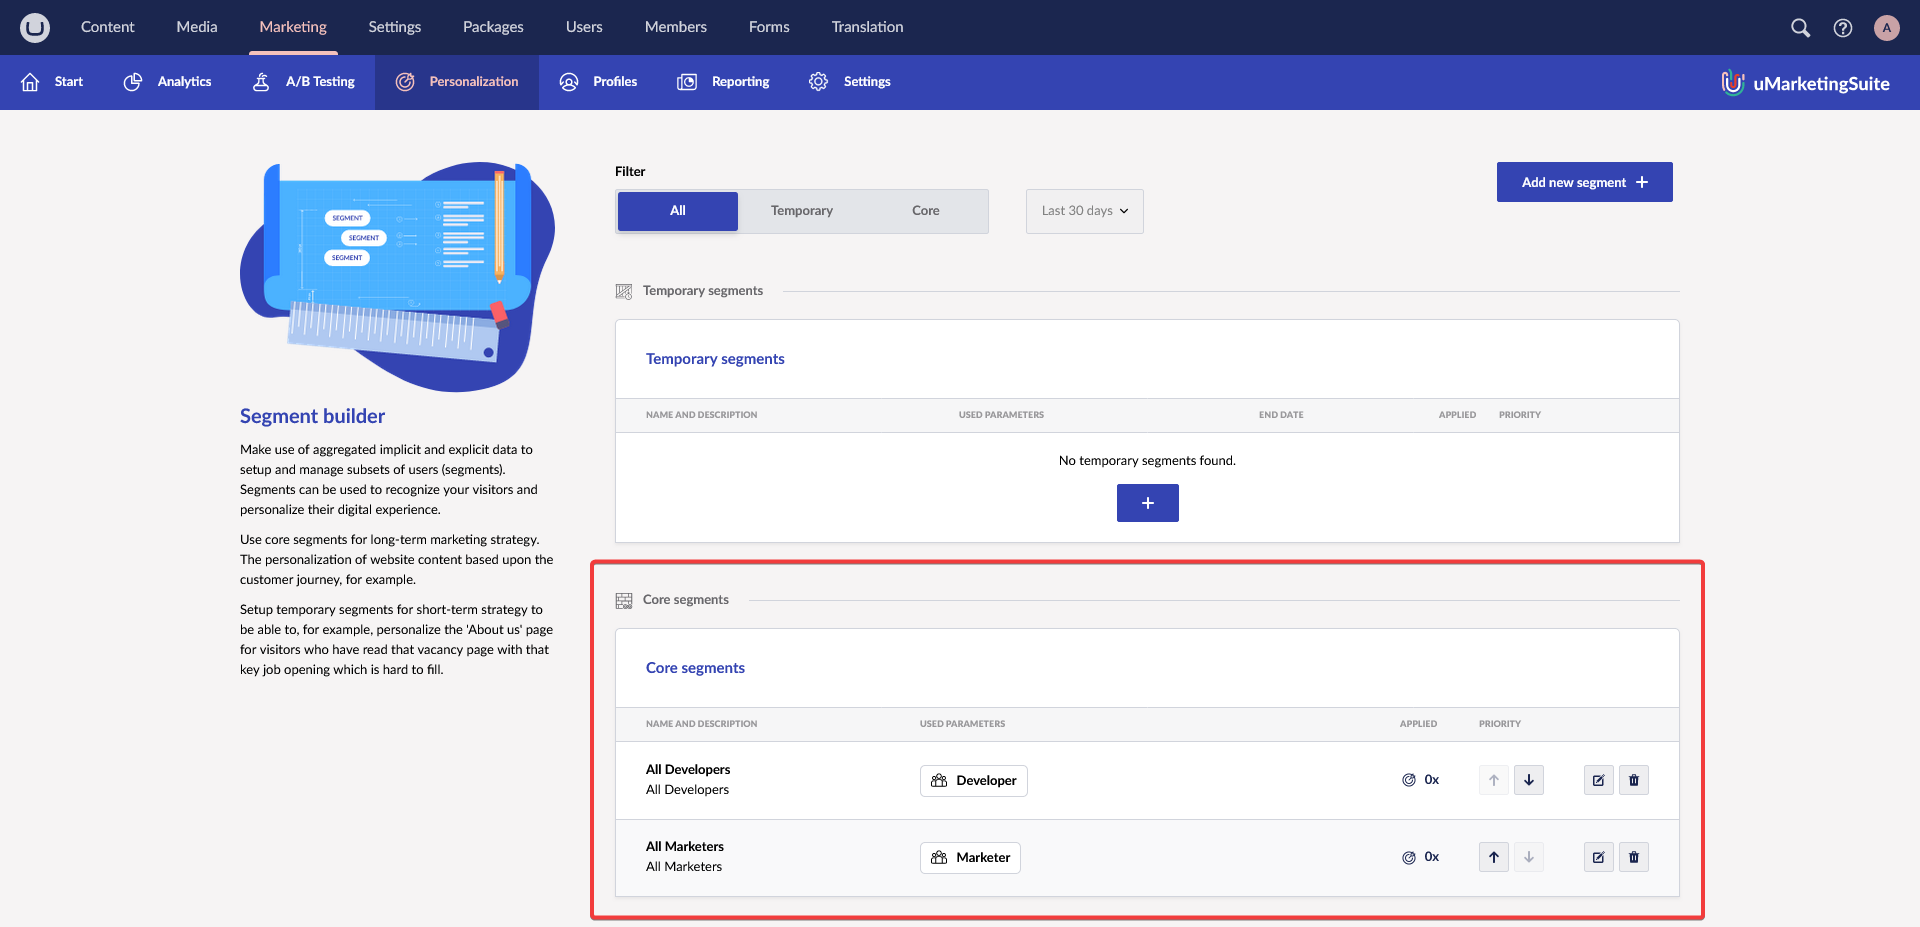
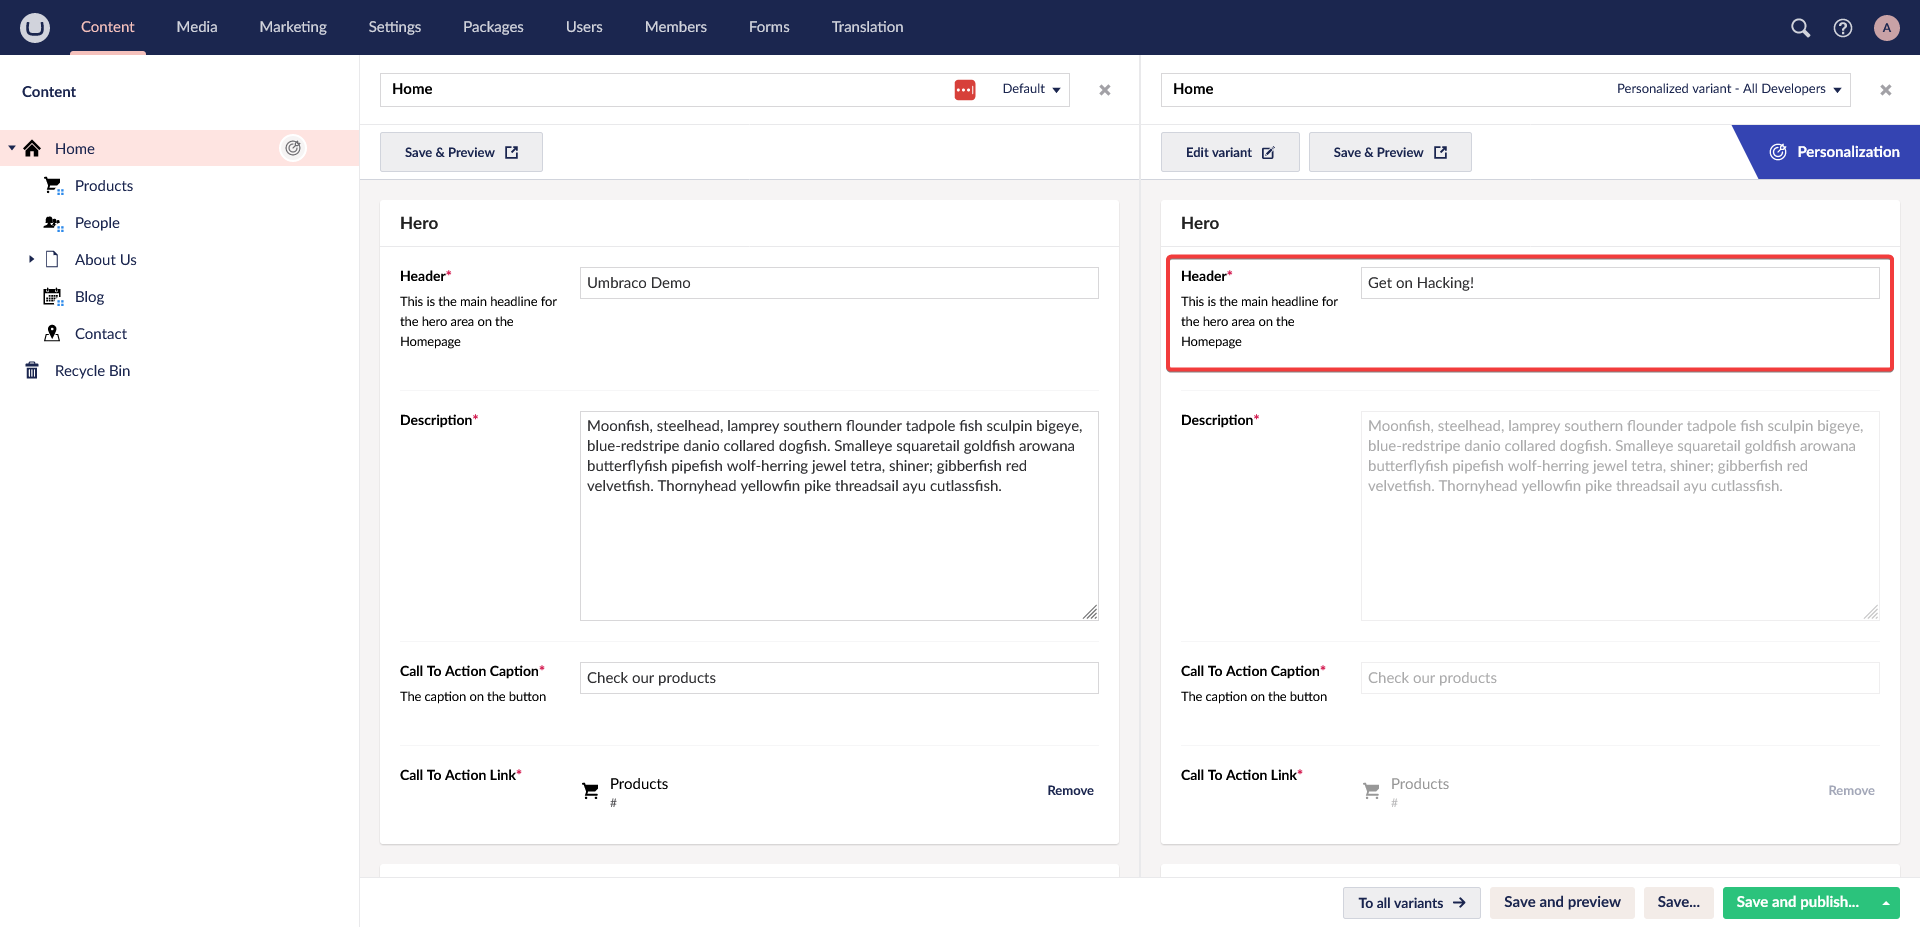
Before we dive into the steps on how to get started, let’s start by imaging a scenario (or use-case), and then we shall see how to put it into practice! We have this gorgeous headless blog made using the Umbraco CMS as its content source, and you are the sole developer, marketer and content editor responsible for this platform. Your target audience is quite broad, but your primary audience consists of both Developers and Marketers. While the topics you write about seem to be of interest to both of them, you feel like your blog is quite generic and not aimed at either of your target audiences in particular. Let’s change that!

Installation

To get started, we will begin by installing both uMarketingSuite and its addon package uMarketingSuite.Headless into our Umbraco solution. We can do so either from our IDE, or by using the following command in a terminal.

dotnet add package uMarketingSuite && dotnet add package uMarketingSuite.Headless

Next step is to enable the API documentation to help us get started with the various endpoints we can use. After heading over to the location where services are configured in the Startup.cs file of our project, we’ll be adding the single line of code to have Swagger generate the documentation for us.


public void ConfigureServices(IServiceCollection services)
{
	/*Your other code here*/

	services.AddUmbraco(_env, _config)
		.AddBackOffice()
		.AddWebsite()
		.AddComposers()
		.AddDeliveryApi()
		.AddMarketingApiDocumentation() // Make sure to add this AFTER the Composers & Delivery API
		.Build();

	/*Your other code here*/
}

That’s it for the Headless installation! We are now ready to run our application and start configuring the marketing & personalization part of our setup!

Configuration

With uMarketingSuite installed, we’ll need to configure our target audience by ways of Personas, and have them be put into a Segment in order to create tailored content for them! For relevancy's sake I won’t be going into the fine details on how to configure them, as you can read all about it on the documentation (https://documentation.umarketingsuite.com/personalization/creating-a-segment/), but let’s show a simplified version of what we have configured instead!

The Marketing -> Personalization-> Personas section with an Audience persona group containing a 'Developer' and 'Marketer' persona

The Marketing -> Personalization -> Personas section with an Audience persona group containing a 'Developer' and 'Marketer' persona

We start by having two different personas as the target audience of our blog, being Developers and Marketers. We'll configure them under the Personas tab as part of Personalization.

The Content -> Personalization -> Content Scoring section, scoring our Developer oriented post 10 points for the Developer persona

The Content -> Personalization -> Content Scoring section, scoring our Developer oriented post 10 points for the Developer persona

After the creation of Personas, we start scoring our our various blog posts to determine whether visitors of that blog are more likely to be either a Developer, a Marketer, or a mix of both.

The Marketing -> Personalization -> Segments section showcasing two core segments, one for All Developers andone for All Marketers

The Marketing -> Personalization -> Segments section showcasing two core segments, one for All Developers andone for All Marketers

With our Personas in place, we will create two core segments in the Segment Builder, in which we implicitly put All Developer personas in one segment, and All Marketers in the other!

The Content section of our Home page showcasing a custom variant for 'All Developers' with a personalized Header Text containing 'Get on Hacking!'

The Content section of our Home page showcasing a custom variant for 'All Developers' with a personalized Header Text containing 'Get on Hacking!'

And lastly, we can start creating personalized content for each of our visitor groups! We will create a personalized variant of our Home page for each segment, and within that variant we’ll modify the Header property to give our visitors a personalized message!

Going Headless

Now that everything is in place on the Umbraco side of things, we can get to the place where the magic happens… APIs! In our scenario we can assume that the blog makes use of Umbraco’s Content Delivery API to fetch the content to render and serve to its visitors. Besides the fetching of content, we’ll need to make sure to track the visits on our platform, as the fetching of content does not necessarily indicate a pageview. For this we make use of the uMarketingSuite Marketing API, available in Swagger after following the installation steps.

For sake of ease, let’s make our visitor’s client responsible for their own pageview tracking, instead of relying on a middleware server like Nuxt.js to do the content fetching & tracking for us. For every pageview that occurs on our headless frontend environment, we will call the following endpoint with a POST request, and specify the domain & path we wish to track in the request body:

/umbraco/umarketingsuite/api/v1/analytics/pageview/trackpageview/client


{
	"url": "https://localhost:44300/blog/this-will-be-great-for-developers/",
	"referrerUrl": ""
}

The response we get from from this endpoint will be a unique visitor ID assigned to this visitor, which we can use for all other Content Delivery API and Marketing API requests (including the trackpageview endpoints). By opening the Swagger UI you will see that the various parameter(s) have been added to the different endpoints.

Let’s take a look at what happens when our visitor has tracked enough pageviews on developer-oriented pages that he gets assigned to the persona “Developer”!

Now for the magic!

To utilize personalization we can use any of the native Content Delivery API endpoints that are in Umbraco. Let’s use the path based item fetching endpoint for today's example. By default, if we were to fetch the contents of our Home page as an anonymous visitor, we would get the following response:


{
  "contentType": "home",
  "name": "Home",
  "route": {
    "path": "/",
    "startItem": {
      "id": "ca4249ed-2b23-4337-b522-63cabe5587d1",
      "path": "home"
    }
  },
  "properties": {
    "heroHeader": "Umbraco Demo",
		// ...
		// Your other properties show up here too, ofcourse!
  },
  "cultures": {}
}

However, as soon as we provide the Content Delivery endpoint with the previously obtained visitor ID as a header field, we will get the following personalized content response for our Developer visitor:


{
  "contentType": "home",
  "name": "Home",
  "route": {
    "path": "/",
    "startItem": {
      "id": "ca4249ed-2b23-4337-b522-63cabe5587d1",
      "path": "home"
    }
  },
  "properties": {
		"heroHeader": "Get on Hacking!",
		// ...
		// Your other properties show up here too, ofcourse!
  },
  "cultures": {}
}

And it truly is as easy as that! Our Content Delivery API response will now be tailored to this specific visitor, as configured in Umbraco! All that's left to do is render your newly retrieved (personalized) content, and you are good to go!

Summary

With the use of uMarketingSuite, providing a tailor-made visitor experience becomes a breeze, regardless of it being a traditional or Headless Umbraco environment. By tracking the visitors pageviews, and then supplying the Content Delivery API requests with the corresponding visitor IDs, uMarketingSuite takes care of the rest and your Headless content will be personalized for each and every visitor!

I hope this article was able to highlight the ease-of-use to get started, and has inspired you to provide a personalized experience to each of your visitors. Thank you very much for reading, and I wish all of you Umbracians a very Merry Christmas, and a prosperous 2024!