tagged with
API
Azure
Headless
Sustainability
Testing
v10
v13
v14
If you’re working on large Umbraco applications with service-oriented architecture; many discrete components; complicated build processes; constant “it works on my machine” defects; and terrifying deployment days, containerisation may be a useful addition to your organisation’s development process. It can reduce complexity in your dev, test, build, and deployment processes, while potentially reducing your Umbraco application’s whole-life carbon emissions.
Containerisation wraps your Umbraco site’s application artifacts into discrete bundles, including all dependencies and its operating system. This allows you to exactly replicate your production environment on your developer workstation, as well as in dev & staging environments.
If you're interested in the technical side of containerisation, you can skip straight to the Implementation section of the article.
Why should Umbracians care about containerisation?
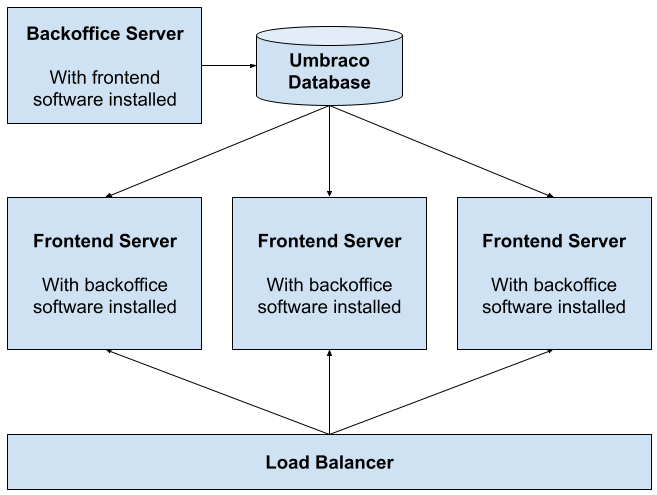
A typical load balanced Umbraco site in 2023 is fundamentally a single monolithic application, where each server contains the entire project irrespective of its role in the stack - as illustrated in Fig#1. The same large application gets distributed everywhere, with the backoffice and frontend servers selected through feature-flags and networking. This setup has lots of advantages, being trivial to work and to deploy, but it’s inefficient from a carbon and cost point of view.
Large expensive servers sit almost idle, running Umbraco with all its dependencies, in order to serve relatively trivial frontends. Usually, these frontends could be implemented as lightweight standalone HTML/JS apps, served entirely through the browser.
Fig 1 - Umbraco's current deployment model
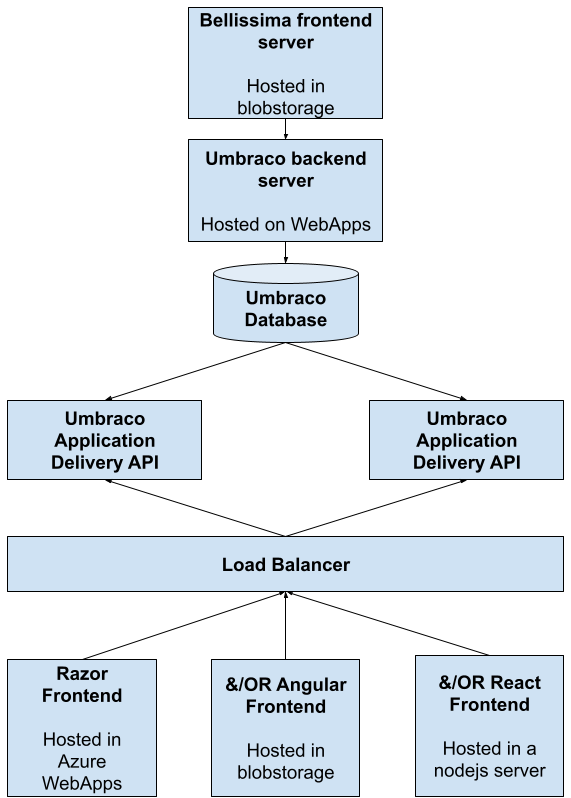
In versions 12 & 13, HQ’s new Delivery APIs introduce first-class support for headless Umbraco & framework-agnostic frontends. In version 14, the new Bellissima backoffice will bring the opportunity to host the backoffice’s frontend independently from its backend. Over the coming five years, a typical Umbraco site will trend towards many discrete projects with varied dependencies, server stacks, and operating systems - as illustrated in Fig2.
Fig 2 - An example deployment model for Umbraco's new versions
For many Umbraco developers, this pivot towards service-oriented architecture will come as a paradigm shift. One of the largest barriers to entry for the adoption of service-oriented architecture is the complexity involved in hosting and maintaining applications with myriad configurations & dependencies. A small team of developers working in three or four different technology stacks can descend rapidly into a chaos of dependencies, similar to the DLL Hell the .NET stack experienced in the early 2000s .
Unifying the development & production environments of large Umbraco applications will be of eminent importance in its coming iterations. Containerisation, if implemented well, can make this process easier, while reducing both hosting costs and the environmental impact of running an Umbraco application.
What software is required?
There are several container management frameworks available. By far the most popular is Docker, with an alternative being Podman. Both have feature parity through the Open Container Initiative (OCI). This article focuses on Docker, but everything in it is applicable to Podman, and any other OCI compliant container management tool. All major cloud providers have native support for containerised applications, including Azure, Google Cloud, and AWS.
What will containerisation do to my application?
Containerisation allows you to deploy and develop on standardised environments, each exactly matching your production instances. As containerisation neatly bundles & isolates the deployable application artefacts, the environment your developers test on exactly matches the production environment - irrespective of server technology in use, and whether the developer works on a Windows, MacOS, or Linux device.
The upside of this is that, at all stages of the software development cycle, everyone who interacts with the software is interacting with an exact replica of the production software - from developer, to QA analyst, to automated tests, to CI pipeline, to client UAT, through to your website’s end-users.
What can containerisation do for my development process?
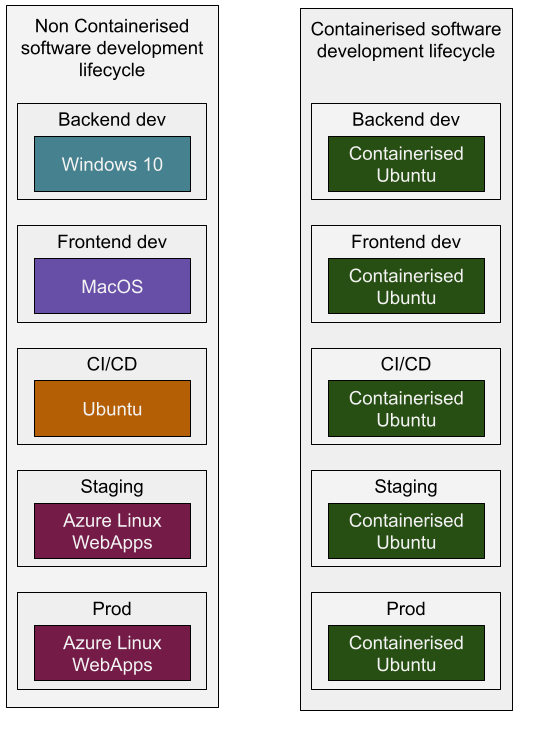
Consider two scenarios, illustrated in Fig#3. A new feature is being added to your Umbraco app to display a table of data stored in the backoffice.
Fig 3 - Different environments in the development process
An example of the feature’s software development life cycle is illustrated on Fig#3’s left column:
A backend developer on Windows creates a new API Controller in C# to expose data for the feature. They debug the application in Windows
A front-end developer on Mac writes some TypeScript, HTML & CSS to display the data. They debug the application on Mac
The application is built by a CI/CD server running Linux. Unit & integration tests are run on Ubuntu
The application is deployed to an internal test server, running Windows Server 2019. QA is conducted against a Windows server
The application is deployed to a staging, hosted on a set of Azure WebApps running Linux. Staging is conducted in a Linux environment
The application is deployed to a production set of Azure WebApps running Linux - using deployment slots. Production is on a fresh Linux environment
The feature worked its way through five different environment configurations, including four different operating systems, with the tested application being materially different in each case. The scope for instance-specific errors is significant.
Consider a containerised process, illustrated in the right hand column of Fig#3:
A developer on a Windows machine creates a new API Controller to expose data for the feature. They use VSCode to debug the Umbraco site in a Docker Container, running Ubuntu
A developer on a Mac writes some typescript, HTML & CSS to display the data on the front-end. They run the Umbraco site through a Docker Container, and use VSCode to debug their node.js application in a Docker Container, running Ubuntu
The application is built by a CI/CD server running Ubuntu, where automated unit & integration tests are conducted inside of Docker Containers
The application is deployed to a set of WebApps in either AWS or Azure for internal testing. QA is conducted against a Docker Container, running Ubuntu
The application is deployed to a set of WebApps in either AWS or Azure for UAT testing. UAT Testing is conducted on against Docker Containers, running Ubuntu
The application is deployed to a production set of Azure WebApps. The website runs on Docker containers, running Ubuntu
The feature was debugged on exactly one environment configuration, even though the developers could continue to work on different operating systems. Though the scope for instance specific errors isn’t entirely removed, it’s massively reduced.
Containerisation also brings a range of other benefits, including simplified deployments, cloud-agnostic architecture, and in some cases can allow environmental efficiency improvements. Containerisation does come with some downside risks, as discussed in the downsides to containerisation section.
What are the technical benefits of containerisation?
Process isolation means that many applications can be deployed securely to a single server, and behave as if they’re on discrete physical servers. A containerised Umbraco 10 application running on Ubuntu 20 can sit on the same physical server as a containerised node.js application running on Ubuntu 18, and a containerised SQL Server. Through this process isolation, the service-oriented model of Umbraco outlined in Fig#2 can be achieved on a single server, rather than several discrete servers.
Deployments of containerised software entirely overwrite the existing application with the new version. The devops/CI/CD opportunities for containerised Umbraco were discussed in detail by Erik-Jan Westendorp & Corné Strijkert’s 2022 article on Kubernetes. The article is full of excellent information on setting up blue/green deployments for Umbraco.
What’s the business case for containerisation?
Containers reduce key person risk in an organisation by reducing the length of the developer onboarding process. Each time a new developer works on a project, there’s some (usually considerable) amount of installation & configuration before they can launch an application locally, never mind writing a line of code. When configured correctly, a containerised application can be run immediately by new developers, the first-launch being as simple as “install Docker Desktop, check out the project from git, and run the command `docker-compose up` to launch the app locally”.
Through containerised process isolation & strategically designed software architecture, your application can run anywhere you can find a server. This allows your organisation to become more cloud-agnostic, and enables it to choose between cloud-vendors based on price, rather than feature lockin.
This year the average cost of an Azure subscription in Europe increased by 9-15%, while Google Cloud’s price increased a year earlier. For firms already dealing with thin margins and high interest rates, these price rises can quickly spiral into existential issues. With many organisations relying on features unique to their cloud-vendor for their application architecture, few have the opportunity to shop around and mitigate this cost. This vendor lock-in reduces the ability of an organisation to negotiate in the face of the large cloud providers. Removing this critical dependency introduces negotiating leverage in the face of multi-hundred-billion dollar cloud providers.
What’s environmental case for Containerised Umbraco
A server’s manufacturing and disposal process creates carbon. These emissions are known as embodied carbon. A typical server begins its life with around 1,300kgCO2e of embodied carbon. This is slightly more than the carbon emitted if you flew from Paris to New York and back, and represents 15-25% of a server’s lifetime emissions.
It’s typical to amortise these emissions across a nominal 4 year lifespan, with 325kgCO2e assigned to each of the 4 years - similar to the amortisation of the financial cost of the server. These emissions exist irrespective of your server’s energy source, and must be accounted for even if your hosting partner advertises a 100% green energy mix. From a financial & carbon reduction point of view, it is therefore most efficient to run fewer servers closer to 100% utilisation, than running lots of servers at a low utilisation each.
As of version 12, Umbraco applications are often deployed to two or more physical servers, one for the backoffice and at least one for the front-end. As Umbraco applications move towards a separated-concerns model in versions 12, 13 & 14, we’re likely to see Umbraco sites with many underlying applications, each requiring different operating systems & dependencies, as illustrated in Figure#2.
A standard approach to hosting an application with version 14’s architecture would be three or four discrete servers, each running their unique operating system. The embodied carbon impact of this approach is significant, and steps should be taken to mitigate it before it happens.
Through containerisation’s process isolation, many applications can run securely & independently inside of their native operating system, on one single physical server. Load balancing with additional cloud servers per application can still be employed to alleviate temporary spikes in traffic when required.
It’s important to note that containerising will not automatically reduce the embodied emissions of your Umbaco application. It does however give you the ability to architect your software & hosting in a way that significantly reduces embodied carbon. It gives you the opportunity to host your dev, QA, and staging environments on a single server - confident that they aren’t polluting each other’s environments. This could save hundreds of kilograms of CO2e/year for each Umbraco website adopting this technique. Further, containerisation gives you the opportunity to measure the actual energy & CO2e consumption of your applications through Green Coding Berlin’s Green Metrics Tool, rather than estimating emissions.
Are there any downsides to Containerisation?
There is some downside risk to containerisation. It would be remiss of any article to ignore that fact. Many of the disadvantages come from the paradigm shift in containerised workflows, often experienced by organisations when adopting new technology stacks.
Although containerisation can help make life a breeze once you’ve got it up and running, it comes with a learning curve. Training is required for developers coming from a dotnet/microsoft world, as the majority of the ecosystem revolves around linux. Devops engineers in particular will require a lot of training to overcome challenges in data persistence, networking, and for sufficiently complex applications, orchestration.
Your organisation’s security posture may need to change. Out of date images, or misconfigured containers could cause enormous security issues. Your organisation is responsible for addressing CVEs in your images, which is a dislocation from the recent past, where server maintenance & security has been offloaded to the cloud provider. With the adoption of containers, your organisation is bringing this not-inconsiderable security role back in-house.
Your organisation’s approach to support - specifically hotfixing - may also need to change. Containers aren’t designed to be hotfixed. If a patch needs to go out, the entire application needs to be redeployed. Hotfixing a production site isn’t currently considered a best-practice approach, but being honest & pragmatic, speedy patches to broken production websites are still common at lots of organisations.
For Umbraco specifically, there are a couple of challenges that need to be considered before moving to containerised applications. When you deploy a containerised application, the entire environment is refreshed, and the old is deleted forever. This means that files on the system do not persist between releases. For Umbraco sites you must:
If your containerised application is deployed with multiple servers under load balancing, you need to implement all of the steps outlined in the Load Balancing documentation page.
Implementation
The content beyond this point is a hands-on practical exercise in implementation a containerised Umbraco application.
Quickstart
With all that said, practically how do you go about working with Docker or Umbraco?
Earlier in this article, I promised that the first launch of a properly configured project would amount to no more than “install Docker Desktop, check out the project from git, and run the command `docker-compose up` to launch the app locally”. For this site, there’s one extra step:
`docker volume create umbraco_docker_project_mssql_data` to create a volume for your SQL data
`docker compose --env-file ./.env.example up --build` to launch the application
Slow-and-methodical start
This section will run you through creating this repository from scratch.
Prepare your project for Docker & Linux
Set your git repository to use Linux end of line configuration for .sh and .cshtml files. This is important because some scripts written in Windows will not run correctly on your Linux containers later. It's a huge hassle to identify this issue when it comes up.
Create a file .gitignore in the root of the solution directory
Enter the following end or line instructions for Git
.sh text eol=lf
.cshtml text eol=lf
To verify and adjust this setting on individual files:
Open the file in VSCode
At the bottom right, check for either CRLF or LF, which indicates the file line endings mode
Download and install the application, you don't need to create a Docker account
Launch the application
You should now have Docker Desktop, along with all of its dependencies. Open VSCode's terminal and enter
docker -v
and
docker-compose -v
to check both are installed
An example of Docker Desktop
Create Docker and environment files
We need a few docker files to get the project up and running, and a .env file. With the exception of .dockerignore, these all go in the solution level folder, not inside of the Umbraco project.
.env Contains your environment variables. At runtime, these override any settings in your dotnet appsettings.json files
docker-compose.yml a configuration file for Docker's compose feature. This makes it easier to manage projects that contain multiple containers
docker-entrypoint.sh a shell script to execute when the docker container starts up. We'll use this to install our database
docker-setup.sql a sql script to be executed by docker-entrypoint.sh
dockerfile.mssql an instruction set for Docker to build the mssql server
dockerfile.umbracosite an instruction set for Docker to build the Umbraco applications
./UmbracoDockerProject/.dockerignore a list of files you'd like to exclude from docker's build processes. Note that this file goes into your Umbraco project, not at the solution level
.env File
This file contains environment variables & config settings for your containerised applications. Don't ever commit this file to your git repositories. In the repository, it's saved under .env.example, copy the contents into .env, then change the variables to match your project
These settings will be used by the rest of this guide. It's important to adjust them to your application's requirements.
UmbracoDockerProject/.dockerignore
Create a file .dockerignore in your Umbraco project directory (the directory with the .csproj file, as opposed to the one with the .sln file)
**/bin/
**/obj/
The .dockerignore file
What's the dockerignore file doing?
This tells Docker to ignore the bin and obj directories when building your images. This ensures you don't accidentally include locally built assemblies in your docker images.
dockerfile.umbracosite
For simple projects, a dockerfile will just be named dockerfile. In this project, as we have multiple different docker images, they've each got an identifier as a suffix.
# syntax=docker/dockerfile:1

FROM mcr.microsoft.com/dotnet/sdk:7.0 as build-env

# Build Stage
WORKDIR /src
COPY ["UmbracoDockerProject/UmbracoDockerProject.csproj", "."]
RUN dotnet restore
COPY . .
RUN dotnet publish UmbracoDocker.sln --configuration Release --output /publish

# Runtime stage
FROM mcr.microsoft.com/dotnet/sdk:7.0 as runtime-env
WORKDIR /publish
COPY --from=build-env /publish .
ENV ASPNETCORE_URLS "http://+:80"
EXPOSE 80
ENTRYPOINT [ "dotnet", "UmbracoDockerProject.dll"]
the dockerfile.umbracosite
What's the dockerfile.umbracosite file doing?
Build stage:
Pulls down the base image of dotnet 7.0
Copies the UmbracoDocker/UmbracoDockerProject.csproj csproj into the image
Installs all of its dependencies
Builds the site in Release configuration
Publishes the built application to /publish
Runtime stage:
Pulls down the base image of dotnet 7.0
Sets the working directory to /publish
Copies the content from the build stage into the runtime working directory
Exposes port 80 to allow internet access
Sets the entrypoint for the application to the Umbraco site's DLL
Once you've created this script, you should be able to run docker build ./ -t umbraco-in-docker -f dockerfile.umbracosite to build the image. The first time you run this script, it'll take a long time, as it needs to pull down a lot of dependencies.
Once it's complete, you should be able to open Docker Desktop, click on Images, and see an image named umbraco-in-docker:
Our Umbraco application's image in docker desktop
docker-compose.yml
Now that we've got an image, we can create and launch a container using Docker Compose. Create the following docker-compose.yml file in the soltion directory.
sets the context (location) of the service to the current directory .
sets the dockerfile for the service to dockerfile.umbracosite
ensures the service restarts any time is stops or encounters an error
sets the ports for the application to be exposed on. Note that if the port is in use by another application on the host computer, you'll receive an error like Bind for 0.0.0.0:5011 failed: port is already allocated
Configures the directory /publish/wwwroot/media inside of the container to use a docker volume named umbraco_media
Sets up a volume for umbraco_media
Running docker-compose commands
Run the command docker-compose up. This will successfully launch an Umbraco site with the message Boot Failed... But at least we know the code runs.
A broken umbraco website
Docker Desktop should now have an entry in its Containers section named time-in-umbraco-docker, with a website umbraco_website-1 beneath it.
A running docker container
You'll also have a volume named time-in-umbraco-docker_umbraco-media.
A docker volume for your media
Undoing docker-compose commands
Note that you can reverse the docker-compose up command at any time by running:
docker-compose down --rmi local --volumes to remove all docker artifacts, and data volumes
docker-compose down --rmi local to remove all docker artifacts, but leave data
This will remove any docker-compose generated components (including your media and data). It's a good idea to clear down the data & volumes while debugging your Docker setup.
Why isn't the site running?
We can inspect the log files to find out why the site isn't running. In docker desktop, select Containers, then select Umbraco_Website-1, click Files, then scroll down the list to the application directory ./publish/umbraco/Logs/UmbracoTraceLog.[datetime].json. Right click the file and select Edit to quickly inspect the file.
Reading through the logs, there's no database configured for the site!
How to quickly browse a running container's Umbraco log files
Containerise your MSSQL database
Containerisng the MSSQL server is a bit more involved than the Umbraco applicaiton was, and will require a few files.
dockerfile.mssql
Similar to the dockerfile.umbracosite file, we need to tell Docker how to create the MSSQL server image.
FROM mcr.microsoft.com/mssql/server:2022-latest

USER root

RUN mkdir -p /var/opt/sqlserver

RUN chown mssql /var/opt/sqlserver

EXPOSE 1433/tcp

COPY docker-setup.sql /
COPY docker-entrypoint.sh /

RUN chmod +x /docker-entrypoint.sh

# entrypoint & cmd are set by the docker compose file
ENTRYPOINT [ ]
CMD [ ]
dockerfile.mssql
What's the dokerfile.mssql file doing?
Specify the base image to use. Currently configured to use 2022-latest, but you may have different requirements or licenses with Micrsoft. Adjust this setting appropriately.
Temporarily switch the user to root so that we can create the required SQL Server directories
Creates the /var/opt/sqlserver directory and sets mssql as an owner of the directory
Exposes the server over port 1433
Copies two files to the image docker-setup.sql and docker-entrypoint.sh (these are created in the next steps)
makes docker-entrypoint.sh an executable file
configures empty entrypoints & command instructions. We'll configure these in docker-compose.yml soon
Create empty files named docker-entrypoint.sh and docker-setup.sql. You should then be able to run docker build ./ -t umbraco-in-docker-mssql-server -f dockerfile.mssql, after which, your Docker Desktop's list of images will include umbraco-in-docker-mssql-server.
docker-entrypoint.sh
This shell script is executed by Docker whenever the mssql server starts up. It's configured in the docker-compose.yml file. It's modified from Carl Sargunar's Umbraco Docker Workshop scripts
Make sure the file docker-entrypoint.sh is set to LF line endings
#!/bin/bash
set -e

if [ "$1" = '/opt/mssql/bin/sqlservr' ]; then
  # If this is the container's first run, initialize the application database
  if [ ! -f /tmp/app-initialized ]; then
    # Initialize the application database asynchronously in a background process. This allows a) the SQL Server process to be the main process in the container, which allows graceful shutdown and other goodies, and b) us to only start the SQL Server process once, as opposed to starting, stopping, then starting it again.
    function initialize_app_database() {
      # Wait a bit for SQL Server to start. SQL Server's process doesn't provide a clever way to check if it's up or not, and it needs to be up before we can import the application database
      sleep 15s

      #run the setup script to create the DB and the schema in the DB
      # These variables are passed in from docker-compose.yml, via dockerfile.mssql
      /opt/mssql-tools/bin/sqlcmd -S $2 -U $3 -P $4 -d master -i docker-setup.sql -v UMBRACO_DB_NAME="$5" UMBRACO_DB_USER_LOGIN="$6" UMBRACO_DB_USER_PASSWORD="$7" UMBRACO_DB_USER_NAME="$6_USER"
      # /opt/mssql-tools/bin/sqlcmd -S $2 -U $3 -P $4 -d master -i docker-setup.sql

      # Note that the container has been initialized so future starts won't wipe changes to the data
      touch /tmp/app-initialized
    }
    initialize_app_database $1 $2 $3 $4 $5 $6 $7 &
  fi
fi

exec "$@"
docker-entrypoint.sh
What's the docker-entrypoint.sh file doing?
Declares itself as a shell script
Sets the script to exit if there are any errors
Checks the first argument passed to it is '/opt/mssql/bin/sqlservr' to verify we're running the correct shell script
Inspects the /tmp/app-initialized file to see if this is the container's first run. If so, runs through the setup script
runs the script docker-setup.sql with the arguments passed into the script
marks the container as initialised, by touching /tmp/app-initialized
docker-setup.sql
The docker-entrypoint.sh file executes this file the first time a container is run. It accepts some arguments, creates a database, and assigns a SQL user to it. It's modified from Carl Sargunar's Umbraco Docker Workshop scripts
IF NOT EXISTS(SELECT * FROM sys.databases WHERE name = '$(UMBRACO_DB_NAME)')
    BEGIN
        CREATE DATABASE [$(UMBRACO_DB_NAME)]
    END

CREATE LOGIN $(UMBRACO_DB_USER_LOGIN)
    WITH PASSWORD = '$(UMBRACO_DB_USER_PASSWORD)';
GO

-- Creates a database user for the login created above.
USE [$(UMBRACO_DB_NAME)]
    CREATE USER $(UMBRACO_DB_USER_NAME) FOR LOGIN $(UMBRACO_DB_USER_LOGIN);
GO

USE [$(UMBRACO_DB_NAME)]
    ALTER ROLE db_datareader ADD MEMBER $(UMBRACO_DB_USER_NAME)
GO

USE [$(UMBRACO_DB_NAME)]
    ALTER ROLE db_datawriter ADD MEMBER $(UMBRACO_DB_USER_NAME)
GO

USE [$(UMBRACO_DB_NAME)]
    ALTER ROLE db_ddladmin ADD MEMBER $(UMBRACO_DB_USER_NAME)
GO
docker-setup.sql
What's the docker-setup.sql file doing?
Accepts the following arguments from the docker-compose.yml file:
UMBRACO_DB_NAME - the name of the Umbraco database
UMBRACO_DB_USER_LOGIN - the DB User's login
UMBRACO_DB_USER_PASSWORD - the DB User's password
UMBRACO_DB_USER_NAME - the DB User's username
Check if the database $UMBRACO_DB_NAME exists, and creates a new one if not
Creates a login for $UMBRACO_DB_USER_LOGIN with the password $UMBRACO_DB_USER_PASSWORD
Creates a database user $(UMBRACO_DB_USER_NAME)
Switches into the Umbraco database, and sets the following user roles to $(UMBRACO_DB_USER_NAME)
db_datareader
db_datawriter
db_ddladmin
These account roles match the current Database Account Roles documentation, but may need adjusting in the future.
Create a Volume for your SQL data
All data in a Docker container is destroyed between releases. That's not great for SQL servers, so next we need to create some persistent storage on the machine for our SQL data. This will survive server restarts & docker teardowns.
Run the command docker volume create umbraco_docker_project_mssql_data to create the volume.
Warning
Mac Users: Docker MSSQL Server on Apple Silicon
If you're using a first generation Apple Silicon Mac (likely the case if your Apple computer was manufactured in late 2020 or 2021), you will need to configure Rosetta Emulation to get MSSQL server running:
Open docker desktop
Click the Settings cog in the top right
In the General tab, make sure Use virtualization framework is set to true
Click Features in Development
Set Use Rosetta for x86/amd64 emulation on Apple Silicon to true
Adjust the docker-compose.yml file
Now that we've got a SQL server image, and all of its startup scripts, we'll need to include it in the docker-compose.yml file.
We've included the new MSSQL server DB, added a new network, and connected the Umbraco site to some configuration files.
A new volume is referenced for the MSSQL data
A new network is added to allow the applications to communicate
A new sql_derver_db node
Sets the context & builds the image according to dockerfile.mssql
Tells docker that the bash script docker-entrypoint.sh script should run when this container starts
Passes a set of arguments to docker-entrypoint.sh through the command node
Sets a friendly name for the container image
Specifies the mssql image from Microsoft's container registry
Exposes the port 1433, allowing external connections to the server
Attaches the SQL server to the new network so that other containerised apps can communicate with it
Sets a series of environment variables, mostly from the .env file
ACCEPT_EULA instructs the SQL server to auto-accept the license agreement
MSSQL_PID instructs the SQL server to start in Express mode. Other options include Developer or Enterprise, note that Microsoft requires licenses for some of these options
Sets the backup, data, and log directories at /var/opt/mssql
Associates the volume we created earlier, configuring it to host /var/opt/mssql
Creates a healthcheck, which attempts to query the database with the Umbraco SQL user
On the umbraco_website node
Added a new depends_on node, this checks if the SQL Server is successfully running before we launch the Umbraco site
Two new environment variables have been added to specify the UmbracoDbDSN and UmbracoDbDSN_ProviderName
A new network component has been added to connect the Umbraco application to the MSSQL server, without this node, the two isolated processes won't be able to talk to each other
The full list of environment variables you can pass to MSSQL Server in the environment node can be found in MSDN's documentation.
Run docker-compose down --rmi local --volumes to remove the broken Umbraco site, then run docker-compose up. After a minute or so, your Docker Desktop will include two services, an Umbraco Website, and a SQL database:
Containers for MSSQL Server and Umbraco running in Docker
Visiting the port, we can see the Umbraco Installation page:
The Umbraco install page running in a containerised website
After filling out the form, we can see the Clean Starter Kit:
Clean starter kit running on our containerised Umbraco application
Umbraco's now running in Docker containers! But we can do better. The following optional sections will configure automated installations, use usync to automatically copy data into the website, and connect an extra front-end server.
Connecting to your Docker MSSQL databases
You can connect to your Docker hosted SQL with MSSQL Server Studio from your desktop. To connect as the Umbraco Application user, enter the following properties (values are set in the .env file, the port is set in docker-compose.yml):
Server Type: Database Engine
Server name: localhost,1433
Authentication: SQL Server Authentication
Login: EXAMPLE_DATABASE_LOGIN_NAME
Password: EXAMPLE_DATABASE_LOGIN_P@ssword
In the options tab >>
Connect to database: EXAMPLE_UMBRACO_DATABASE_NAME
To connect as Admin, enter the following properties:
Server Type: Database Engine
Server name: localhost,1433
Authentication: SQL Server Authentication
Login: sa
Password: YOUR_PASS_goes_HERE@
In the options tab >>
Connect to database: EXAMPLE_UMBRACO_DATABASE_NAME
Connect to a containerised MSSQL instance with MSSQL Server Management Studio
Configure unattended installs
By adding a new node into docker-compose.yml, we can quickly add multi-instance support.
The file changes
In the docker-compose.yml file, update umbraco_website's environment node to include the following properties
The Username, email, and password for your unattended install user
Run the following commands to drop your old application, and restart with unattended installs:
(this step deletes all your data) Run docker-compose down --rmi local --volumes to remove your application from Docker
Run docker-compose up to relaunch the app
When your app relaunches, it should automatically install Umbraco, and instead of being presented with the Install screen, you'll be presented with the Clean Starter Kit.
Add healthchecks to your site startup
We've configured a healthcheck for the SQL server already, we can add one for our web applications too. In the docker-compose.yml file, on the umbraco_website node, add the following node:
adds a test definition, a simple curl to the front-end just checks there's no 500 error
Sets the interval to 30 seconds, and waits 180 seconds before launching
After implementing this change, your Docker Desktop will wait until the test has passed before highlighting the application in green as "running"
Split the Umbraco application into two, a frontend and backoffice
Now that our Umbraco application has a healthcheck, we can add new applications which depend on it - for example, a front-end. In the docker-compose.yml, make the following changes
The file changes
In the umbraco_website node
Update the node's name from umbraco_website to umbraco_website_backoffice
Add a new node container_name: '${PROJECT_FRIENDLY_NAME}_umbraco_backoffice'
Add a new volume property umbraco_logs:/publish/umbraco/Logs
In the volume node
Add a new property:
umbraco_logs:
external: false
Create a new node umbraco_website_frontend
website_frontend_1:
container_name: '${PROJECT_FRIENDLY_NAME}_umbraco_frontend_1'
build:
context: .
dockerfile: dockerfile.umbracosite
restart: always
ports:
- 5012:80
volumes:
- umbraco_media:/publish/wwwroot/media
- umbraco_logs:/publish/umbraco/Logs
depends_on:
sql_server_db:
# this condition forces the website to wait for the database to report "healthy" status
condition: service_healthy
# this condition forces the front-end to wait for the backoffice to be "healthy" before starting
umbraco_website_backoffice:
condition: service_healthy
environment:
ConnectionStrings__umbracoDbDSN: "Server=${UMBRACO_DATABASE_SERVER_AND_CONTAINER_NAME},1433;Database=${UMBRACO_DATABASE_NAME};User Id=${UMBRACO_DATABASE_USERNAME_STRING};Password=${UMBRACO_DATABASE_PASSWORD_STRING};TrustServerCertificate=true;"
ConnectionStrings__umbracoDbDSN_ProviderName: 'System.Data.SqlClient'
Umbraco__CMS__Unattended__InstallUnattended: 'false'
networks:
- umbraco_application_mssql_network
    healthcheck:
      test: curl --fail http://localhost:80 || exit 1
      interval: 30s
      timeout: 30s
      retries: 100
      start_period: 180s
What's the change to docker-compose.yml doing?
We're replicating our backoffice instance into a new frontend instance. The key differences between the two configurations are:
The container names are updated so we can see the difference between the two
A shared logs volume has been created to track both front and backend logs in one location
The front-end:
Attached to the mssql network
Has a different port 5012 to the backoffice, 5012 instead of 5011
Umbraco__CMS__Unattended__InstallUnattended is set to false, so that the backoffice doesn't attempt to auto-install Umbraco
Once you've launched the site using docker-compose up, you should be able to sign into the backoffice on localhost:5011/umbraco, make a change to the site, and then see that change in the front-end at localhost:5012
So far, the app is launching with Paul Seal's Clean Starterkit's content. What if we want to launch the site with some different default content? We can make use of Kevin Jump & Jumoo's uSync, and its auto-import features to launch a site full of test content. Install uSync, then update docker-compose with the following changes.
In the website_frontend_1's environment node, add the following configurations to disable uSync there. We don't want to run any of these features on the front-ends.
Umbraco in Kubernetes by Erik-Jan Westendorp & Corné Strijkert is full of excellent information on setting up complex deployment processes for containerised Umbraco. https://24days.in/umbraco-cms/2022/umbraco-kubernetes/